音频是内核的一个驱动框架,个人有过音频相关的工作经验,阅读过内核alsa框架代码并具有一些调试技巧,本着分享知识,提高团队技术能力的目的,在此进行音频alsa框架的整体解析,希望阅读此文章的同事后续均能从事音频相关内核开发。当然,于己也是一种回顾和复习,
前言
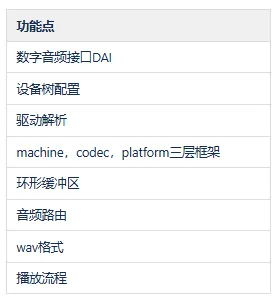
本文计划将alsa整体全貌介绍一遍,不清楚音频内核的可以走马观花一次,后面接触了可以继续深入,了解音频内核的可以一起精进。本文仅个人经验总结,非权威知识体系,不可全信,如有错误请指出。alsa大概涉及解析点如下:
数字音频
设备树解析
设备驱动解析
内核alsa框架解析
音频路由解析
wav格式解析
播放流程解析
通常错误分享
本文不会涉及pulseaudio及上层中间件和配置文件等系统相关技巧,仅从底层查看和分析问题。
本文面向研发技术人员,需要具备设备树理解能力,C语言阅读能力,内核子系统了解能力,内核调试基本技巧,音频基础知识,操作系统基本概念。文章提到相关基本知识不会详细解释,建议通过网络搜索的方式了解。
一、数字音频
数字音频接口简称DAI(Digital Audio Interfaces),它主要在DSP处理模数和数模转换中和主机进行数据传输,通常DAI指的是I2S、PCM、PDM、DCODEC、VAD、SPDIF等。本文主要讲I2S。
1.1 DAI的音频方案
基于DAI的音频方案如下:

这里红框内的称之为DAI,而红框外的是模拟电路喇叭和麦克风。我简单解释喇叭和麦克风一下,注意:模拟电路涉及知识深奥,这里只做了解。
1.1.1 喇叭原理
喇叭通常称之为功放,是利用小的电压输出从而激励出大的声压,从而产生人耳能听到的声音。最简单的功放电路如下。
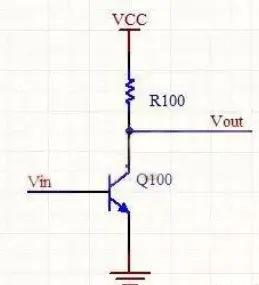
注意,这里的VCC是PA的Power,通过控制这个电,能够有效的控制PA的控制和扩大功放大小和降低PA的功耗。通常的,代码是作为kcontrol的一个控件设置。
1.1.2 麦克风原理
麦克风通常是电容感应的方式,空气的声压能够影响电容的容值,从而产生电荷的变化,从而转换成数字电压信号。最简单的电容感应电路如下。
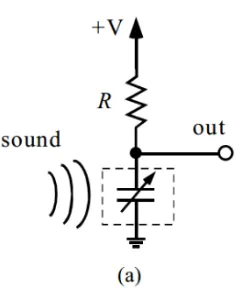
注意,这里的+V是麦克的偏置电压,通常是mic bias,通过控制这个电,能够有效控制mic的噪声和降低麦克风的功耗。通常的,代码是set_bias_level回调设置。
1.1.3 整体框图
综上可知,对于集成ADC+DSP+DAC + .... 组件的设备,通常作为音频codec芯片。芯片和主控直接连接如下:
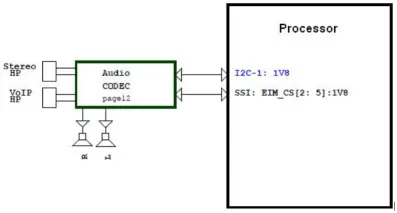
这里CLK可以多个,CS是片选,DATA是I2S的数据传输。通过CLK+CS+DATA三类信号连接,通常是I2S总线
1.2 I2S总线
I2S信号有多种变体(PHILIPS模式/左对齐模式/右对齐模式),需要根据芯片手册选择,这里以ES8388举例(PHILIPS模式),其I2S默认如下。

如上可以知道:LRCK作为声道的片选,LRCK为低为左声道,LRCK为高为右声道,左声道从LRCK下降沿后的第二个时钟上升沿有效,右声道从LRCK上升沿的第二个时钟上升沿有效。
1.3 时钟
值得注意的是,这里通常多个CLK有要求,这里SCLK通常是为BCLK,音频还有一个MCLK。我将三种CLK列表如下

这里MCLK是输入给CODEC内,通常需要是计算的BCLK的256/128倍,内部通告PLL计算得出。
这里SCLK是I2S信号的位时钟,真正传输I2S信号数据位,故其计算方式为: 音频位时钟 = 采样频率 * 采样位数 * 通道
这里LRCK是作为左右通道选择时钟,也叫采样频率。
1.4 I2C
这里知道,针对数据是通过I2S通信,针对命令大部分可以通过I2C,SPI等常用通信方式,这里只介绍I2C。
这里以ES8388为例,I2C时序如下:
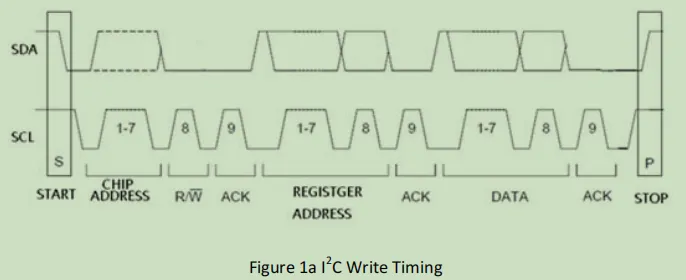
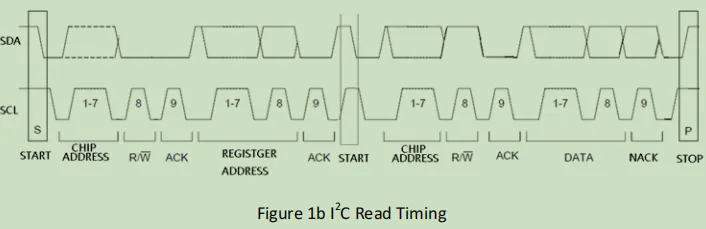
可以知道,I2C以起始位,芯片地址,读写标志,应答,寄存器地址,应答,结束位。七个部分组成。
对于声卡,我们知道I2C的芯片地址和寄存器地址即可进行通信。
1.5 设计举例
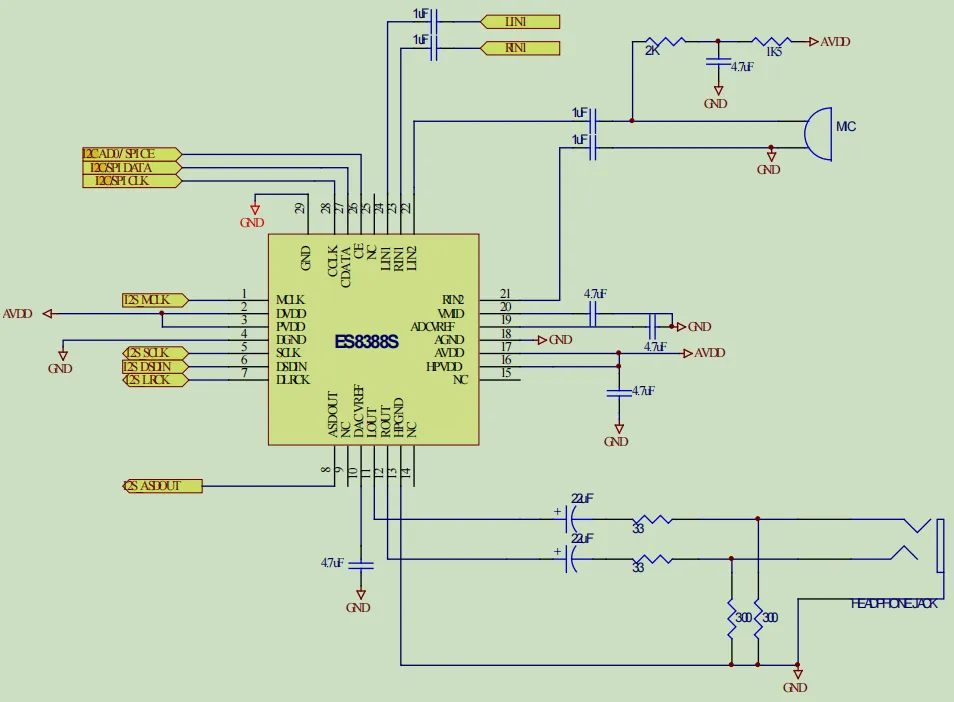
综上可知,对于CODEC的电路设计,可以如下:
1.6 其他
其他通用的PCM和PDM这里不做详谈。
至此,可以清楚知道,声卡CODEC和主控的连接关系。
二、设备树解析
2.1 设备树举例
这里具体设备树如下:
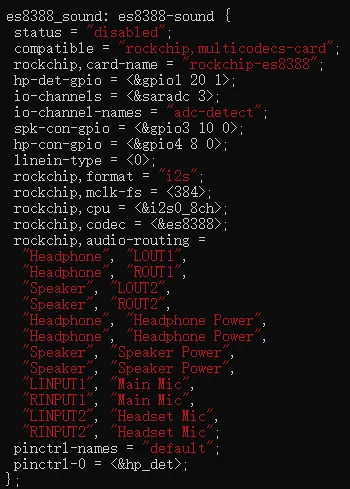
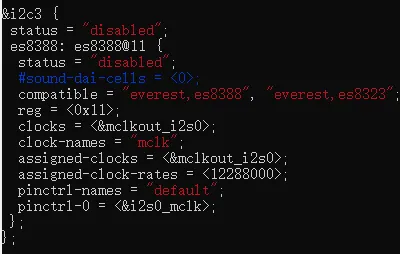
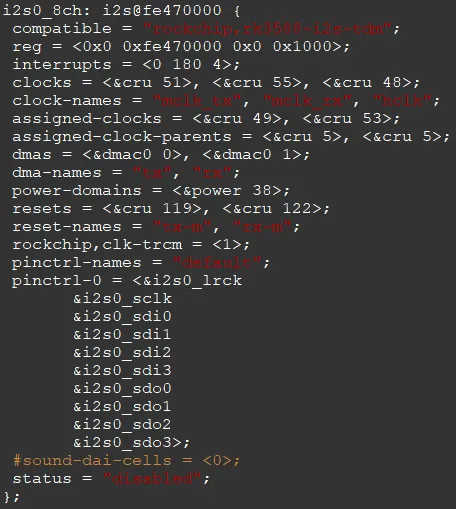
可以看到,这里分为三个设备,一个是I2C的控制设备,名字为"everest,es8388",一个为声卡设备,名字为"rockchip,multicodecs-card",一个为I2S控制器,名字为“rockchip,rk3588-i2s-tdm”。我把功能列表如下。

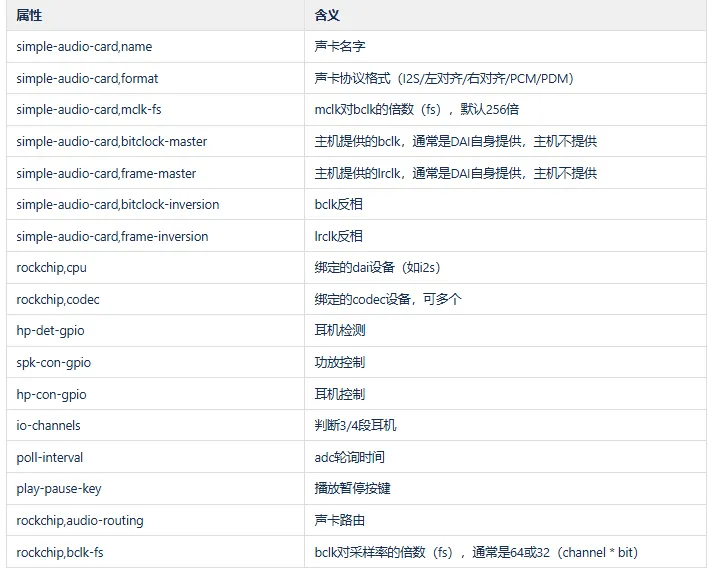
2.2 设备树节点 这里我列表解释驱动内置的设备树熟悉和其含义
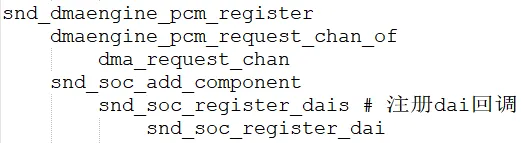
三、驱动解析 3.1 I2C设备驱动 从设备树可以了解,驱动这边作为component注册到音频,并且分配了mclk时钟。主要流程如下。

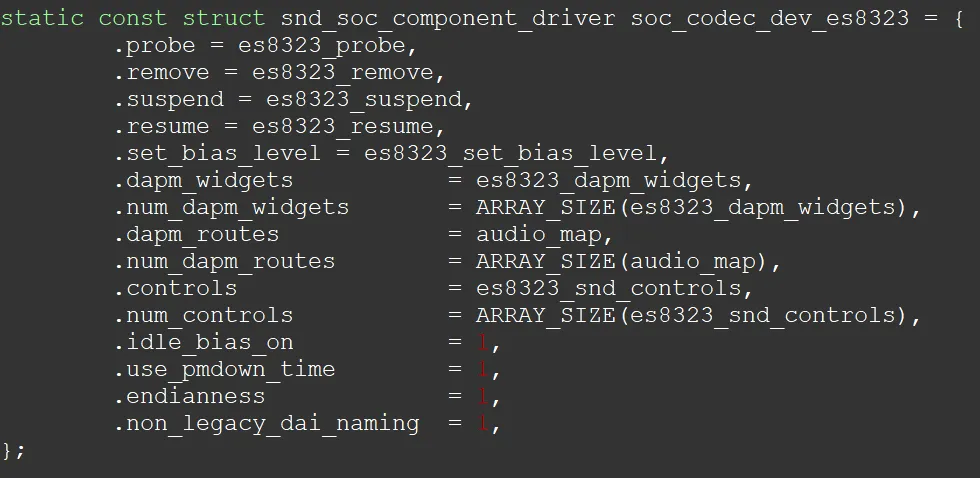
值得注意的两个结构体:
component结构体,实现电源控制和声卡路由控制组件
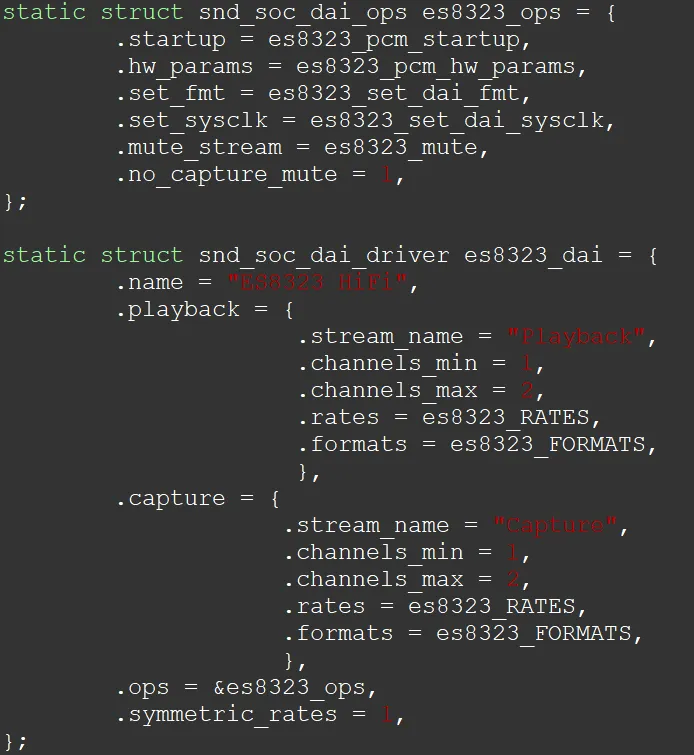
dai driver结构体
3.2 声卡设备驱动
从设备树可以了解,声卡驱动主要注册声卡设备。但还做了其他的事情,如耳机检测,声卡控制等等。具体代码流程如下。

这里其实需要注意声卡的几个属性的填充,例如snd_soc_dai_link(声卡侧的dai),dapm_widget(电源管理组件),kcontrol(路由控制的回调),jack_report(耳机上报),后面会提到。
3.3 I2S控制器驱动
从设备树可以了解,主要是I2S总线控制器的驱动,其中启用了dma0的0通道和1通道。具体代码流程如下。

I2S总线控制器也是作为component注册到音频,同时通过pcm dma申请了dma通道。
四、内核ALSA框架解析
4.1 ASoC介绍
内核ALSA实际上也叫ASoC(ALSA System on Chip),早期和普通驱动一样,放在内核driver目录下,后面为了改善如下问题,单独将sound子系统放在kernel根目录
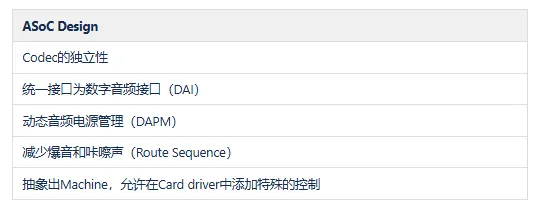
上述是官方说明,个人可能理解有原因如下:
早期Linux Kernel没有对声卡有过较多和较深入的发展,但是Linux Kernel因为开源的关系广泛用于各个设备,针对每个设备复杂的显示和声音设备,内核不能一一兼容,开源社区旨在将显示和声音剥离成应用层(微内核和模块化的思想),从而诞生X11(显示服务器),但是声卡却迟迟没有一个系统的框架,故Linux Kernel团队主动将ALSA框架从driver目录剥离出来为sound目录,所以我们可以看到,ALSA框架早期是完全由Linux Kernel团队开发的框架,包括了上层的alsa仓库(可以从内核文档找到libalsa和libpcm的编写规范)。
个人观点可能是声卡实在是既算不上很大的框架,又算不上很小的框架,社区没大佬愿意接盘做。所以一直处于这个临界态:明明只是驱动,但是却和arch,fs,kernel,init,virt,net这类大的功能放在一起了。
4.2 ASoC框架
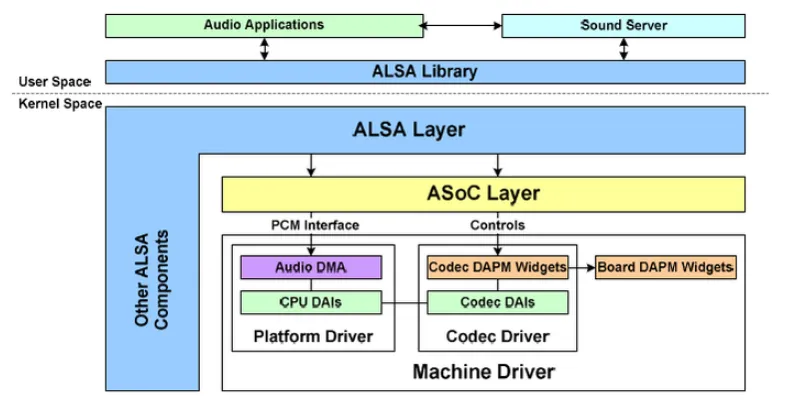
如上是整个alsa框架示意图。
这里内核ALSA设计理念主要在于抽象,抽象了platform,codec,machine三层关系,platform实际是dma搬运驱动,codec是声卡芯片,而machine完全抽象用作声卡
而三层直接的两个实际层codec和platform通过dai link。当然dai也是抽象,主要抽象了所有的接口设备例如i2s,pcm,pdm等等。其框架图如下:
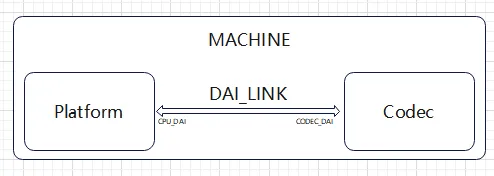
对于新的驱动设计,我们主要需要设计machine驱动,修改codec驱动,调试platform驱动。主要原因是
对于machine驱动,每个机器组合不一样,此驱动需要根据实际硬件设计来调整和修改驱动,linux主线提供了sound/soc/generic/simple-card.c样例,瑞芯微提供了sound/soc/rockchip/rockchip_multicodecs.c的驱动样例。
对于codec驱动,每个机器硬件codec可能不一样,但是对于machine是<rockchip,codec>绑定上去的。此驱动只需要根据硬件原理图变更进行修改。如果新的codec驱动,codec芯片厂商能够提供,集成即可。
对于platform驱动,实际上是soc的i2s总线控制器和dma数据搬运,平台默认是良好的,无需修改任何代码,只需要在音频数据出现问题时进行有效调试,例如XRUN问题。
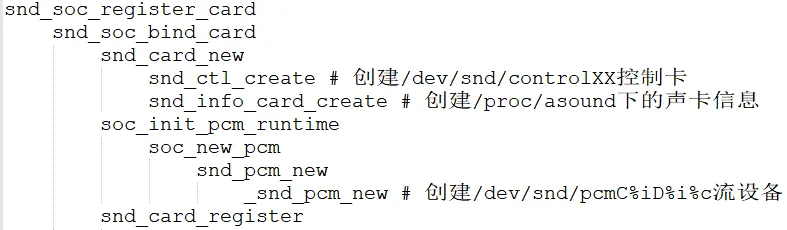
驱动注册api调用流程如下:
对于machine:
对于codec

对于platform
对于上述框架总体,我们可以注册声卡来提供流设备/dev/snd/pcmC%iD%i%c,提供控制设备/dev/snd/controlXX。
这样对于上层使用音频,只需要用/dev/snd/controlXX控制声卡和用/dev/snd/pcmC%iD%i%c来传输音频。
五、音频传输分析
5.1 音频传输流程
对于音频的传输,大致流程如下:
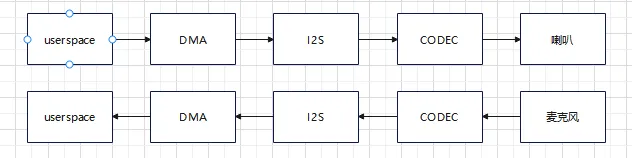
从userspace到dma和dma到I2S上两条路径,dma都在参与,这里就会涉及到如下两个问题
userspace到DMA的数据量
DMA搬运到i2s的数据量
5.2 环形缓冲区
为了解决两个数据量快慢的方式,通常是用的生产消费者模型来设计缓冲区,内核将其设计成了环形缓冲区,如下所示
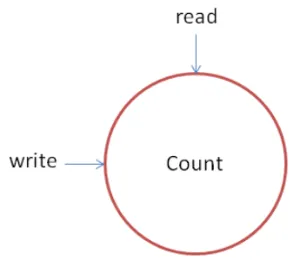
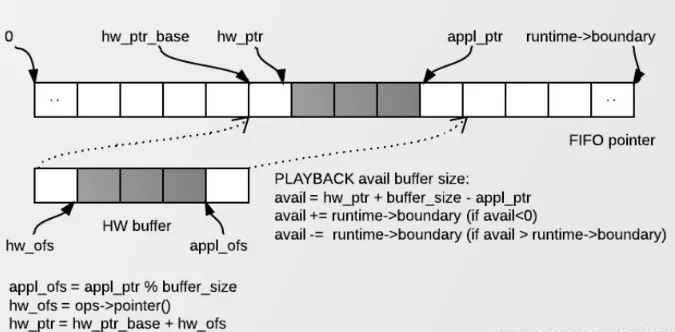
也就是一边读,一边写,只要两边不冲突,这个缓冲区可以永远运行下去。如下是实际的缓冲区设计。
 这里解释如下:
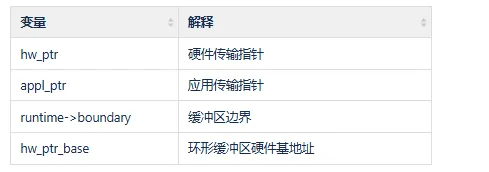
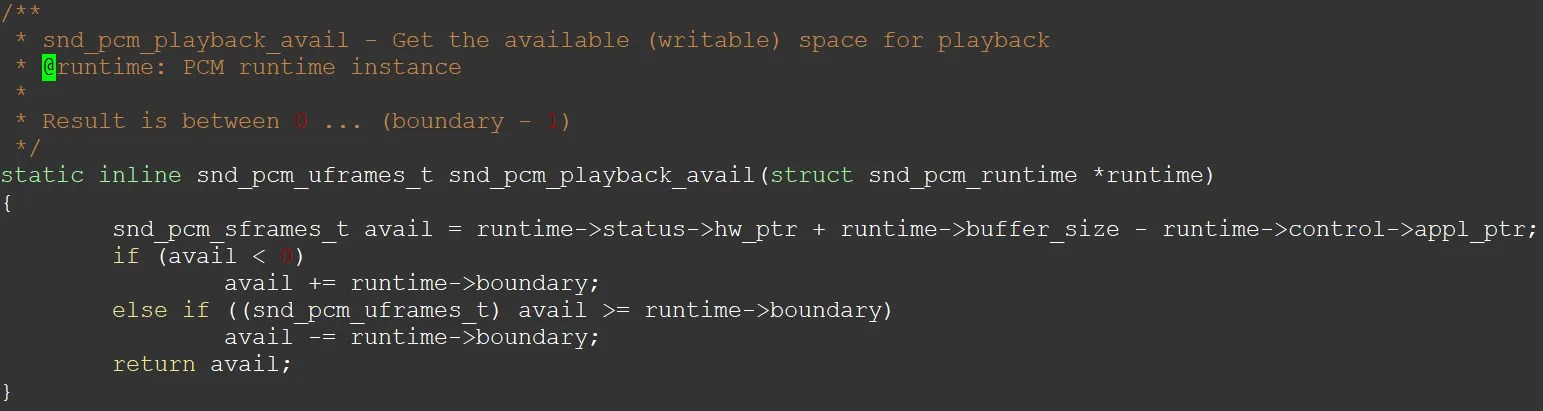
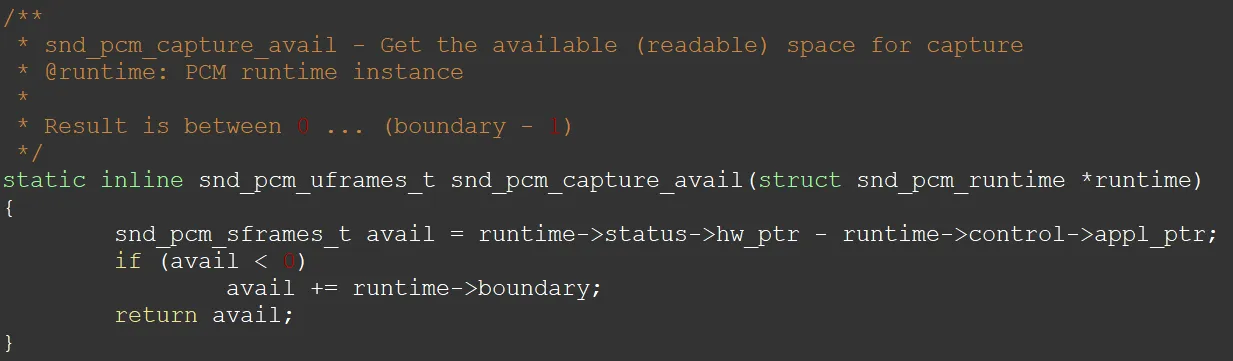
也就是说,当应用下发一次音频数据,会触发dma开始搬运,这时候先会出现hw_ptr_base和第一个buffer size,应用会主动填充appl_ptr,hw_ptr是实际内核搬运指针。播放的时候,appl_ptr一直在前面,并且超过第一个buffer size时,再新增一个buffer size,而hw_ptr永远在appl_ptr后面追赶。boundary是当前缓冲区的边界,这里代码如下:
 注意boundary大小一直是buffer_size的倍数如下

对于上述,我们可以清楚的知道,声卡在数据传输过程中,需要良好的处理好生产者和消费者的冲突。如果生产者和消费者一直没问题,则声卡播放和录音就没问题。
当然通常也不会出问题,除非设置失误(其实也不会设置失误,因为hw_param会refine),也就是说,通常是声卡不支持导致,更多问题还是在codec和硬件。所以如果遇到环形缓冲区的问题,先查codec和硬件本身问题通常不会错,最后再查platform层I2S总线和DMA搬运的问题。
六、音频路由分析
6.1 DAPM概念
上面说了pcm stream 设备/dev/snd/pcmC%iD%i%c的环形缓冲区处理的原理,通过pcm stream设备可以进行音频的播放和录制,但是音频在播放和录制之前,需要设置音频通路,否则codec未设置在一个正常状态下不会正常工作。所以这才有了音频路由的诞生。对于内核,将其封装为DAPM(Dynamic Audio Power Management)。DAPM设计了如下概念:


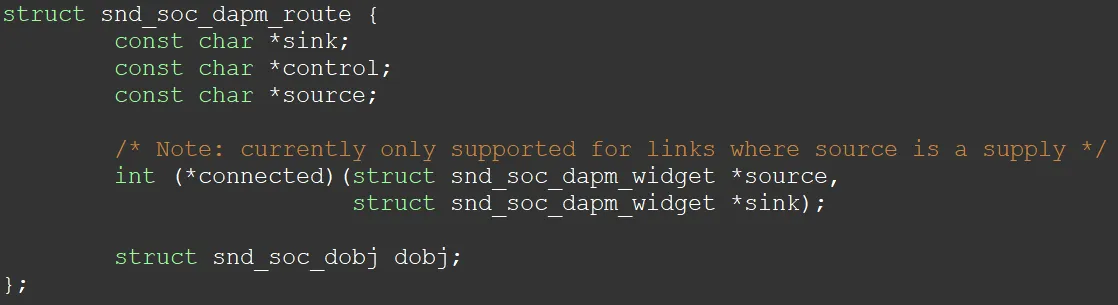
这里需要注意的是,route结构体先是sink,再是source。这里会影响大家查看代码理顺音频通路。connected是控件的回调,用于真正的控制Codec寄存器。
6.2 声卡控件
上面可以知道,内核DAPM会设置Codec控件,那么这个控件实际上是对应的声卡内部的基本数字电路单元,主要有Mux和Mixer,PGA,ADC,DAC等等
通常,这些控件会在Codec的datasheet中找到。这里举例如下:
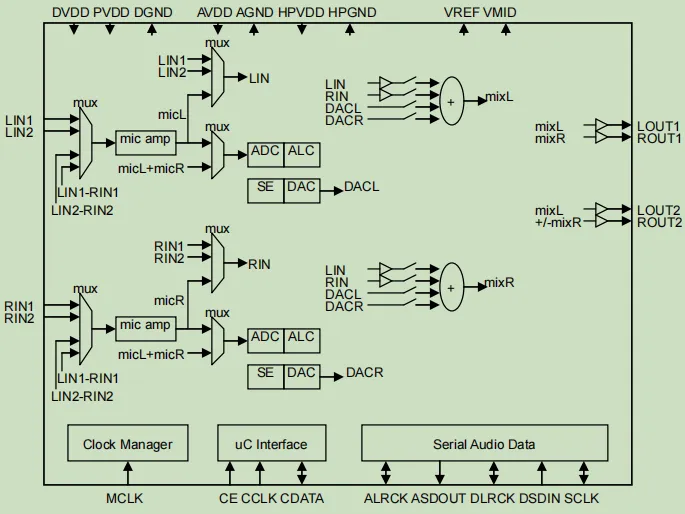
上图可以看到基本电子电路元器件,我们需要控制的则是这个Codec芯片内部这些电子元器件,使得其内部接通,从而Codec才能正常工作
6.3 播放路由
根据上面可以知道,对于Codec芯片,在播放和录制之前,需要对Codec内部进行控件设置,只有设置对了,声卡才会正常工作。下面举例播放和录制的音频通路需要设置情况
播放情况的控件设置如下
这边可以发现如果需要其正常工作,通路应该如下,我列表出来,这里只是接出来LOUT接喇叭和INPUT接麦克风,bypass和其他场景不阐述。

对于代码路由举例,这里只举例一个播放和录音的通路(仅Codec侧)例子。如下:
播放通路
SND_SOC_DAPM_AIF_IN("I2S IN", "Playback", 0, SND_SOC_NOPM, 0, 0),

{"Left DAC", NULL, "I2S IN"},

{"Left Mixer", "Left Playback Switch", "Left DAC"},

{"Left Out 1", NULL, "Left Mixer"}

{"LOUT1", NULL, "Left Out 1"},

SND_SOC_DAPM_OUTPUT("LOUT1"),
到这里LOUT1已经是SND_SOC_DAPM_OUTPUT类型的widget了
录制通路
SND_SOC_DAPM_INPUT("LINPUT1"),

{"Differential Mux", "Line 1", "LINPUT1"},

{"Left PGA Mux", "DifferentialR", "Differential Mux"},

{"Left ADC Mux", "Stereo", "Left PGA Mux"},

{"Left ADC Power", NULL, "Left ADC Mux"},

{"Left ADC", NULL, "Left ADC Power"},

{"I2S OUT", NULL, "Left ADC"},

SND_SOC_DAPM_AIF_OUT("I2S OUT", "Capture",  0, SND_SOC_NOPM, 0, 0),
通路还不止这些,虽然主要是Codec侧的设置,但是Card侧也需要配置DAPM的route。主要如下
声卡侧
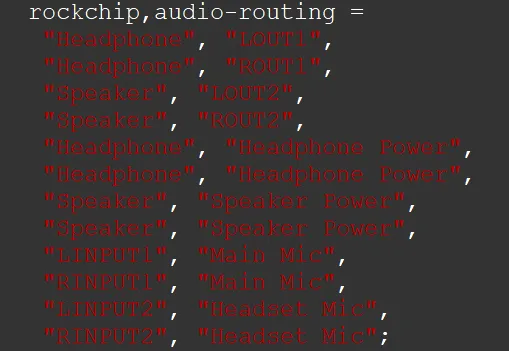
这里可以知道LOUT1的输出是Headphone
也可以知道LINPUT1 的输入是 Main Mic
这样整个链路就直接通了,如下:
播放:Playback---> I2S IN ---> Left DAC ---> Left Mixer ---> Left Out 1 ---> LOUT1 --→ Speaker -→Headphone

录制:Main Mic ---> LINPUT2 ---> Differential Mux ---> Left PGA Mux ---> Left ADC Mux ---> Left ADC Power ---> Left ADC ---> I2S OUT ---> Capture
这里可能有疑问了,原理图上的通路怎么和代码实际有点出入,这里主要原因还是和芯片寄存器设置有关系,有些寄存器Codec芯片并不强制要求你设置,有些寄存器Codec的框图并没有明确写出来,这时候需要具体情况具体分析。
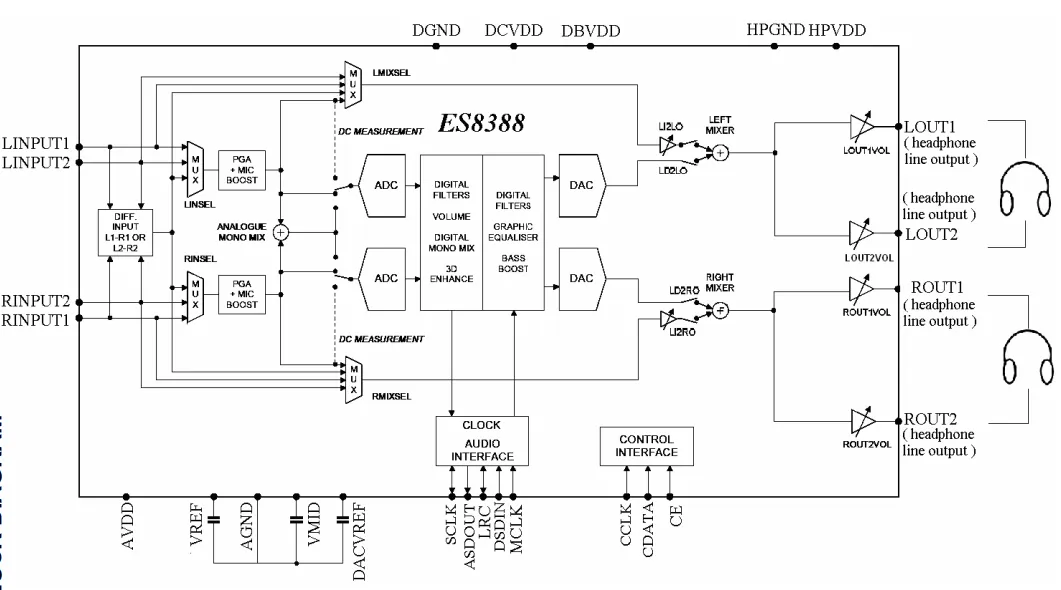
对于Codec,我们需要拿到芯片的user guide/datasheet,例如ES8388的用户手册《ES8388 user Guide.pdf》从文档中找到《BLOCK DIAGRAM》,通常的,我们也只需要关心Mux和Mixer,其他基本不关心,最多关心PGA的gain大小。
对于代码,我们看到驱动内实现的snd_soc_dapm_route 结构体已经把所有的通路已经设置好了。我们只需要关心能通的路即可,没必要专注每个电路元器件。(snd_soc_dapm_route结构体一般是提前提供好的,一般人不会改这个)
6.4 通路配置
根据上述描述,音频路由一旦打通,肯定是要做点动作的,这里主要是两点
根据kcontrol设置codec寄存器,打开mux和mixer开关 设置widget属性,控制上电时序 针对控制寄存器,kcontrol提供了多个宏,主要两个如下:
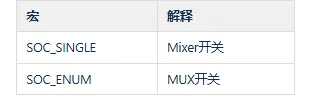 通过上述宏和变体,即可正常的控制对于的寄存器开关状态。
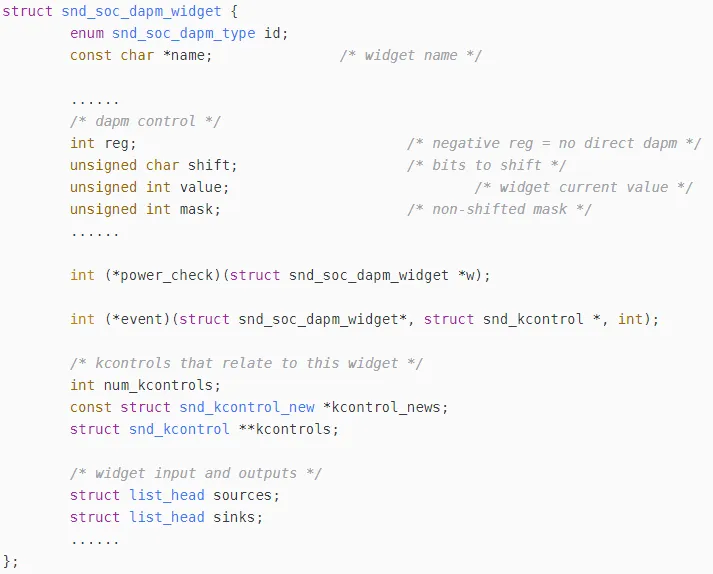
针对widget属性,它封装了kcontrol的控件,将其设置为DAPM的属性,主要如下:
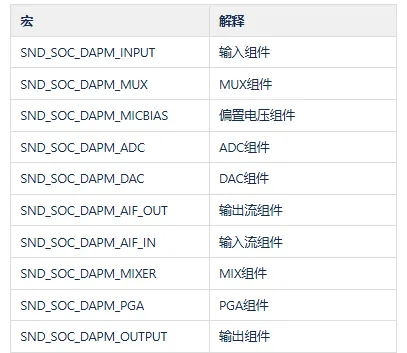
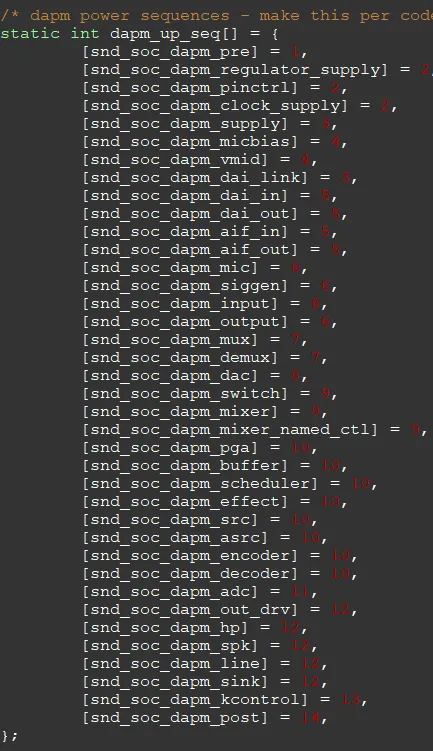
其他的就不列了,对应的组件封装的意义在于上电时序,DAPM默认上电时序和下电时序如下:
上电时序
下电时序
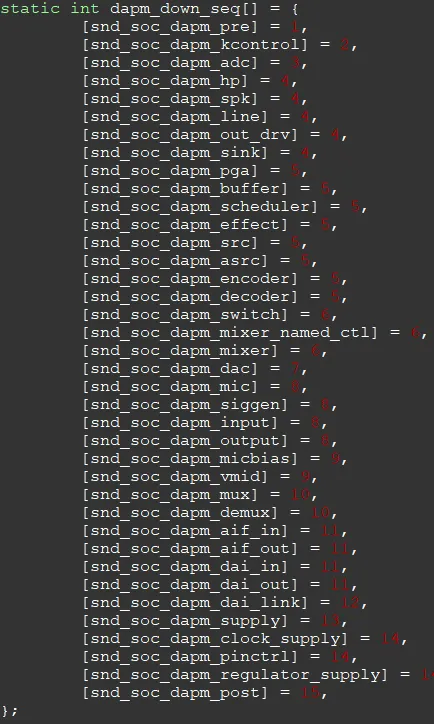
从这里可以知道,dapm定义的widget会安装固定的流程进行上电,具象化就例如水流一样, 什么时候流向哪里,最后能够流向终点即成功。
那么什么时候触发水流呢,这时候就是DAPM的事件了,通常的我们知道,声音只有开始,停止,暂停,挂起,唤醒这些事件,实际上DAPM所有事件如下
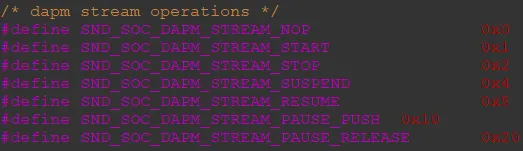
这样,在打开音频播放和录制的时候,会主动下发事件,根据对应的事件,按照DAPM的时序进行逐步上电和下电,从而达到DAPM的控制。
这样,从整体看来,音频通过kcontrol来描述组件,在其之上,通过widgt封装了一层,其意义在于实现dapm的电源时序管理。同时为了控制kcontrol控件打开的流程和顺序,又设计了route概念,通过通路来确定声卡工作流程。
七、wav格式解析
wav是一种传统的音频格式保存方法。下面是WAV的整体格式
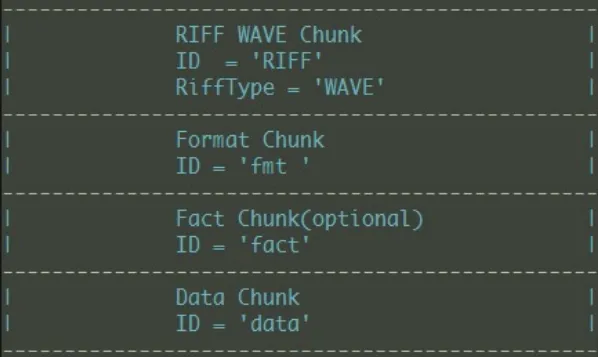
下面是具体wav格式分布情况

对应结构体如下(alsa-utils/aplay/formats.h):
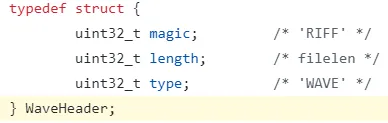
WaveHeader是包含文件的长度。具体如下
 这里文件大小为:137126,注意这里会主动减去自身的长度8,所以文件长度为137126 + 8 = 137134
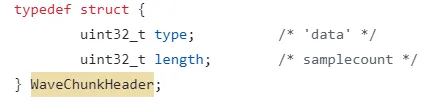
Chunk标识如下


具体如下:

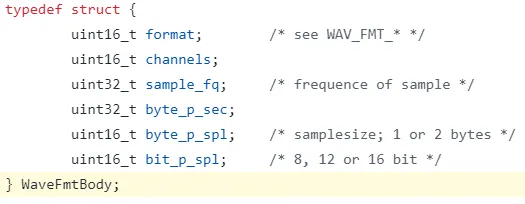 WaveFmtBody包含音频基本信息,具体如下

这里可以获取到alsa测试音频Front_Center.wav的格式为pcm(01 00),通道为单通道(01 00),采样率为48000(80 bb 00 00),字节率为96000(00 77 01 00),采样字节数(02 00),采样位数(10 00)
这里字节率计算方式为:通道数 * 采样率 * 采样位数 / 8 = (1 * 48000 * 16 / 8 = 96000)
这里采样字节数计算方式为: 通道数 * 采样位数 / 8 = (1 * 16 / 8 = 2)
最后是data chunk的标识,具体如下,内容为实际音频数据

这里知道真实的音频数据长度为 13709个字节。加上头的44个字节,就是实际文件大小 13709 + 44 = 137134
至此,通过wav文件格式解析,对于分析声卡是否能够播放能够做基本的判断。
八、播放流程解析
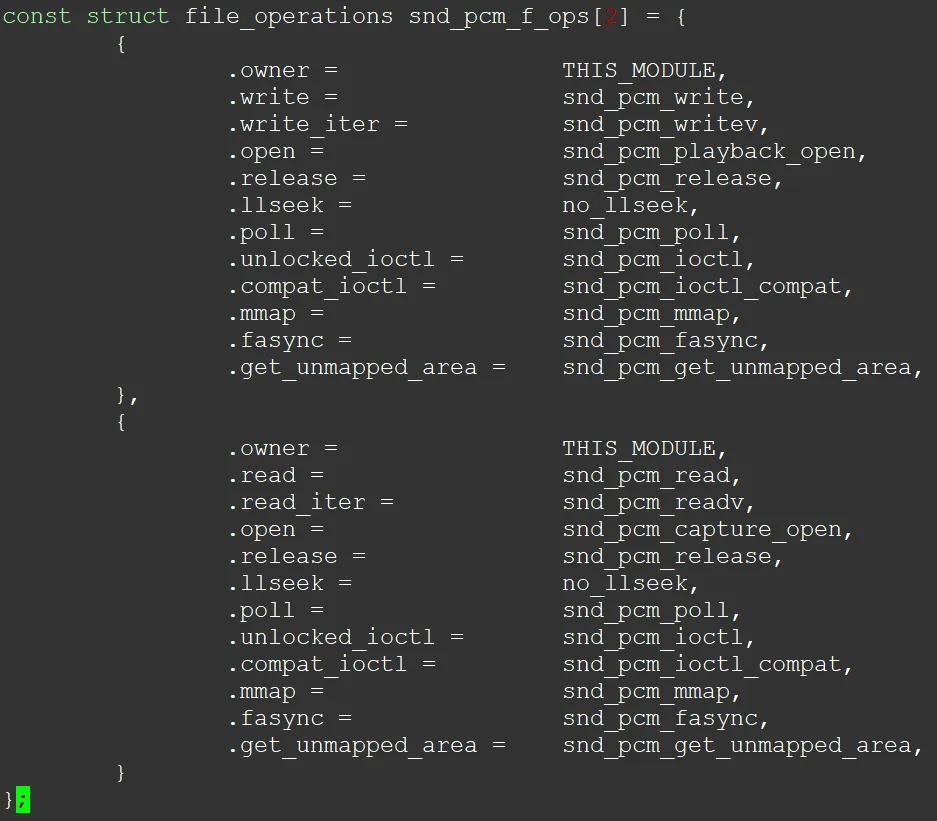
播放录制都是通过pcm流文件来控制,涉及结构体如下
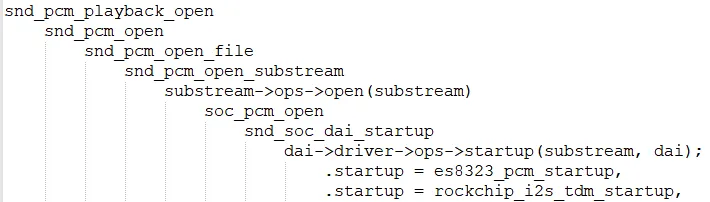
对于文件的播放,主要流程如下:
文件打开后需要ioctl,正常用到如下
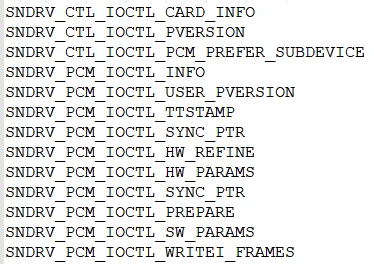
这里注意的是,为什么要说refine和params,这两个ioctl涉及到的问题最多,通常是设置参数相关,也就是,音频无法播放,一定是params设置错误,并且refine也refine参数不对导致的。
至于sync_ptr的指针同步,上面缓冲区已经提到了。这里不深究。
综上可以知道,以播放为例子,应用对内核下发的所有动作。
以aplay为例,播放一个wav文件,会先从wav中解析头44个字节,获取到wav文件格式的参数,例如通道,采样率,采样位数等信息,然后根据这些信息会先refine检测一下,然后如果内核有匹配的params,则通过hw_params下发。
根据aplay的例子,可以知道,一个音频无法播放或者播放不对,一定是驱动refine错误或者hw_params下发到codec上不支持导致的。以es8388为例,如下
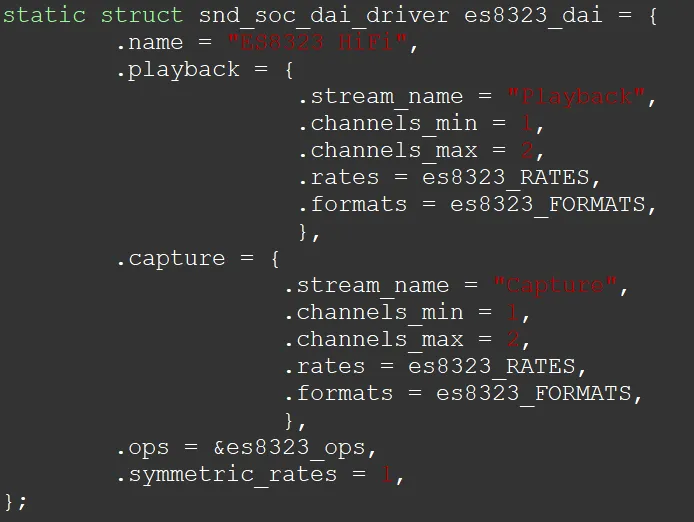
这里可以知道,.rate和.formats是codec能支持的声卡。如不在支持内,则hw_param下发后会报错。
九、调试错误分享
根据上述介绍,已经可以大致了解如下
基本的alsa框架已经讲解清楚,其他细节点这里没有去说明。接下来做错误和调试分享
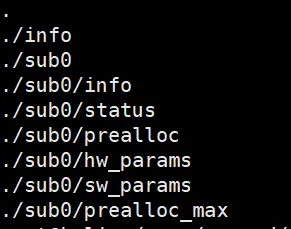
9.1 proc 声卡信息查看
find /proc/asound/
proc文件系统内有声卡的基本信息查看,主要查看如下
9.2 mclk和其他clk信息查看
cat /sys/kernel/debug/clk/clk_summary

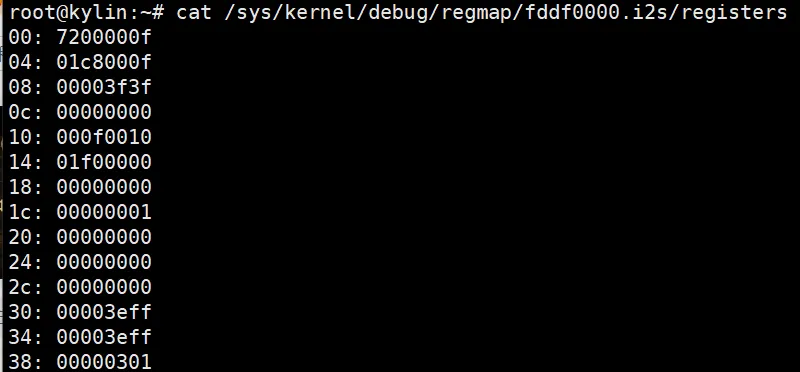
9.3 直接修改寄存器
cat /proc/iomem

9.4 i2c工具调试
i2cdetect
i2cdump
i2cset
i2cget
9.5 strace 调试
strace aplay -Dhw:1,0 startup.wav > 1.log 2>&1
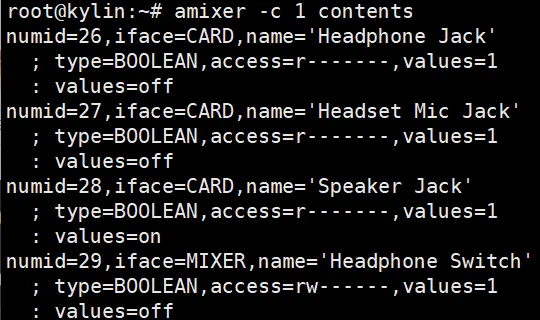
9.6 amixer控制控件
9.7 XRUN调试
CONFIG_SND_DEBUG=y
CONFIG_SND_PCM_XRUN_DEBUG=y
会出现如下文件
/proc/asound/card0/pcm0p/xrun_debug
设置级别即可
echo 7 > /proc/asound/card0/pcm0p/xrun_debug
9.8 ftrace
cd /sys/kernel/debug/tracing
echo "snd_pcm:applptr" >> set_event
echo "snd_pcm:hwptr" >> set_event
echo "snd_pcm:xrun" >> set_event
tail -f trace
9.9 dma中断

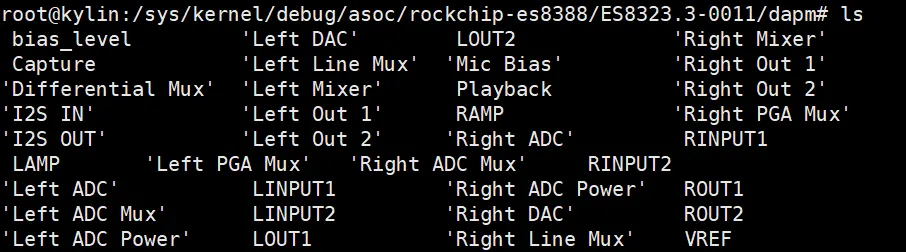
9.10 debugfs
cd /sys/kernel/debug/asoc

9.11 alsamixer
mixer调试器

9.13 驱动文档


至此,已经可以具备所有alsa相关的调试技巧。
3588平台内核在某个阶段之后,如果启动硬光标之后,容易在一些场景下概率出现光标消失的问题。且无法恢复,只有重新启动。根据此问题现象,可以确定根本原因在内核,下面介绍一下此问题,以及如何解决和规避光标消失问题。
一:问题描述
在3588平台,客户经常反馈光标时不时就消失了,可能和插拔显示器,休眠唤醒,开关显示器有关系。当鼠标消失之后,没有任何方法来正常打开鼠标,只有重启系统。
二:定位
根据问题描述
“只有重启能够恢复”,能够说明问题在内核

“插拔显示器,休眠唤醒,开关显示”。能够说明和RK平台的VOP有关
而RK平台的VOP驱动主要在 文件 drivers/gpu/drm/rockchip/rockchip_drm_vop2.c
于是调试此文件即可
三:具体原因
留意这笔提交
Author: Andy Yan <andy.yan@rock-chips.com>
Date: Fri Feb 25 20:31:08 2022 +0800
drm/rockchip: vop2: A workaround for PD_CLUSTER0 off

 The internal PD of VOP2 on rk3588 take effect immediately
 for power up and take effect by vsync for power down.

 And the PD_CLUSTER0 is a parent PD of PD_CLUSTER1/2/3,
 we may have this use case:
 Cluster0 is attached to VP0 for HDMI output,
 Cluster1 is attached to VP1 for MIPI DSI,

 When we enable Cluster1 on VP1, we should enable PD_CLUSTER0 as
 it is the parent PD, event though HDMI is plugout, VP1 is disabled,
 the PD of Cluster0 should keep power on.

 When system go to suspend:
 (1) Power down PD of Cluster1 before VP1 standby(the power down is take
 effect by vsync)
 (2) Power down PD of Cluster0

 But we have problem at step (2), Cluster0 is attached to VP0. bus VP0
 is in standby mode, as it is never used or hdmi plugout. So there is
 no vsync, the power down will never take effect.

 According to IC designer: We must power down all internal PD of VOP
 before we power down the global PD_VOP.

 So we get this workaround:
 We we found a VP is in standby mode when we want power down a PD is
 attached to it, we release the VP from standby mode, than it will
 run a default timing and generate vsync. Than we can power down the
 PD by this vsync. After all this is done, we standby the VP at last.

 Signed-off-by: Andy Yan <andy.yan@rock-chips.com>
 Change-Id: Ib9be8628f07d783c6bc3b7678c5eebfc63aabe1c
可以发现RK曾经为了解决某一问题做了一次workaround修复。
再看如下函数
static void vop2_power_domain_get(struct vop2_power_domain *pd)
{
if (pd->parent)
vop2_power_domain_get(pd->parent);

spin_lock(&pd->lock);
if (pd->ref_count == 0) {
if (pd->vop2->data->delayed_pd)
cancel_delayed_work(&pd->power_off_work);
vop2_power_domain_on(pd);
}
pd->ref_count++;
spin_unlock(&pd->lock);
}

static void vop2_power_domain_put(struct vop2_power_domain *pd)
{
spin_lock(&pd->lock);

/*
* For a nested power domain(PD_Cluster0 is the parent of PD_CLuster1/2/3)
* the parent power domain must be enabled before child power domain
* is on.
*
* So we may met this condition: Cluster0 is not on a activated VP,
* but PD_Cluster0 must enabled as one of the child PD_CLUSTER1/2/3 is enabled.
* when all child PD is disabled, we want disable the parent
* PD(PD_CLUSTER0), but as module CLUSTER0 is not attcthed on a activated VP,
* the turn off operation(which is take effect by vsync) will never take effect.
* so we will see a "wait pd0 off timeout" log when we turn on PD_CLUSTER0 next time.
*
* So we have a check here
*/
if (--pd->ref_count == 0 && vop2_power_domain_can_off_by_vsync(pd)) {
if (pd->vop2->data->delayed_pd)
schedule_delayed_work(&pd->power_off_work, msecs_to_jiffies(2500));
else
vop2_power_domain_off(pd);
}

spin_unlock(&pd->lock);
if (pd->parent)
vop2_power_domain_put(pd->parent);
}
留意这个注释
+ /*
+ * @lock: protect power up/down procedure.
+ * power on take effect immediately,
+ * power down take effect by vsync.
+ * we must check power_domain_status register
+ * to make sure the power domain is down before
+ * send a power on request.
+ *
+ */
可以看到RK需要确保 窗口的poweron是必须要在窗口已经poweroff下才能进行的。
所以可以留意这个使用引用计数变量:
pd->ref_count
也就是说,RK用引用计数的方式来统计vop的窗口是否已经正常poweroff了,如果引用计数不为0,说明窗口是正常打开的,故不会主动再次打开窗口
所以RK drm/rockchip: vop2: A workaround for PD_CLUSTER0 off 这笔提交出了问题。
留意如下注释和提交
 According to IC designer: We must power down all internal PD of VOP
 before we power down the global PD_VOP.
代码如下:
if (vp) {
 ret = clk_prepare_enable(vp->dclk);
 if (ret < 0)
 DRM_DEV_ERROR(vop2->dev, "failed to enable dclk for video port%d - %d\n",
 vp->id, ret);
 crtc = &vp->rockchip_crtc.crtc;
 VOP_MODULE_SET(vop2, vp, standby, 0);
 vop2_power_domain_off(pd);
 vop2_cfg_done(crtc);
 vop2_wait_power_domain_off(pd);
reinit_completion(&vp->dsp_hold_completion);
 vop2_dsp_hold_valid_irq_enable(crtc);
 VOP_MODULE_SET(vop2, vp, standby, 1);
 ret = wait_for_completion_timeout(&vp->dsp_hold_completion, msecs_to_jiffies(50));
 if (!ret)
 DRM_DEV_INFO(vop2->dev, "wait for vp%d dsp_hold timeout\n", vp->id);
vop2_dsp_hold_valid_irq_disable(crtc);
 clk_disable_unprepare(vp->dclk);
 }
这里是有一个漏洞,也就是这笔workaround的补丁,会主动关闭vop,但是关闭vop的时候,并没有给引用计数清零。所以窗口因为这笔workaround提交被异常关闭了,就很难再被打开了。
解决问题的方法如下:
diff --git a/drivers/gpu/drm/rockchip/rockchip_drm_vop2.c b/drivers/gpu/drm/rockchip/rockchip_drm_vop2.c
index 996afa881289..e648a23bcc9f 100644
--- a/drivers/gpu/drm/rockchip/rockchip_drm_vop2.c
+++ b/drivers/gpu/drm/rockchip/rockchip_drm_vop2.c
@@ -3454,6 +3454,7 @@ static void vop2_power_domain_off_by_disabled_vp(struct vop2_power_domain *pd) crtc = &vp->rockchip_crtc.crtc;
 VOP_MODULE_SET(vop2, vp, standby, 0);
 vop2_power_domain_off(pd);
+ pd->ref_count = 0;
 vop2_cfg_done(crtc);
 vop2_wait_power_domain_off(pd);
四:规避方法
现在我们知道,光标消失和RK的一笔workaround有关,细心看一下这个补丁可以发现如下:
if (pd->data->id == VOP2_PD_CLUSTER0 || pd->data->id == VOP2_PD_CLUSTER1 ||
 pd->data->id == VOP2_PD_CLUSTER2 || pd->data->id == VOP2_PD_CLUSTER3) {
 phys_id = ffs(pd->data->module_id_mask) - 1;
 win = vop2_find_win_by_phys_id(vop2, phys_id);
 vp_id = ffs(win->vp_mask) - 1;
 vp = &vop2->vps[vp_id];
 } else {
 DRM_DEV_ERROR(vop2->dev, "unexpected power on pd%d\n", ffs(pd->data->id) - 1);
 }
也就是只有plane是cluster0/1/2/3的情况下,workaround才生效,那么针对内核,可以设置光标层不使用cluster层即可,方法如下:
&vp0 {
 rockchip,plane-mask = <(1 << ROCKCHIP_VOP2_CLUSTER0 | 1 << ROCKCHIP_VOP2_ESMART0)>;
 rockchip,primary-plane = <ROCKCHIP_VOP2_ESMART0>;
 cursor-win-id = <ROCKCHIP_VOP2_ESMART1>;;
};
这里拿esmart1来举例,可以使用任意的非cluster层即可。
五:当前现象
如果使用修改引用计数的方法来解决问题,那么实际上还是有概率会把鼠标层关闭,但下一次drm_atomic_check_only的时候,还是会正常打开。那么现象为:
概率发现光标消失(在插拔显示器,休眠唤醒的情况下),但是动一下鼠标光标会正常显示。
考虑到此情况下,影响很小,不算bug,无需再次修改。
如果使用规避方法,此影响也不复存在
六:进一步修改
如果当前现象仍需要提高体验,可以进一步定制,也就是识别如果识别是光标层,且光标绑定在crtc上时,就将其设置为可见。而非不可见。但个人觉得没多大必要。
@@ -4131,6 +4132,8 @@ static int vop2_plane_atomic_check(struct drm_plane *plane, struct drm_plane_sta
 plane->name, state->src_x >> 16, state->src_y >> 16, state->src_w >> 16,
 state->src_h >> 16, state->crtc_x, state->crtc_y, state->crtc_w,
 state->crtc_h);
+ if(plane == crtc->cursor)
+ state->visible = true;
 return 0;
 }
这样就保证了,鼠标窗口不会因为其他特殊情况出现异常关闭的情况。
七:总结
此问题为RK为了解决其他问题引入的新问题。此问题和引用计数有关,内核有很多的地方都使用引用计数,但需要留意的是,引用计数必须要考虑周全,一旦某种情况下某人修改问题不注意使用引用计数,那么整个引用计数逻辑判断就会失效,从而诞生问题。
CAN(Controller Area Network)是一种有效支持分布式控制或实时控制的串行通信网络。CAN总线是一种在汽车上广泛采用的总线协议,被设计作为汽车环境中的微控制器通讯,公司项目逐渐朝车载领域发展,而车载领域使用can的场景越来越多,这里分析一下can的调试技巧,有助于排查can总线的问题
一:can的驱动
drivers/net/can/rockchip/rockchip_can.c
drivers/net/can/rockchip/rockchip_canfd.c
rk3588有两个can驱动,均可通过设备树自由选择,默认可选canfd通讯,则设备树如下配置
can0: can@fea50000 {
 compatible = "rockchip,can-2.0";
 reg = <0x0 0xfea50000 0x0 0x1000>;
 interrupts = <0 341 4>;
 clocks = <&cru 112>, <&cru 111>;
 clock-names = "baudclk", "apb_pclk";
 resets = <&cru 185>, <&cru 184>;
 reset-names = "can", "can-apb";
 pinctrl-names = "default";
 pinctrl-0 = <&can0m0_pins>;
 tx-fifo-depth = <1>;
 rx-fifo-depth = <6>;
 status = "disabled";
 };
&can0 {
 assigned-clocks = <&cru 112>;
 assigned-clock-rates = <200000000>;
 status = "okay";
};
真的can总线,默认可以调整其时钟的频率,默认是200M。如遇到分频不精确,可以调整时钟源为其他值,从而提高can总线的采样点
二:命令
2.1 查看can的状态
ip -details -statistics link show can0
2: can0: <NOARP,UP,LOWER_UP,ECHO> mtu 16 qdisc pfifo_fast state UP mode DEFAULT group default qlen 10
 link/can promiscuity 0 minmtu 0 maxmtu 0
 can state ERROR-ACTIVE (berr-counter tx 0 rx 0) restart-ms 1
 bitrate 250000 sample-point 0.868
 tq 40 prop-seg 42 phase-seg1 43 phase-seg2 13 sjw 1
 rockchip_canfd: tseg1 1..128 tseg2 1..128 sjw 1..128 brp 1..256 brp-inc 2
 clock 99000000
 re-started bus-errors arbit-lost error-warn error-pass bus-off
 12020 0 0 12132 3438 12450 numtxqueues 1 numrxqueues 1 gso_max_size 65536 gso_max_segs 65535
 RX: bytes packets errors dropped overrun mcast
 320320 40040 0 0 0 0
 TX: bytes packets errors dropped carrier collsns
 0 0 0 12020 0 0
这里有如下信息可以着重看到
a.state can总线的状态
b.bitrate 比特率
c.sample-point 采样点
d.TX,RX 数据包状态
2.2 设置can的采样点
ip link set can0 type can tq 125 prop-seg 6 phase-seg1 7 phase-seg2 2 sjw 1
通过设置如上参数,可以修改can的采样,也可以直接设置比特率来自动计算采样点
ip link set can0 type can bitrate 250000
2.3 开启can测试
ip link set can0 down
ip link set can0 up type can bitrate 250000
ip link set can0 up
while true
do
    cansend can0 00000000#0000000000000000
done
上述命令可以直接打开can0设备,并发送默认数据
2.3 开启can回环测试
ip link set can0 down
ip link set can0 up type can bitrate 250000 loopback on
ip link set can0 up
while true
do
    cansend can0 00000000#0000000000000000
done
上述可以直接测试can的回环
2.4 接收和发送信息
# 接收can信息
candump can0 > can_recv.log &

# 发送can信息
cansend can0 123#1122334455
cansend can0 5A1#11.2233.44556677.88
cansend can0 1F334455#1122334455667788
2.5 调试can数据
因为can的数据通过net skb上报,所以解析skb数据即可确定接收和发送的can数据信息。如下函数
static void skb_dump(struct sk_buff *skb, struct net_device *dev){
 int i = 0;
if(!skb || !dev){
 pr_err("%s: bad param\n",__FUNCTION__);
 goto out;
 }
 printk(KERN_CONT "Kylin:Can packets(len=%d): ",skb->len);
 for (i = 0; i < skb->len; i++){
 printk(KERN_CONT "%02x", *(skb->data + i));
 }
 printk(KERN_CONT "\n");
out:
 return;
}
然后只需要将skb_dump函数加入接收可发送的处理中即可。
2.6 确定can的错误帧
对于接收到的can中断,主要有如下中断
#define RX_FINISH_INT BIT(0)
#define TX_FINISH_INT BIT(1)
#define ERR_WARN_INT BIT(2)
#define RX_BUF_OV_INT BIT(3)
#define PASSIVE_ERR_INT BIT(4)
#define TX_LOSTARB_INT BIT(5)
#define BUS_ERR_INT BIT(6)
#define RX_FIFO_FULL_INT BIT(7)
#define RX_FIFO_OV_INT BIT(8)
#define BUS_OFF_INT BIT(9)
#define BUS_OFF_RECOVERY_INT BIT(10)
#define TSC_OV_INT BIT(11)
#define TXE_FIFO_OV_INT BIT(12)
#define TXE_FIFO_FULL_INT BIT(13)
#define WAKEUP_INT BIT(14)
而关于BUS_ERR的错误,有如下情况
#define BIT_ERR 0
#define STUFF_ERR 1
#define FORM_ERR 2
#define ACK_ERR 3
#define CRC_ERR 4
对应情况可以进去调试即可。
2.7 日志
关于netdev_dbg的日志,可以通过如下步骤
a. #define DEBUG  在驱动内部定义
b. 设置日志等级为8
而其他的netdev_*日志,可直接设置日志等级为8即可查看,如
dmesg -n8
2.8 中断上下文
针对can的问题,可以先确定中断
cat /proc/interrupts | grep can
查看硬件中断是否正常
然后再确定软中断
cat /proc/softirqs
 CPU0 CPU1 CPU2 CPU3 CPU4 CPU5 CPU6 CPU7
 HI: 2834 1 1 3 0 0 0 0
 TIMER: 7791 33602 36340 57451 22095 6063 31674 5003
 NET_TX: 2596 9 7 2 1 3870 2639 3561
 NET_RX: 33128 100 36 307 141 3876 2662 21700
 BLOCK: 7154 17766 14324 14861 13713 2332 2492 1812
 IRQ_POLL: 0 0 0 0 0 0 0 0
 TASKLET: 160 2 1 2 1 1 75 3
 SCHED: 85621 59461 52573 172213 82530 16771 32225 13479
 HRTIMER: 0 0 0 0 0 0 0 0
 RCU: 77962 44178 37468 71517 57343 36644 33600 27705
确定NET_RX是否正常,如不正常,则can驱动内的netif_rx调用太频繁
2.9 提高can中断的实时响应
1)dts中去掉所有:cpu-idle-states = <&CPU_SLEEP>;
2)设置成性能模式:echo performance > /sys/devices/system/cpu/cpu0/cpufreq/scaling_governor
3)绑定can的中断到一个特定的cpu上: irq_set_affinity_hint(ndev->irq, get_cpu_mask(num_online_cpus() - 1));
一:adb
1.1 windows系统需要安装adb工具,默认能够使用adb功能
- 按键windows+r打开运行
- 输入sysdm.cpl,回车
- 高级
- 环境变量
- 系统变量
- PATH 将adb.exe添加到系统环境变量
打开命令提示符,输入adb --version 如果正常出现 adb版本信息,则添加成功
1.2 linux系统安装adb工具
- 安装
apt-get install android-tools-adb - lsusb
2207:0006
- 创建adb_usb.ini文件,写入android设备的VID
cd ~/.android
touch adb_usb.ini
在adb_usb.ini文件中写入以下内容:
0x2207
添加权限:
创建权限文件:touch /etc/udev/rules.d/70-android.rules
在70-android.rules文件中写入一下内容:
UBSYSTEM=="usb", ATTRS{idVendor}=="18d1", ATTRS{idProduct}=="d002", MODE="0666"
重启USB服务:
chmod 666 /etc/udev/rules.d/70-android.rules
service udev restart
重启adb服务:
adb kill-server
adb start-server
查看adb版本:
adb --version
1.3 使用adb工具
- 列出adb设备
adb devices
List of devices attached
0123456789ABCDEF device
- 连接adb
adb shell
#
- 运行命令“ls”
adb shell ls
bin dev home lost+found mnt opt root sbin sys usr
boot etc lib media '(null)' proc run srv tmp var
- 从设备拉取文件
adb shell touch testfile

adb pull testfile
testfile: 1 file pulled.
- 将文件传到设备中
adb push testfile /tmp/
testfile: 1 file pushed.

adb shell ls /tmp/testfile
/tmp/testfile
二:lrzsz(通过串口传输文件)
- 安装lrzsz
apt install lrzsz
- 将文件通过串口发送到设备
输入rz ---> 选择文件发送
- 将文件通过串口接收到主机
输入 sz /tmp/testfile ----> 选择需要存放文件的地址
三:samba(共享设备所有文件给主机)
- 安装samba
apt-get install samba
- 配置samba
[work]
        comment=this is Linux share directory
        path=/
        public=yes
        create mode=0777
        directory mode=0777
        guest ok = yes
        browseable = yes
        writeable = yes
- 重启samba服务
systemctl restart smbd
- 通过IP访问samba文件
在文件管理器下输入IP 即可跳转,账号和密码为系统的账号密码
四:SFTP传输文件
- Linux
sftp -p root@172.25.80.124
- FileZilla
主机: 172.25.80.124 用户 kylin 密码 qwe123 端口 22
五:CIFS共享文档
- Windows打开文件共享
win主机右击要共享的目录,选择属性,在共享页面选择共享模式
- Linux
通过mount -t cifs //192.168.1.105/User /home/kylin/temp -o username=***,password=*,vers=2.0命令挂载目录。
其中192.168.1.105/User为win主机IP及共享目录,/home/kylin/temp为挂载目标目录。username后为win主机用户名,password为对应密码。
- 内核配置
CONFIG_CIFS=y
CONFIG_CIFS_STATS=y
CONFIG_CIFS_STATS2=y
# CONFIG_CIFS_WEAK_PW_HASH is not set
# CONFIG_CIFS_UPCALL is not set
CONFIG_CIFS_XATTR=y
CONFIG_CIFS_POSIX=y
CONFIG_CIFS_ACL=y
CONFIG_CIFS_DEBUG=y
# CONFIG_CIFS_DEBUG2 is not set
# CONFIG_CIFS_DFS_UPCALL is not set
CONFIG_CIFS_SMB2=y
CONFIG_CIFS_SMB311=y
CONFIG_CIFS_FSCACHE=y
CONFIG_NETWORK_FILESYSTEMS=y
CONFIG_NFS_FS=y
CONFIG_NFS_V2=y
CONFIG_NFS_V3=y
CONFIG_NFS_V3_ACL=y
CONFIG_NFS_V4=y
CONFIG_NFS_SWAP=y
# CONFIG_NFS_V4_1 is not set
CONFIG_NFS_FSCACHE=y
# CONFIG_NFS_USE_LEGACY_DNS is not set
CONFIG_NFS_USE_KERNEL_DNS=y
# CONFIG_NFSD is not set
外网源能够让客户使用apt或yum命令一键安装我们制作的软件包,不需要手动解决繁琐的依赖问题。本文将介绍如何简单快速的搭建一个apt外网源。
一、准备外网源环境
1.1 搭建外网访问网页服务
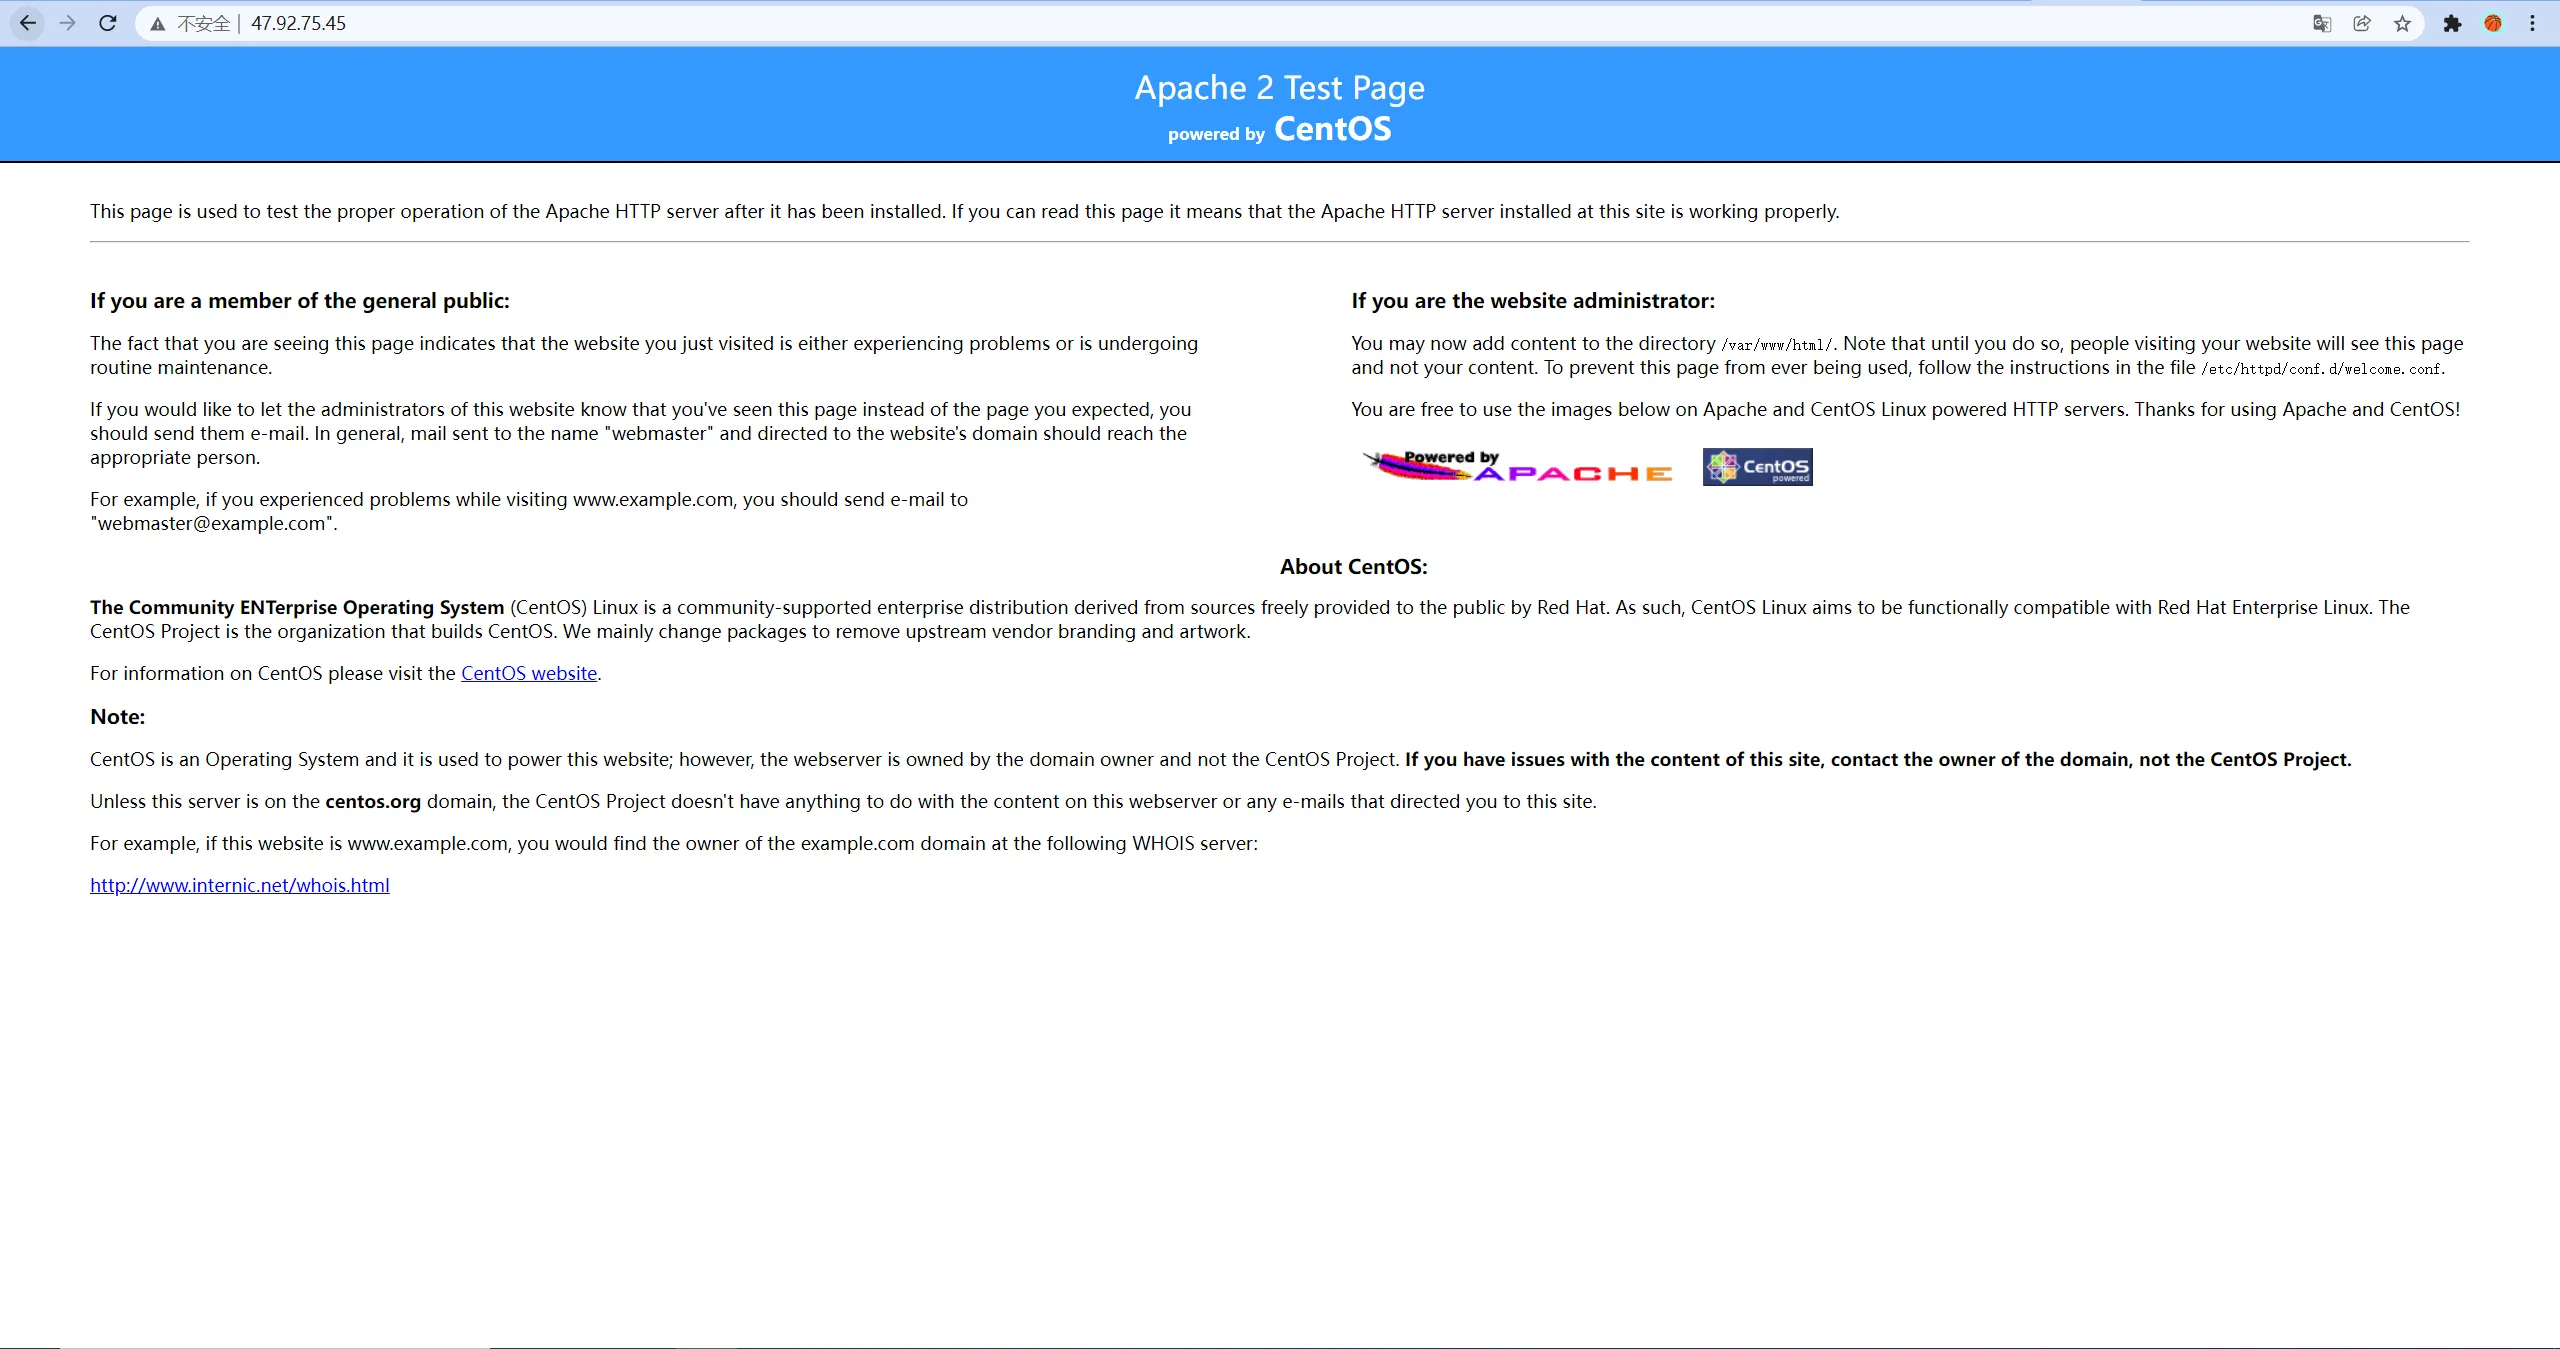
因为需要通过外网访问,所以我们需要一个能联通到外网的服务器。目前市面上比较常见的有腾讯云、阿里云等,我们这里使用公司购买的阿里云服务器(公网ip为47.92.75.45)。
通过ssh登录上去之后,发现我们之前的同事已经通过apache服务搭建了一个后端代理服务器,所以我们本文就不多介绍代理服务器如何搭建,可以自行百度tomcat(或其他后端软件)服务器搭建教程。
这时我们通过在网页输入外网ip,就可以看到如下的网页
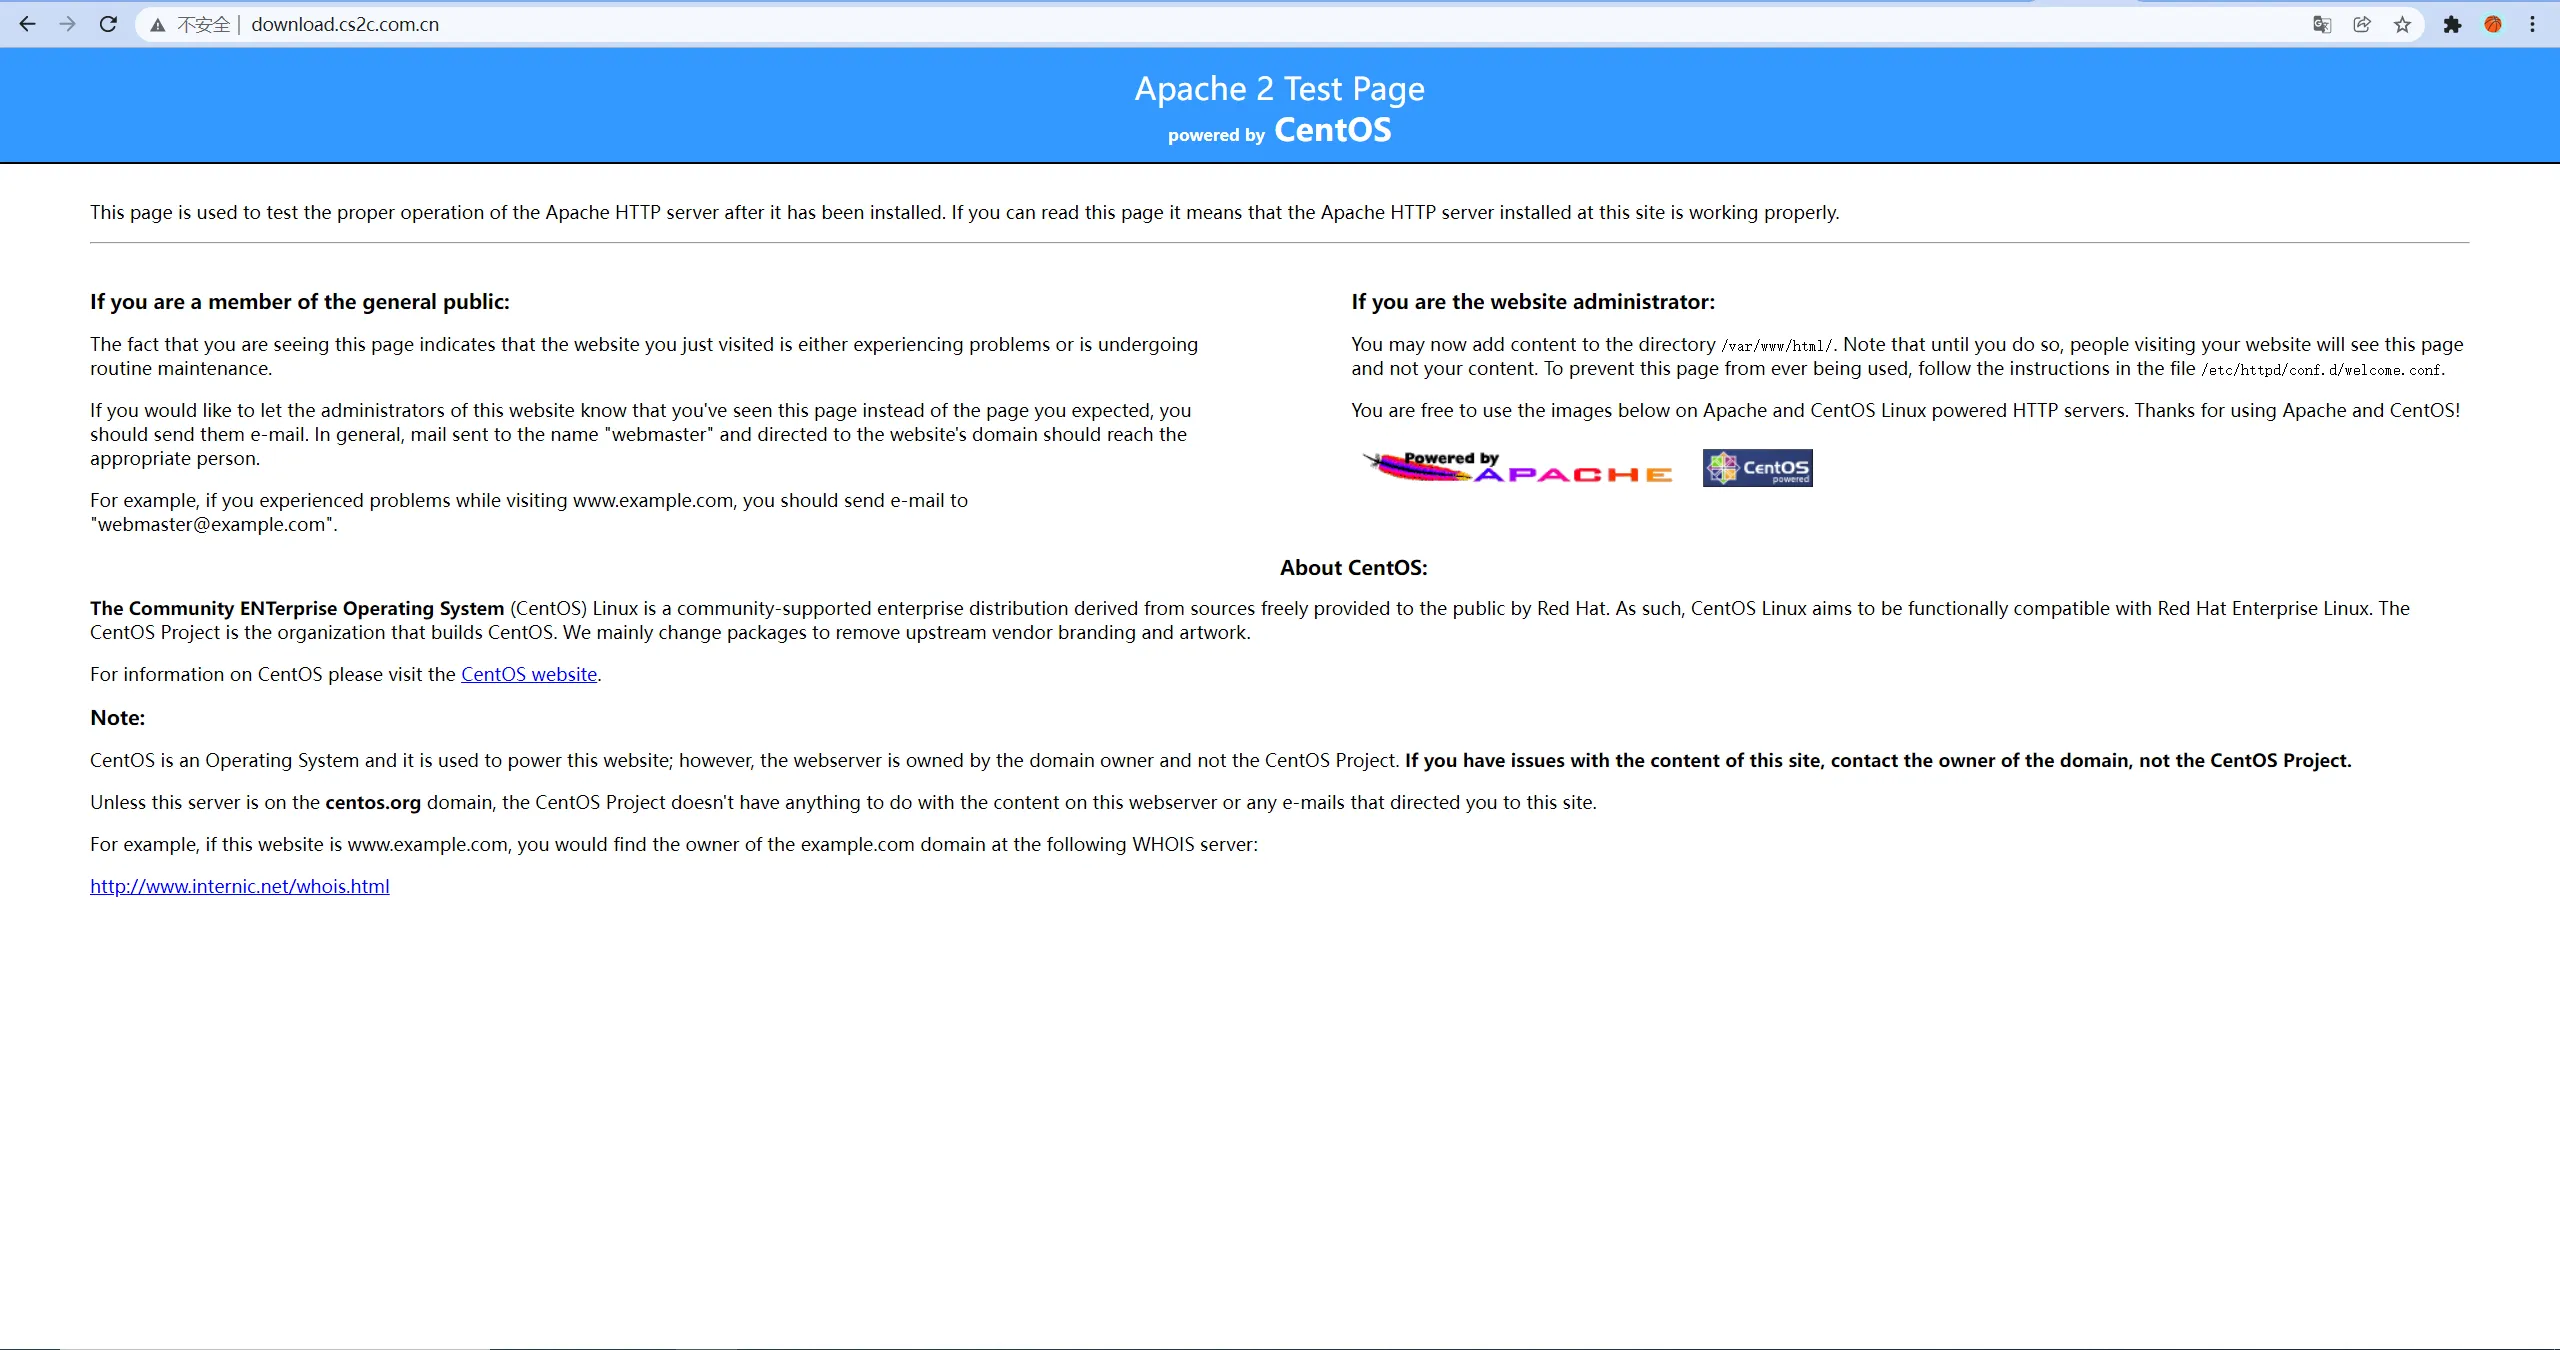
这时我们是通过ip去访问的网页,通过域名访问还需要我们去购买域名并绑定ip,这个步骤就不多做解释。公司已经购买了域名,所以我们也可以通过域名访问这个网页
1.2 创建软件源仓库文件夹
随后我们进入服务器默认的一个文件夹可以看到

因此可以在网页上看到对应的文件信息

所以我们需要先在外网服务器上创建一个文件夹来存放我们的软件镜像仓库

创建之后网页上也会出现对应的文件夹(由于后端软件不同,可能部分软件需要重启一下服务才能看到所做的改动)

此时,外网源服务器上的工作就告一段落,我们在外网源服务器上面创建了一个用于外网用户访问的路径,后面将会把软件源镜像放入这个路径中。
二、准备内网环境
2.1 制作要上传的软件包镜像
我们可以通过apt-mirror工具制作我们需要的软件源镜像。首先下载apt-mirror软件

然后配置/etc/apt/mirror.list文件
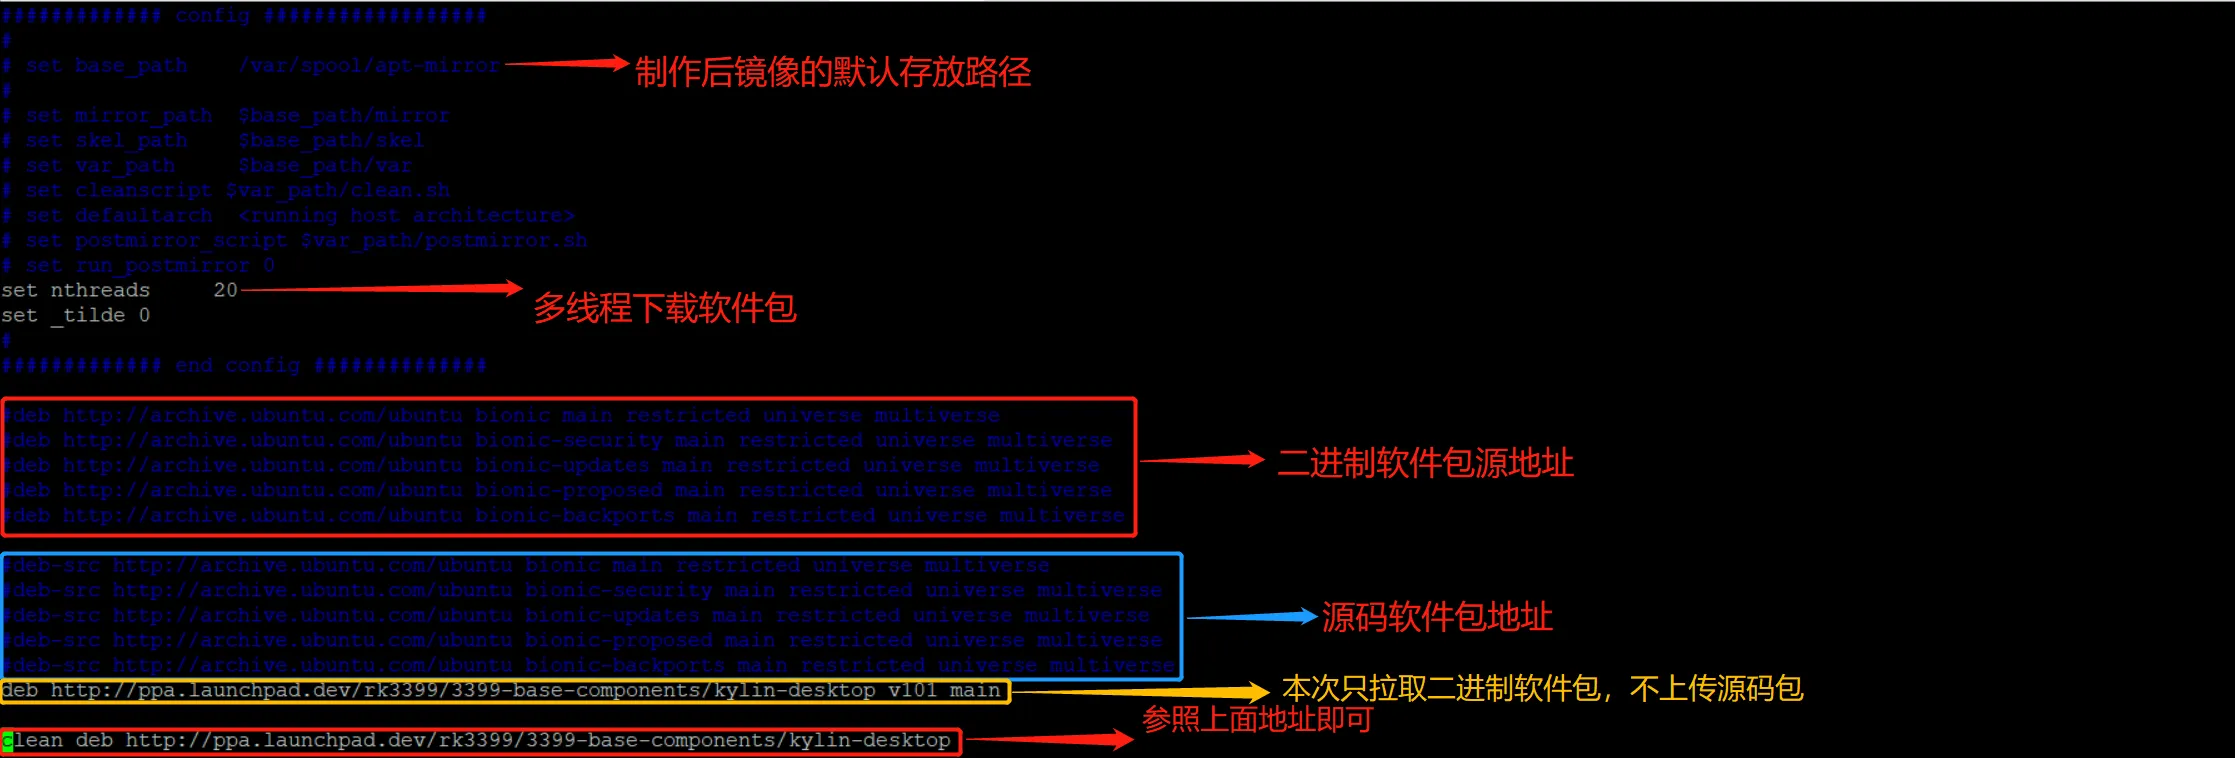
随后使用apt-mirror命令即可拉去镜像到默认文件夹中
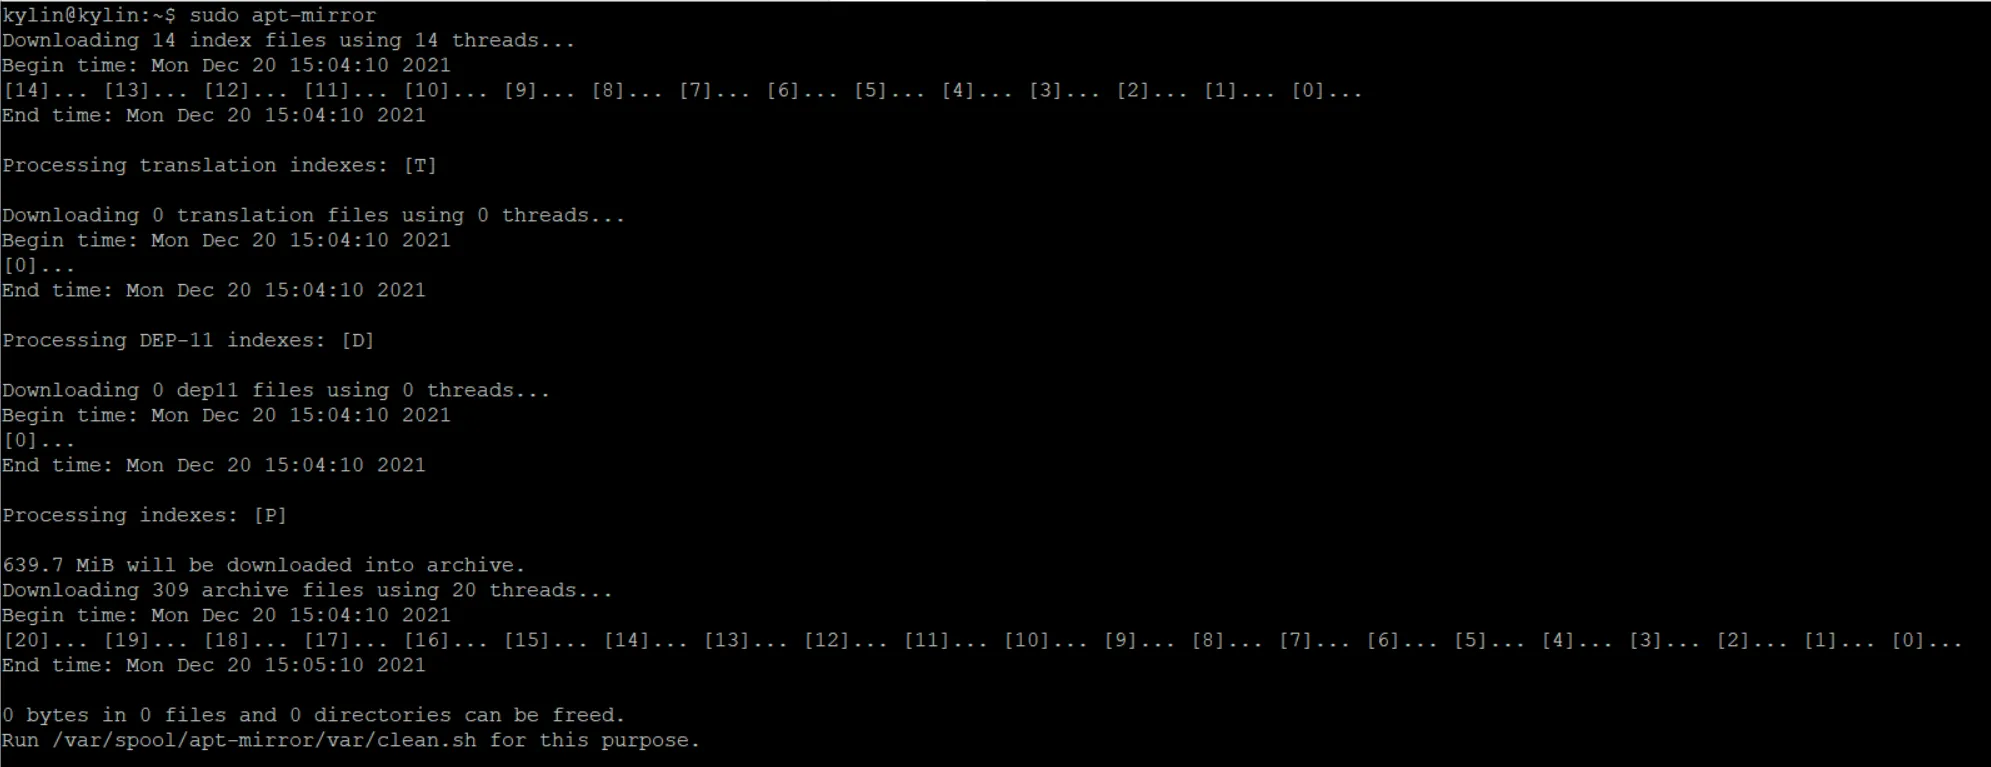
我们可以在默认路径中看到已经下载好的软件镜像文件
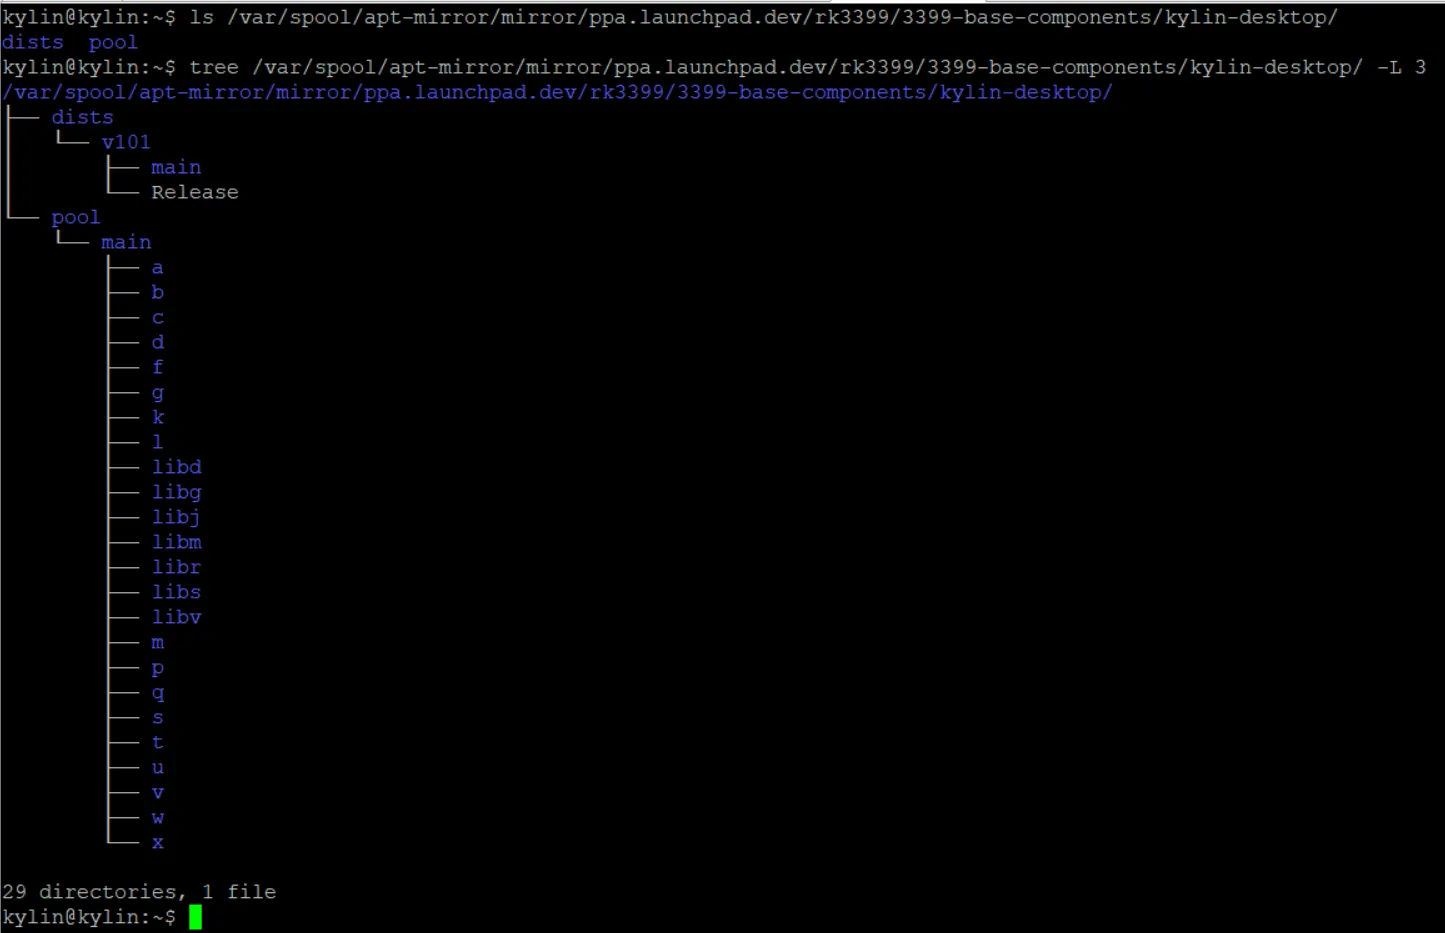
到此,我们就制作好了需要的软件源镜像
2.1 定时同步软件镜像源
由于我们不停地在更新软件包,所以可以通过定时任务去同步软件源上的更新到镜像中,这里我们可以使用crontab工具,下面简单介绍crontab软件的用法
编辑/etc/crontab 将你想要执行的脚本按照提示给的格式匹配即可
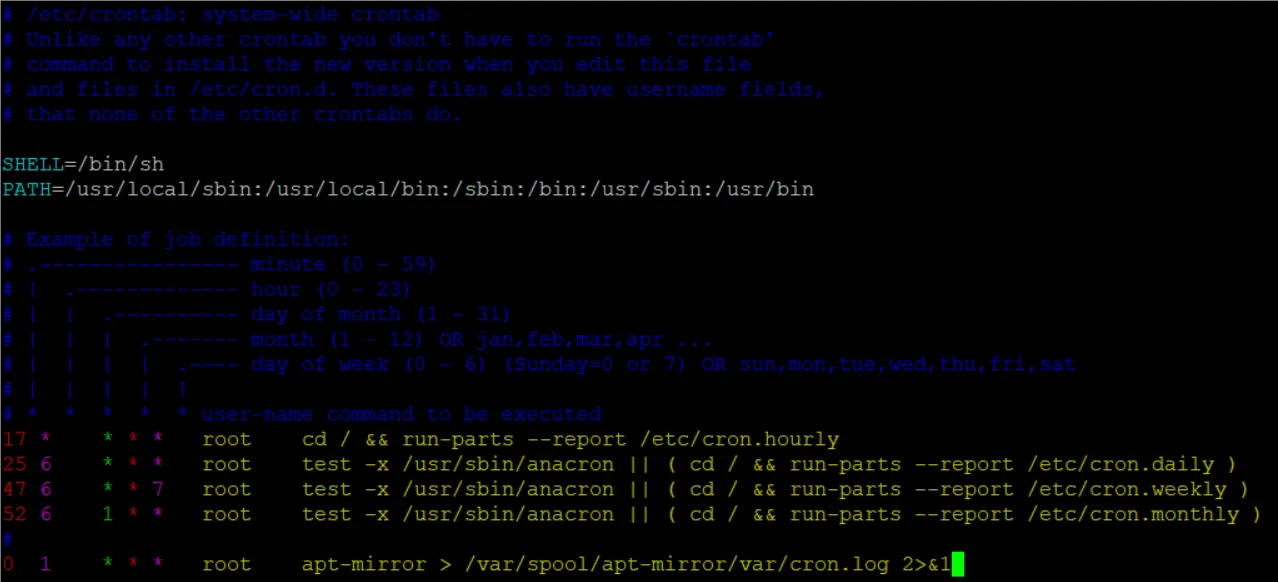
这里我们添加了最后一行,意思是在每天的凌晨1点,执行apt-mirror命令,更新软件源镜像
三、把软件源从本地同步到外网仓库
3.1 同步
我们使用rsync命令同步软件源镜像,将我们的镜像文件夹同步到外网服务器上我们创建的文件夹中

这时,我们刷新网页就可以看到两个软件源的文件夹

此时,我们只需要将 deb [trusted=yes] http://download.cs2c.com.cn/kylin/rk3399/3399-base-components/kylin-desktop/ 10.1 main 加入到/etc/apt/sources.list,update后即可下载软件源中的软件包。
注意必须要加入[trusted=yes]选项,如果不加则会出现gpg密钥验证错误的问题。这是由于我们的服务器密钥没有被添加到我们本地需要安装软件包机器的密钥列表中,长沙外网源是通过kylin-keyring软件包将密钥添加到系统当中的,我们目前通过添加信任即可。
更新:可以通过 gpg -o public-file.key --export keyId 命令将外网源服务器的gpg密钥导出到public-file.key文件,然后将这个文件拷贝到你要装软件包的机器上 /etc/apt/trusted.gpg.d/ 路径下即可,这样就不需要添加 [trusted=yes] 选项了。
keyId是通过 gpg --gen-key 命令生成,已经生成的可以通过 gpg --list-keys 命令查看当前环境的gpg key。
同时还需要在外网源服务器生成InRelease文件去验证gpg密钥,命令是 gpg --clearsign --no-tty --batch --personal-digest-preferences SHA256 -o InRelease Release 密码是gpg --gen-key生成的密码。
3.2 实时同步
我们也可以把rsync加入到crontab中,每天或每周定时同步外网的软件源镜像。这里由于需要同时连接内网和外网不安全,所以就不使用定时同步。
