目录
我们在开发openharmony的时候,hcs的修改后编译内核,经常发现hcs不生效,本文基于解析hcs的编译逻辑确定问题,从而得出正确编译hcs的方法。从某种意义上这是其实是openharmony的本身bug。
一、hcs介绍
参考链接如下:
OpenHarmony-HDF驱动框架介绍及加载过程
https://forums.openharmony.cn/forum.php?mod=viewthread&tid=766
OHOS HDF 图谱-1-驱动配置信息树状图
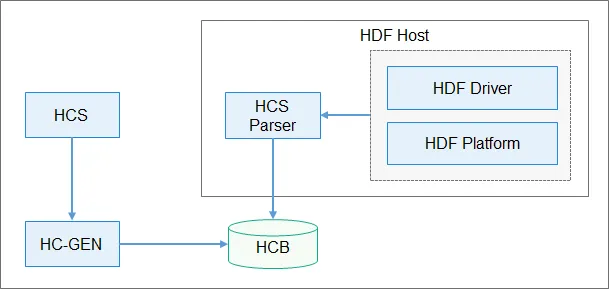
从上述文章我们可以知道
1.1 类似于dts
hcs模仿了dts的基本功能,对openharmony的设备驱动进行了抽象,简单的hcs配置如下:
display :: host {
    hostName = "display_host";
    device_hdf_drm_panel :: device {
        device0 :: deviceNode {
            policy = 0;
            priority = 197;
            preload = 0;
            moduleName = "HDF_DRM_PANEL_SIMPLE";
        }
    }
}
这里描述了display模块,其对应的某个驱动为HDF_DRM_PANEL_SIMPLE
1.2 类似Linux总线设备驱动框架
我们知道,在标准linux内核中,设备树很好的融入了总线设备驱动框架,对于设备和驱动,我们只需要在驱动写好我们的注册结构体即可,示例如下:
static struct mipi_dsi_driver panel_simple_dsi_driver = {
        .driver = {
                .name = "panel-simple-dsi",
                .of_match_table = dsi_of_match,
        },
        .probe = panel_simple_dsi_probe,
        .remove = panel_simple_dsi_remove,
        .shutdown = panel_simple_dsi_shutdown,
};
hcs模仿了linux的做法,所以我们可以对应的做如下的结构体的注册,示例如下:
struct HdfDriverEntry g_hdfDrmPanelSimpleEntry = {
    .moduleVersion = 1,
    .moduleName = "HDF_DRM_PANEL_SIMPLE",
    .Init = HdfDrmPanelSimpleEntryInit,
};
这里注意的是,dts里面设备和驱动匹配成功了调用的是probe回调,而openharmony的hcs注册成功了调用的是Init回调
1.3 hcb的存在
对于dts,我们可以知道通过dtc命令可以汇编和反汇编dts和dtb,这样对我们调试dts来说十分方便,同样的openharmony也借用了这样的概念。
openharmony通过hc-gen命令可以对hcs进行汇编和反汇编,示例如下
编译hcs:
$sdk/drivers/hdf_core/framework/tools/hc-gen/build/hc-gen -b hdf.hcs -o hdf.hcb
这里将hdf.hcs编译成了hdf.hcb
反编译hdf_hcs.hcb:
$sdk/rk3568/drivers/hdf_core/framework/tools/hc-gen/build/hc-gen -d hdf_hcs.hcb -o hdf.hcs
这里将hdf_hcs.hcb反汇编成了hdf.hcs。这里实际会输出hdf.d.hcs
1.4 解析hcb
我们知道设备树是通过标准的libfdt库来解析dtb的,类似的,我们可以知道hcb是通过华为开发的hcs parser库来解析,hcs parser库位置如下:
drivers/hdf_core/framework/utils/src/hcs_parser/
解析流程图如下
二、hcs的内核编译过程
为了分析hcs的解析过程,我对kernel的make过程进行了分析,如下:
2.1 hdf的Makefile
内核为了能够正常引入hcs,在hdf框架的Makefile有如下代码
HCS_DIR := ../../../../../$(PRODUCT_PATH)/hdf_config/khdf
ifeq ($(wildcard $(CURRENT_DIR)/$(HCS_DIR)),)
HCS_DIR := ../../../../../$(PRODUCT_PATH)/hdf_config
endif

ifeq ($(CONFIG_DRIVERS_HDF), y)
ifeq ($(wildcard $(CURRENT_DIR)/$(HCS_DIR)),)
HCS_ABS_DIR := $(abspath $(CURRENT_DIR)/$(HCS_DIR))
$(error miss hcs config in $(HCS_ABS_DIR) for small system\
 or $(HCS_ABS_DIR)/khdf for standrad system)
endif


ifeq ($(CONFIG_DRIVERS_HDF_TEST), y)
obj-$(CONFIG_DRIVERS_HDF_TEST) += test/
obj-$(CONFIG_DRIVERS_HDF_TEST) += $(HCS_DIR)/hdf_test/
$(warning HCS_DIR=$(HCS_DIR))
else
obj-$(CONFIG_DRIVERS_HDF) += $(HCS_DIR)/
$(warning HCS_DIR=$(HCS_DIR))
endif
endif
如上我们可以知道,内核编译hcs取决于两个配置:CONFIG_DRIVERS_HDF和CONFIG_DRIVERS_HDF_TEST
于是我们查看defconfig如下
arch/arm64/configs/rockchip_linux_defconfig
可以知道上面两个配置均打开
所以得出结论是:我们hcs的编译目录为:
obj-$(CONFIG_DRIVERS_HDF_TEST) += $(HCS_DIR)/hdf_test/
这个目录的路径如下:
vendor/hihope/rk3568/hdf_config/khdf/hdf_test/
2.2 hcs的Makefile
根据hdf的Makefile我们可以知道真正起作用的hcs路径,现在开始分析hcs的Makefile核心代码如下:
$(obj)/$(HCS_OBJ): $(CONFIG_GEN_HEX_SRC)
        $(Q)$(CC) $(c_flags) -c -o $@ $<
        $(Q)rm -f $<

$(CONFIG_GEN_HEX_SRC):  $(LOCAL_HCS_ROOT)/%_hcs_hex.c: $(HCS_DIR)/%.hcs | $(HC_GEN)
        $(Q)echo gen hdf built-in config
        $(Q)if [ ! -d $(dir $@) ]; then mkdir -p $(dir $@); fi
        $(Q)$(HC_GEN) $(HCB_FLAGS) -o $(subst _hex.c,,$(@)) $<

$(CONFIG_GEN_SRCS): $(CONFIG_OUT_DIR)%.c: $(HCS_DIR)/%.hcs | $(HC_GEN)
        $(Q)echo gen hdf driver config
        $(Q)if [ ! -d $(dir $@) ]; then mkdir -p $(dir $@); fi
        $(Q)$(HC_GEN) -t -o $@ $<

$(HC_GEN):
        $(HIDE)make -C $(HC_GEN_DIR) BUILD_DIR=$(dir $@)

$(obj)/$(HCS_MACRO_OBJ): $(HCS_MACRO_SRC) $(HCS_DEP)
        $(Q)$(CC) $(c_flags) -c -o $@ $<

$(HCS_DEP): $(HC_GEN)
        $(Q)echo gen hdf built-in config macro
        $(Q)$(HC_GEN) -m -o $(HCS_MACRO_GEN_FILE) $(HCS_FILE)

obj-$(CONFIG_DRIVERS_HDF) += $(HCS_OBJ) \
                             $(HCS_MACRO_OBJ)
我们可以知道,如果CONFIG_DRIVERS_HDF置位,则会编译HCS_OBJ和HCS_MACRO_OBJ
这里的核心代码如下:
$(Q)$(HC_GEN) $(HCB_FLAGS) -o $(subst _hex.c,,$(@)) $<
$(Q)$(CC) $(c_flags) -c -o $@ $<
我把它做一下变量扩展,易于理解如下:
drivers/hdf_core/framework/tools/hc-gen/build/hc-gen -b -i -a -o vendor/hihope/rk3568/hdf_config/khdf/hdf_test/hdf_hcs vendor/hihope/rk3568/hdf_config/khdf/hdf_test/hdf.hcs
cc  -c -o /hdf_hcs_hex.o /root/tf/repo/rk3568/vendor/hihope/rk3568/hdf_config/khdf/hdf_test/hdf_hcs_hex.c
这里我们就可以发现,实际上内核在编译的时候,通过linux的hdf驱动的Makefile内迁到hcs的Makefile上编译hdf.hcs为hdf_hcs_hex.c,然后将hdf_hcs_hex.c编译成hdf_hcs_hex.o,然后合并到Image内使用。
2.3 built-in.a
根据上面的分析,我们完全可以清楚的知道,内核是将其作为o插入的Image内,这时候我们直接找built-in.a即可找到实际的文件路径,如下
../../OBJ/linux-5.10/drivers/hdf/built-in.a
这时候我们找到文件应该如下:
# cat ../../OBJ/linux-5.10/drivers/hdf/built-in.a  | grep hdf_hcs_hex.o
../../../../vendor/hihope/rk3568/hdf_config/khdf/hdf_test/hdf_hcs_hex.o/
此时我们将相对路径转换成绝对路径,所以如下:
out/kernel/vendor/hihope/rk3568/hdf_config/khdf/hdf_test/hdf_hcs_hex.o
此时,我们完全正确的找到了hcs的编译成果
三、hcs的简要解析
上面介绍了hcs,也说明了hcs的最终编译成果,这里简单说明一下hcs在openharmony是如何修改的
我们知道openharmony使用的hcs应该如下:
vendor/hihope/rk3568/hdf_config/khdf/hdf_test/hdf.hcs
内容如下:
#include "../hdf.hcs"
#include "hdf_config_test.hcs"
#include "hdf_test_manager/device_info.hcs"
#include "adc_test_config.hcs"
#include "gpio_test_config.hcs"
#include "i2c_test_config.hcs"
#include "pwm_test_config.hcs"
#include "spi_test_config.hcs"
#include "sdio_test_config.hcs"
#include "emmc_test_config.hcs"
#include "uart_test_config.hcs"
#include "rtc_test_config.hcs"
#include "watchdog_test_config.hcs"

root {
    module = "hisilicon,hi35xx_chip";
}
上面可以知道, 其还是包含了上一层的hdf.hcs("../hdf.hcs")
这时候我们找上层的hdf.hcs如下:
#include "device_info/device_info.hcs"
#include "platform/adc_config_linux.hcs"
#include "platform/pwm_config.hcs"
#include "platform/rk3568_watchdog_config.hcs"
#include "platform/rk3568_uart_config.hcs"
#include "platform/sdio_config.hcs"
#include "platform/emmc_config.hcs"
#include "platform/rk3568_spi_config.hcs"
#include "input/input_config.hcs"
#include "wifi/wlan_platform.hcs"
#include "wifi/wlan_chip_ap6275s.hcs"
#include "camera/camera_config.hcs"
#include "sensor/sensor_config.hcs"
#include "audio/audio_config.hcs"
#include "audio/codec_config.hcs"
#include "audio/dai_config.hcs"
#include "audio/dma_config.hcs"
#include "audio/dsp_config.hcs"
#include "audio/analog_headset_config.hcs"
#include "light/light_config.hcs"
#include "vibrator/vibrator_config.hcs"
#include "vibrator/linear_vibrator_config.hcs"
#include "vibrator/drv2605l_linear_vibrator_config.hcs"
#include "lcd/lcd_config.hcs"

root {
    module = "rockchip,rk3568_chip";
}
此时我们知道设备的信息可以在:#include "device_info/device_info.hcs"
于是我们对设备驱动的修改可以在#include "device_info/device_info.hcs"中,修改即可生效
四、编译措施
回到我们的问题,正常情况下,我们通过单独编译或者全量编译的命令是没办法编译到hcs文件的,这是openharmony的bug。
正常的单独编译命令如下:
KBUILD_OUTPUT=../../OBJ/linux-5.10 PRODUCT_PATH=vendor/hihope/rk3568 DEVICE_COMPANY=rockchip DEVICE_NAME=rk3568 PRODUCT_COMPANY=hihope GPUDRIVER=mali ./make-ohos.sh TB-RK3568X0 enable_ramdisk
此时我们无法编译我们修改的hcs文件,我们需要将中间文件单独删除如下:
rm ../../vendor/hihope/rk3568/hdf_config/khdf/hdf_test/hdf_hcs_hex.o
这样我们就可以在编译内核的时候编译更新hcs的修改了。
五、常用问题排查
5.1 hcs修改了仍不生效
有同事根据上述方法修改了hcs还是无法生效,这里给出排除方法,帮助定位:
5.1.1 手动编译确定hcs编写无误
cd vendor/hihope/rk3568/hdf_config/khdf
make
此时会在本地生成hcb文件,我们通常情况下编写的hcs文件带有字串标识符,所以此时使用grep可以判断是否已经包含,如下
grep -nr "HDF_DRMPANEL"
device_info/device_info.hcs:244: moduleName = "HDF_DRMPANEL";
匹配到二进制文件 hdf_test/hdf_hcs.hcb
匹配到二进制文件 hdf_hcs.hcb
如果进一步还想确认,可以使用上文的hc-gen命令,反编译后查看自己写的节点是否存在
$sdk/drivers/hdf_core/framework/tools/hc-gen/build/hc-gen -d hdf_hcs.hcb -o test.hcs
5.1.2 确定boot_linux.img是否包含字符串
上面5.1.1确定没问题了,基本就不会出问题, 但是为了给个说法,这里也可以通过grep确定boot_linux.img是否包含,如下
grep -nr "HDF_DRMPANEL" $sdk/out/rk3568/packages/phone/images/boot_linux.img
grep: 警告: GREP_OPTIONS 已被废弃;请使用别名或脚本
匹配到二进制文件 /$sdk/out/rk3568/packages/phone/images/boot_linux.img
5.1.3 我不想确认,但是我就觉得没编进去怎么办
如果不想确认,建议在编译内核的过程中打印日志,如果有日志,代表编译是进去的,如果没有,没编译进去。方便懒人。如下:
还是hcs的编译目录:
vendor/hihope/rk3568/hdf_config/khdf/hdf_test
打开Makefile,添加如下
diff --git a/rk3568/hdf_config/khdf/hdf_test/Makefile b/rk3568/hdf_config/khdf/hdf_test/Makefile
index 7b53c08..6781b0a 100755
--- a/rk3568/hdf_config/khdf/hdf_test/Makefile
+++ b/rk3568/hdf_config/khdf/hdf_test/Makefile
@@ -68,11 +68,12 @@ HCS_MACRO_GEN_FILE := $(HDF_FRAMWORK_TEST_OUT)/hdf_macro_test
 HCS_FILE := $(HCS_DIR)/hdf.hcs

 $(obj)/$(HCS_OBJ): $(CONFIG_GEN_HEX_SRC)
+       $(Q)echo 你看编没编进去: [$(CC) $(c_flags) -c -o $@ $<] make o
        $(Q)$(CC) $(c_flags) -c -o $@ $<
        $(Q)rm -f $<
此时你编译内核的时候就会打印。打印了就编译进去了,没打印就编译没进去,那你检查hcs是不是写错了。