目录
RK最近实现了从上层处理的硬件光标层,仓库地址为 https://github.com/JeffyCN/drm-cursor 。以往的如RK3399的硬件光标都是走的libdrm的通用接口,但在新的平台例如RK3568和RK3588上,内核貌似没有单独设置鼠标层。
如果需要在平台上使用硬件光标,可以使用这个库实现。
这里实现的drm curosr 鼠标指针,是通过hook的方式,把drm设置鼠标的相关函数通过EGL的接口实现,避免通过libdrm走到内核上面去。
关于什么是光标,这里给出了解释:
Cursors

Similar to planes, many hardware also supports cursors. A cursor is a very small buffer with an image that is blended over the CRTC framebuffer. You can set a different cursor for each CRTC with drmModeSetCursor(3) and move it on the screen with drmModeMoveCursor(3). This allows to move the cursor on the screen without rerendering. If no hardware cursors are supported, you need to rerender for each frame the cursor is moved.
一:标准光标函数实现
1.1 libdrm函数实现
drmModeSetCursor
xf86drmMode.c +412

drm_public int drmModeSetCursor(int fd, uint32_t crtcId, uint32_t bo_handle,
uint32_t width, uint32_t height)
{
struct drm_mode_cursor arg;

memclear(arg);
arg.flags = DRM_MODE_CURSOR_BO;
arg.crtc_id = crtcId;
arg.width = width;
arg.height = height;
arg.handle = bo_handle;

return DRM_IOCTL(fd, DRM_IOCTL_MODE_CURSOR, &arg);
}
DRM_IOCTL_DEF(DRM_IOCTL_MODE_CURSOR, drm_mode_cursor_ioctl, DRM_MASTER),
drmModeMoveCursor
drm_public int drmModeMoveCursor(int fd, uint32_t crtcId, int x, int y)
{
 struct drm_mode_cursor arg;
memclear(arg);
 arg.flags = DRM_MODE_CURSOR_MOVE;
 arg.crtc_id = crtcId;
 arg.x = x;
 arg.y = y;
return DRM_IOCTL(fd, DRM_IOCTL_MODE_CURSOR, &arg);
}
DRM_IOCTL_DEF(DRM_IOCTL_MODE_CURSOR, drm_mode_cursor_ioctl, DRM_MASTER),
drmModeSetCursor2
drm_public int drmModeSetCursor2(int fd, uint32_t crtcId, uint32_t bo_handle,
 uint32_t width, uint32_t height, int32_t hot_x,
 int32_t hot_y)
{
 struct drm_mode_cursor2 arg;
 memclear(arg);
 arg.flags = DRM_MODE_CURSOR_BO;
 arg.crtc_id = crtcId;
 arg.width = width;
 arg.height = height;
 arg.handle = bo_handle;
 arg.hot_x = hot_x;
 arg.hot_y = hot_y;
return DRM_IOCTL(fd, DRM_IOCTL_MODE_CURSOR2, &arg);
}
DRM_IOCTL_DEF(DRM_IOCTL_MODE_CURSOR2, drm_mode_cursor2_ioctl, DRM_MASTER|DRM_UNLOCKED)
1.2 Xorg函数实现
对应Xorg中实现光标的地方如下
hw/xfree86/drivers/modesetting/drmmode_display.c
drmmode_set_cursor_position
static void
drmmode_set_cursor_position(xf86CrtcPtr crtc, int x, int y)
{
 drmmode_crtc_private_ptr drmmode_crtc = crtc->driver_private;
 drmmode_ptr drmmode = drmmode_crtc->drmmode;
drmModeMoveCursor(drmmode->fd, drmmode_crtc->mode_crtc->crtc_id, x, y);
}
drmmode_show_cursor
static Bool
drmmode_show_cursor(xf86CrtcPtr crtc)
{
 drmmode_crtc_private_ptr drmmode_crtc = crtc->driver_private;
 drmmode_crtc->cursor_up = TRUE;
 return drmmode_set_cursor(crtc);
}
1.3 是否使用硬件光标
ret = drmModeSetCursor2(drmmode->fd, drmmode_crtc->mode_crtc->crtc_id,
 handle, ms->cursor_width, ms->cursor_height,
 cursor->bits->xhot, cursor->bits->yhot);
/* -EINVAL can mean that an old kernel supports drmModeSetCursor but
 * not drmModeSetCursor2, though it can mean other things too. */
 if (ret == -EINVAL)
 ret = drmModeSetCursor(drmmode->fd, drmmode_crtc->mode_crtc->crtc_id,
 handle, ms->cursor_width, ms->cursor_height);
/* -ENXIO normally means that the current drm driver supports neither
 * cursor_set nor cursor_set2. Disable hardware cursor support for
 * the rest of the session in that case. */
 if (ret == -ENXIO) {
 xf86CrtcConfigPtr xf86_config = XF86_CRTC_CONFIG_PTR(crtc->scrn);
 xf86CursorInfoPtr cursor_info = xf86_config->cursor_info;
 cursor_info->MaxWidth = cursor_info->MaxHeight = 0;
 drmmode_crtc->drmmode->sw_cursor = TRUE;
 }
如果内核的IOCTL为 -ENXIO 则Xorg实现软光标
drmmode_crtc->drmmode->sw_cursor = TRUE;
二:RK的光标的钩子实现
2.1 函数实现
int drmModeSetCursor(int fd, uint32_t crtcId, uint32_t bo_handle,
 uint32_t width, uint32_t height)
{
 /* Init log file */
 drm_get_ctx(fd);
 return drm_set_cursor(fd, crtcId, bo_handle, width, height);
}
int drmModeMoveCursor(int fd, uint32_t crtcId, int x, int y)
{
 return drm_move_cursor(fd, crtcId, x, y);
}
int drmModeSetCursor2(int fd, uint32_t crtcId, uint32_t bo_handle,
 uint32_t width, uint32_t height,
 int32_t hot_x, int32_t hot_y)
{
 return -EINVAL;
}
2.2 钩子的处理
这个仓库最终生成了 libdrm-cursor.so.1.0.0 的库文件,但是光标的实现函数在libdrm的so里面。这里RK使用了ld的preload的配置
方式是在debian/libdrm-cursor.postinst 内添加 echo /usr/lib/*/libdrm-cursor.so.1 >> /etc/ld.so.preload
Xorg的链接情况如下,说明钩子已生效
kylin@kylin:~$ ldd /usr/lib/xorg/Xorg | grep drm
 /usr/lib/aarch64-linux-gnu/libdrm-cursor.so.1 (0x0000007fb9a31000)
 libdrm.so.2 => /lib/aarch64-linux-gnu/libdrm.so.2 (0x0000007fb97d1000)
2.3 drm-cursor运行日志
 drm_get_ctx(485) atomic drm API enabled
 drm_get_ctx(518) max fps: 60
 drm_get_ctx(559) found 0 CRTC: 64(0) (1920x1200) prefer plane: 0
 drm_get_ctx(559) found 1 CRTC: 83(1) (0x0) prefer plane: 0
 drm_get_ctx(567) found 2 CRTCs
 drm_get_ctx(616) found plane: 58[primary] crtcs: 0x1 (ARGB)
 drm_get_ctx(616) found plane: 61[cursor ] crtcs: 0x1 (ARGB)
 drm_get_ctx(616) found plane: 65[overlay] crtcs: 0x1 (ARGB)
 drm_get_ctx(616) found plane: 68[overlay] crtcs: 0x1 (ARGB)
 drm_get_ctx(616) found plane: 80[primary] crtcs: 0x2 (ARGB)
 drm_get_ctx(616) found plane: 84[overlay] crtcs: 0x2 (ARGB)
 drm_get_ctx(625) using libdrm-cursor (1.3.0~20211201)
 drmModeSetCursor(1185) fd: 11 crtc: 64 handle: 0 size: 0x0
 drm_crtc_bind_plane(692) CRTC[64]: using cursor plane
 drm_crtc_bind_plane(700) CRTC[64]: bind plane: 61
 drm_set_cursor(1097) CRTC[64]: request setting new cursor 0 (0x0)
 drm_crtc_thread_fn(866) CRTC[64]: thread started
 drm_crtc_thread_fn(924) CRTC[64]: set new cursor 0 (0x0)
 drmModeMoveCursor(1192) fd: 11 crtc: 64 position: 956,596
 drm_move_cursor(1154) CRTC[64]: request moving cursor to (956,596) in (1920x1200)
可以看出的信息为,1.解析配置文件,2.找到drm支持的crtc,3.找到对应的plane,4.将配置指定的plane配置为光标使用的plane
2.4 内核运行日志
查看内核drm光标这块的日志,需要打开drm相关的配置宏
drm的sys节点为: /sys/module/drm/parameters/debug
对应的可选值如下:
Bit 0 (0x01) will enable CORE messages (drm core code)
Bit 1 (0x02) will enable DRIVER messages (drm controller code)
Bit 2 (0x04) will enable KMS messages (modesetting code)
Bit 3 (0x08) will enable PRIME messages (prime code)
Bit 4 (0x10) will enable ATOMIC messages (atomic code)
Bit 5 (0x20) will enable VBL messages (vblank code) (int)
因为光标通过atomic的api实现的,通过借助本身调试atomic的debug,可以提供一点有用的信息。
echo 0x10 > /sys/module/drm/parameters/debug 打开drm ATOMIC 调试信息
日志如下:
[drm:drm_atomic_state_init] Allocated atomic state 000000009ea89924
[drm:drm_atomic_get_plane_state] Added [PLANE:71:Cluster0-win0] 000000001d2516b5 state to 000000009ea89924
[drm:drm_atomic_get_crtc_state] Added [CRTC:85:video_port0] 000000002526233c state to 000000009ea89924
[drm:drm_atomic_set_fb_for_plane] Set [FB:202] for [PLANE:71:Cluster0-win0] state 000000001d2516b5
[drm:drm_atomic_check_only] checking 000000009ea89924
[drm:drm_atomic_commit] committing 000000009ea89924
[drm:drm_atomic_state_default_clear] Clearing atomic state 000000009ea89924
[drm:__drm_atomic_state_free] Freeing atomic state 000000009ea89924
可以发现,默认使用plane 71,crtc 85,fb202
查看sys下的信息,是否正常对应
1.cat /sys/kernel/debug/dri/0/framebuffer | grep drm-cursor -B 1
framebuffer[202]:
 allocated by = drm-cursor[85]
2.cat /sys/kernel/debug/dri/0/state | grep drm-cursor -B 3
plane[71]: Cluster0-win0
 crtc=video_port0
 fb=208
 allocated by = drm-cursor[85]
3.cat /sys/kernel/debug/dri/0/summary
Cluster0-win0: ACTIVE
 win_id: 4
 format: AB24 little-endian (0x34324241)[AFBC] SDR[0] color_space[0] glb_alpha[0xff]
 rotate: xmirror: 0 ymirror: 0 rotate_90: 0 rotate_270: 0
 csc: y2r[0] r2y[1] csc mode[1]
 zpos: 7
 src: pos[0, 0] rect[64 x 64]
 dst: pos[0, 0] rect[64 x 64]
 buf[0]: addr: 0x0000000001825000 pitch: 256 offset: 0
由此,可以确定,硬件光标正常启动,大小为64x64
三:测试和调试
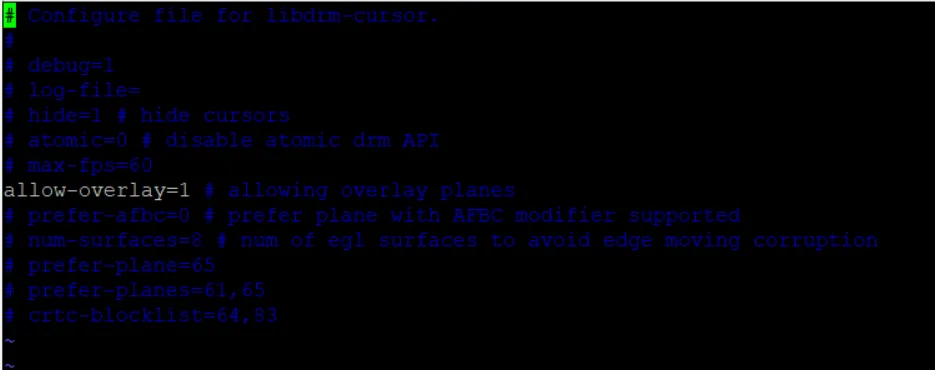
3.1 配置文件 /etc/drm-cursor.conf
# debug=1
# log-file=
# hide=1 # hide cursors
# atomic=0 # disable atomic drm API
# max-fps=60
# allow-overlay=1 # allowing overlay planes
# prefer-afbc=0 # prefer plane with AFBC modifier supported
# num-surfaces=8 # num of egl surfaces to avoid edge moving corruption
# prefer-plane=65
# prefer-planes=61,65
# crtc-blocklist=64,83
debug=1  默认会将log输出在  /var/log/drm-cursor.log

log-file=/tmp/drm-cursor.log  手动指定log文件

hide=1  是否隐藏鼠标

atomic=1 这一项没什么用,drm cursor默认使用atomic 的api

max-fps=60  光标指针的显示帧数。

allow-overlay=1 允许使用overlay层。如果不设置,则默认不使用overlay,也就是只使用cursor层

prefer-afbc=0  是否使用arm的 afbc功能的overlay层

num-surfaces=8 eglCreateWindowSurface 创建的离屏缓冲区的数量

prefer-plane=65  默认设置的plane
prefer-planes=61,65 可选的多个plane
crtc-blocklist=83  阻止在哪些crtc上允许光标层
3.2 如何选择plane和crtc
安装libdrm-tests
modeprint rockchip

Crtc
 id : 64
 x : 0
 y : 0
 width : 1920
 height : 1200
 mode : 0x55ad634f8c
 gamma size : 1024
可以看到当前显示挂的crtc在64上
modetest -M rockchip -p  查看plane

61 64 117 0,0 0,0 0 0x00000001
 formats: XR24 AR24 XB24 AB24 RG24 BG24 RG16 BG16
 props:
 7 type:
 flags: immutable enum
 enums: Overlay=0 Primary=1 Cursor=2
 value: 2
 8 SHARE_ID:
 flags: immutable range
 values: 0 4294967295
 value: 61
 63 rotation:
 flags: bitmask
 values: rotate-0=0x1 reflect-y=0x20
 value: 1
 56 FEATURE:
 flags: immutable bitmask
 values: scale=0x1 alpha=0x2 hdr2sdr=0x4 sdr2hdr=0x8 afbdc=0x10 pdaf_pos=0x20
 value: 18
可以看到plane 61 是挂载crtc64上的cursor层
测试硬件光标验证:
systemctl stop lightdm

modetest -M rockchip -s 91@64:1920x1200 -C
如果出现颜色图,则说明libdrm能够正常使用硬件光标
指定plane
modetest -M rockchip -P 61@64:1920x1200
如果出现颜色图,则说明libdrm能够正常指定plane
四:具体应用
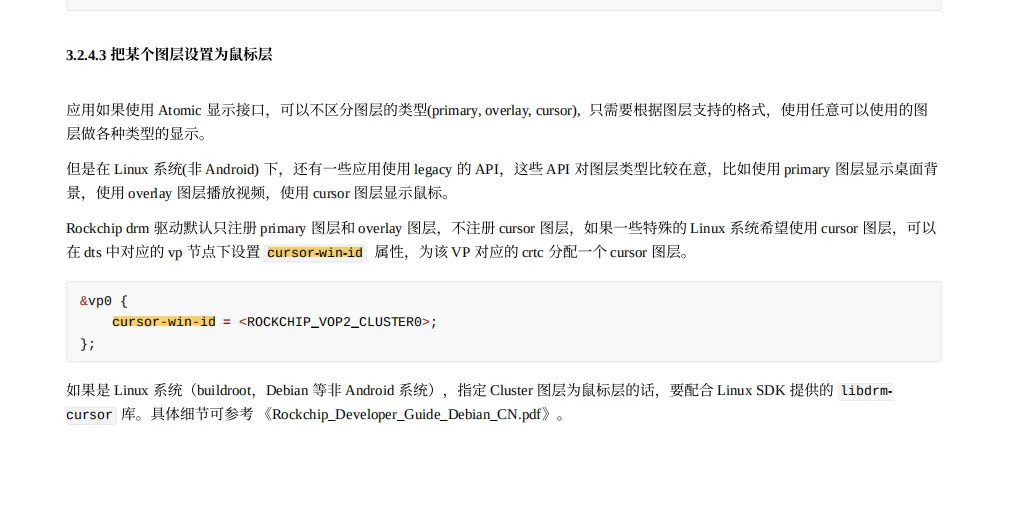
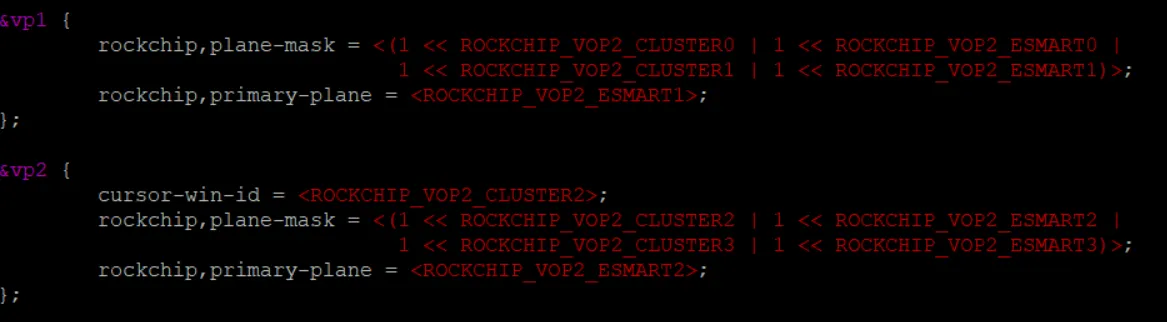
首先需要在内核打开硬件光标层,找到你需要配置硬光标的vp,添加 cursor-win-id,例如我的显示是在vp2上面
然后需要安装libdrm-cursor软件和libdrm-tests软件
首先使用libdrm-tests软件查看实际使用中的crtc层
命令:modetest
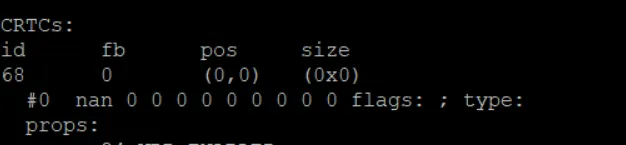
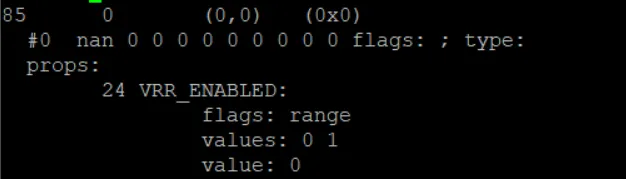
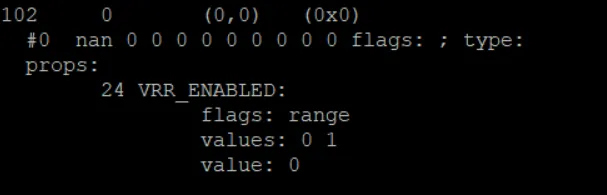
 这里可以看到68、85、102是未使用的crtc,实际连接到fb正在使用的crtc是133
所以我们需要在软件中配置屏蔽掉前面三个crtc层,让鼠标层能够正确匹配到133上面
命令:vim /etc/drm-cursor.conf
修改前
 修改后
修改后
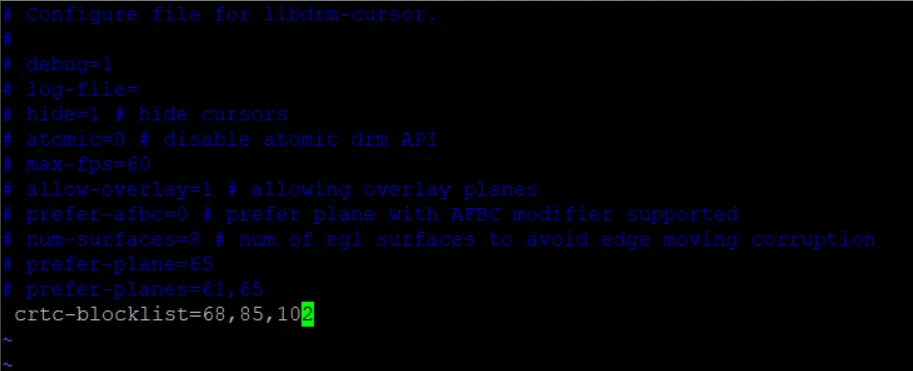
这里我们把硬光标层打开了,所以就不需要overlay层,把它注释掉,然后打开crtc-blocklist选项,把其他不用的ctrc层屏蔽掉,重启机器就能正常使用硬件光标了。crtc层具体的id需要根据实际情况使用modetest命令确定。
五:参考链接
《Linux DRM Developer's Guide》https://landley.net/kdocs/htmldocs/drm.html
《Linux Kernel Doc》 https://www.kernel.org/doc/
《DRM-wikipedia》 https://en.wikipedia.org/wiki/Direct_Rendering_Manager 《Linux GPU Driver Developer's Guide》https://01.org/linuxgraphics/gfx-docs/drm/gpu/index.html
《DRM-KMS Doc》 https://kernel.readthedocs.io/en/latest/gpu/drm-kms.html#mode-setting 《KMS简介》 https://events.static.linuxfound.org/sites/events/files/slides/brezillon-drm-kms.pdf
《EGL Reference Pages》https://www.khronos.org/registry/EGL/sdk/docs/man/
《Linux User and Programmer's Manual》https://www.systutorials.com/docs/linux/man/3-drmModeGetResources/
《Nvidia drm api参考》https://docs.nvidia.com/jetson/l4t-graphics/group__direct__rendering__manager.html
《Linux How to的KMS简介》https://www.linuxhowtos.org/manpages/7/drm-kms.htm
《freedesktop.org的kms文档》https://dri.freedesktop.org/docs/drm/gpu/drm-kms.html