我们之前介绍了优先级调度算法和简单优先级调度算法,这两种调度算法都是基于优先级的值来调度的,也就是每个任务在创建的时候,会分配一个优先级,那么较高优先级始终比较低优先级优先调度。今天我们介绍rtems中另一种调度算法,EDF,最早截止事件调度算法
介绍EDF调度算法
对于最早截止时间调度算法而言,默认情况下会给任务分配一个截止事件,调度器根据每个任务的截止时间来确定优先级,它需要预设一个周期,当任务的实际运行时间越靠近周期设置时间,那么任务的优先级越高。这里优先级的动态调整通过的是timer来实现。
下面通过图示来介绍一下EDF调度算法的工作规则
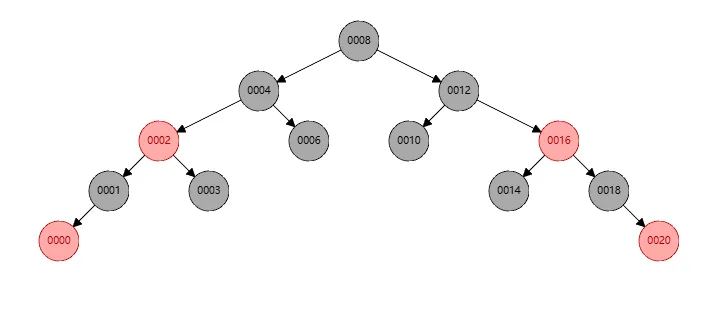
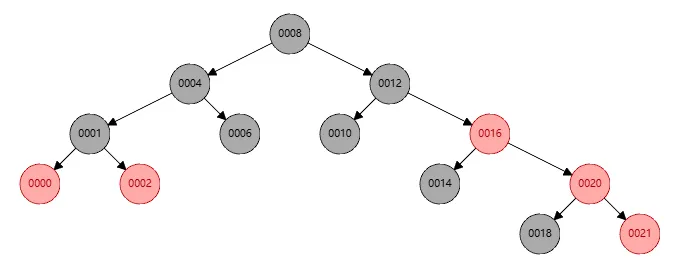
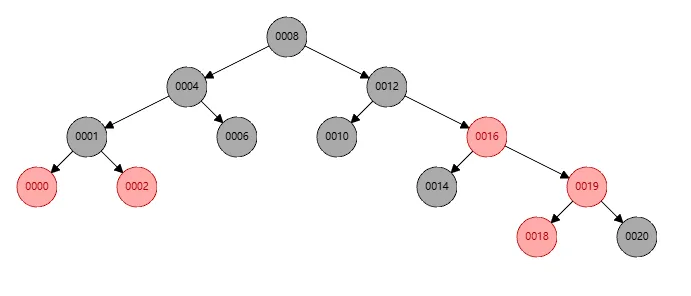
现在加上,有任务A,B,C共三个任务,其中:
- A任务运行时间为2s,A任务的截止时间(周期)是8s
- B任务运行时间为3s,B任务的截止时间(周期)是6s
- C任务运行时间为1s,C任务的截止时间(周期)是4S
根据上面的信息,实际EDF的执行流程会如下表现
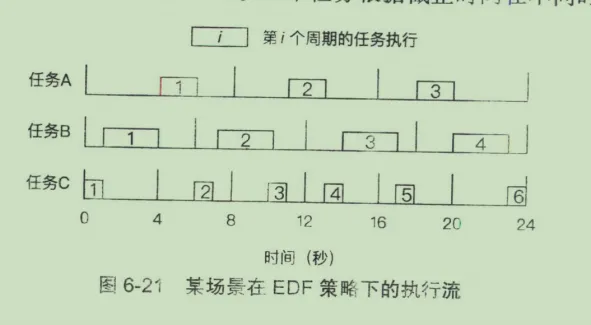
光看图片可能不好理解,如下解释一下就清楚了:
- 根据EDF调度的定义,从0时刻开始调度,那么C的优先级最高,因为C的截止时间最短
- 到第1s的时候,C任务完成执行,但是还没有到周期,此时B任务截止时间是5,A任务截止时间是7,此时B优先级高
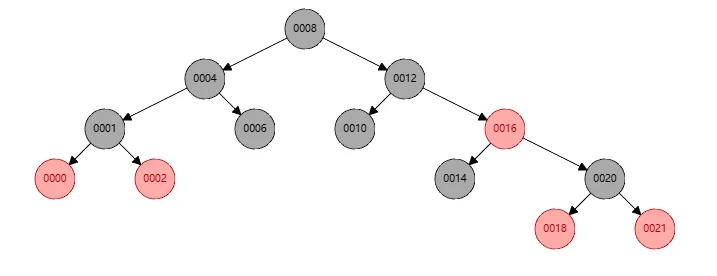
- 到第4s的时候,B任务完成调度,此时C任务也到达周期,C任务的截止时间是4,A任务的截止时间是4,但是A先如的队列,默认执行A
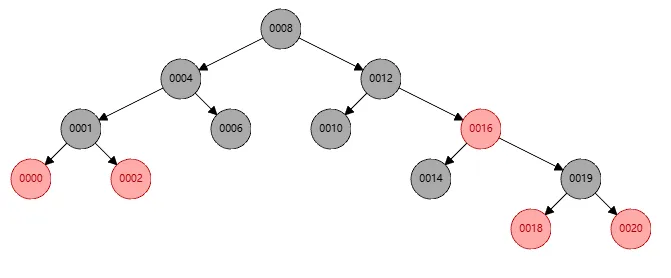
- 到第6s的时候,A任务完成执行,此时B任务到达周期,B任务截止时间是6,C任务优先级最高,默认执行C
- 到第7s的时候,C任务完成,开始执行B任务
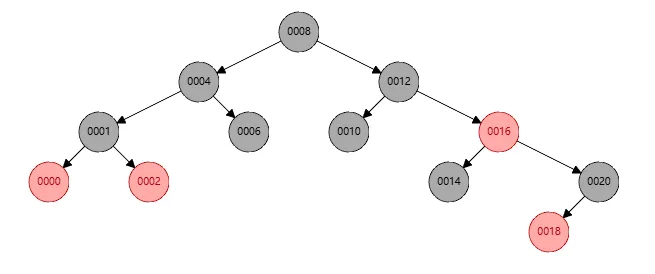
- 到第10s的时候,B任务完成,并且没到截止时间,此时A任务的截止时间是8s,C任务优先执行
- 第11s的时候,A任务得以执行,因为B和C都未到截止时间
- 以此类推。
根据上面的详细解释,我们知道了edf调度算法的执行逻辑,下面查看实现
预设周期
根据上面分析的,如果我们需要使用edf调度算法将任务运行,那么任务必须要有一个周期值设置,在rtems中,设置周期的方式如下
status = rtems_rate_monotonic_create( argument, &rmid );
status = rtems_rate_monotonic_period( rmid, Periods[ argument ] );
status = rtems_rate_monotonic_delete( rmid );
上面的意思非常容易理解,就是为edf调度器设置一个周期,其实现通过timer。
那其实际对timer的操作如下
_Watchdog_Initialize( &the_period->Timer, _Rate_monotonic_Timeout );
deadline = _Watchdog_Per_CPU_insert_ticks(
    &the_period->Timer,
    cpu_self,
    next_length
);
值得注意的是,这里会提前设置周期的长度为 Periods的值,如下
the_period->next_length = length;
所以当timeout的时候,会再次重启timer。
_Rate_monotonic_Restart( the_period, owner, &lock_context );
或
_Rate_monotonic_Renew_deadline( the_period, &lock_context );
根据截止时间设置优先级
根据上面的介绍,我们知道了edf调度算法会通过截止时间来动态调整优先级,也知道了默认情况下我们会预先设置一个周期值,这个周期值就是rtems_rate_monotonic_period的第二个参数,接下来,我们需要明确edf算法如何根据截止时间来动态调整优先级
首先,我们关注_Rate_monotonic_Release_job函数,其实现如下
static void _Rate_monotonic_Release_job(
  Rate_monotonic_Control *the_period,
  Thread_Control         *owner,
  rtems_interval          next_length,
  ISR_lock_Context       *lock_context
)
{
  Per_CPU_Control      *cpu_self;
  Thread_queue_Context  queue_context;
  uint64_t              deadline;

  cpu_self = _Thread_Dispatch_disable_critical( lock_context );

  deadline = _Watchdog_Per_CPU_insert_ticks(
    &the_period->Timer,
    cpu_self,
    next_length
  );
  _Scheduler_Release_job(
    owner,
    &the_period->Priority,
    deadline,
    &queue_context
  );

  _Rate_monotonic_Release( the_period, lock_context );
  _Thread_Priority_update( &queue_context );
  _Thread_Dispatch_enable( cpu_self );
}
上述函数的步骤如下
- 为周期值开启一个定时器watchdog,返回定时器的时间period
- 根据定时器时间来确定deadline
- 根据deadline来调整scheduler edf的优先级Priority
- 在edf调度器中更新优先级的值
- 打开线程dispatch
我将关键点函数提取出来如下
rtems_rate_monotonic_period( rmid, Periods[ argument ] );
_Watchdog_Insert(header, the_watchdog, expire);
deadline = _Watchdog_Per_CPU_insert_ticks(*)
_Priority_Node_set_priority(*)
_Thread_Priority_update( &queue_context );
_Thread_Dispatch_enable( cpu_self );
根据上面的代码流程,我们知道了,在edf调度算法中,一个周期Period内,优先级是根据watchdog的expire来动态调整,expire的值会换算成调度器的priority值,edf调度算法根据此值来动态调整任务的优先级
红黑树管理优先级
对于调度器的优先级管理,edf中使用的是红黑树,其主要函数如下
    _Scheduler_EDF_Schedule,         /* schedule entry point */ \
    _Scheduler_EDF_Yield,            /* yield entry point */ \
    _Scheduler_EDF_Block,            /* block entry point */ \
    _Scheduler_EDF_Unblock,          /* unblock entry point */ \
    _Scheduler_EDF_Update_priority,  /* update priority entry point */ \
下面我们逐个介绍调度器管理优先级的方式
执行调度
_Scheduler_EDF_Schedule的作用是将当前任务调度一次,此时需要获得优先级最高的任务,对于edf而言,默认expire值最小说明优先级越高,所以在红黑树中是获得最小的节点,在红黑树获得最小节点的方式是遍历根节点,找其左孩子
那么执行调度过程中,获得最高优先级任务的方式如下
RBTree_Node *_RBTree_Minimum( const RBTree_Control *tree )
{
  RBTree_Node *parent;
  RBTree_Node *node;

  parent = NULL;
  node = _RBTree_Root( tree );

  while ( node != NULL ) {
    parent = node;
    node = _RBTree_Left( node );
  }

  return parent;
}
当找到优先级最高的任务之后,直接设置其标志位为true即可
_Scheduler_uniprocessor_Schedule
_Thread_Dispatch_necessary = true;
让出任务
对于让出任务而言,我们需要做的是
- 将任务从红黑树中删除
- 根据新的优先级,将任务插入到红黑树中
- 执行调度
关于1,其实就是红黑树的删除操作,其代码如下
RTEMS_RB_REMOVE( RBTree_Control, the_rbtree, the_node );
关于红黑树的删除,可以查看文章<rb-tree实现-删除操作-原理>
关于2,其实就是红黑树的插入操作,其代码如下
static inline bool _RBTree_Insert_inline(
  RBTree_Control *the_rbtree,
  RBTree_Node    *the_node,
  const void     *key,
  bool         ( *less )( const void *, const RBTree_Node * )
)
{
  RBTree_Node **link;
  RBTree_Node  *parent;
  bool          is_new_minimum;

  link = _RBTree_Root_reference( the_rbtree );
  parent = NULL;
  is_new_minimum = true;

  while ( *link != NULL ) {
    parent = *link;

    if ( ( *less )( key, parent ) ) {
      link = _RBTree_Left_reference( parent );
    } else {
      link = _RBTree_Right_reference( parent );
      is_new_minimum = false;
    }
  }

  _RBTree_Add_child( the_node, parent, link );
  _RBTree_Insert_color( the_rbtree, the_node );
  return is_new_minimum;
}
根据上面的代码,我们可以知道,在插入之前,我们需要遍历根节点,找到小于等于某个节点的位置,然后如果待插入节点插入到其节点的左边。然后执行红黑树的插入操作_RBTree_Insert_color
关于红黑树的插入,可以查看文章<rb-tree实现-插入操作-原理>
阻塞任务
对于阻塞当前任务,我们需要做的是
- 将任务从红黑树中删除
- 执行调度
代码如下
static inline void _Scheduler_uniprocessor_Block(
  const Scheduler_Control *scheduler,
  Thread_Control          *the_thread,
  Scheduler_Node          *node,
  void                  ( *extract )(
                             const Scheduler_Control *,
                             Thread_Control *,
                             Scheduler_Node *
                        ),
  Thread_Control       *( *get_highest_ready )( const Scheduler_Control * )
)
{
  ( *extract )( scheduler, the_thread, node );

  /* TODO: flash critical section? */

  if ( _Thread_Is_heir( the_thread ) ) {
    Thread_Control *highest_ready;

    highest_ready = ( *get_highest_ready )( scheduler );
    _Scheduler_uniprocessor_Update_heir( _Thread_Heir, highest_ready );
  }
}
恢复任务
对于当前任务恢复调度,就是将其加入就绪队列中,也就是红黑树的插入操作,其代码如下
void _Scheduler_EDF_Unblock(
  const Scheduler_Control *scheduler,
  Thread_Control          *the_thread,
  Scheduler_Node          *node
)
{
  Scheduler_EDF_Context *context;
  Scheduler_EDF_Node    *the_node;
  Priority_Control       priority;
  Priority_Control       insert_priority;

  context = _Scheduler_EDF_Get_context( scheduler );
  the_node = _Scheduler_EDF_Node_downcast( node );
  priority = _Scheduler_Node_get_priority( &the_node->Base );
  priority = SCHEDULER_PRIORITY_PURIFY( priority );
  insert_priority = SCHEDULER_PRIORITY_APPEND( priority );

  the_node->priority = priority;
  _Scheduler_EDF_Enqueue( context, the_node, insert_priority );
  _Scheduler_uniprocessor_Unblock( scheduler, the_thread, priority );
}
这里就绪队列的入队_Scheduler_EDF_Enqueue就是红黑树的插入操作
总结
至此,我们讲解了edf调度的原理,接下来通过实验来演示edf调度
本文根据<rb-tree实现-删除操作-原理>文章的原理描述,逐一演示删除操作
必要条件
- 默认情况下,图示只按照前驱方式来寻找删除节点。
- 默认情况下,图示先进行左旋/右旋然后再进行染色/颜色互换
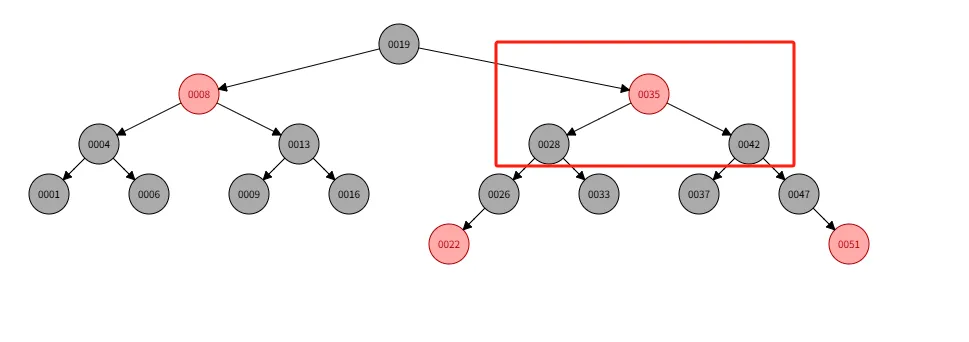
删除红色根节点
红色根节点不影响平衡,无需调整,故直接删除,如下图
删除黑色根节点
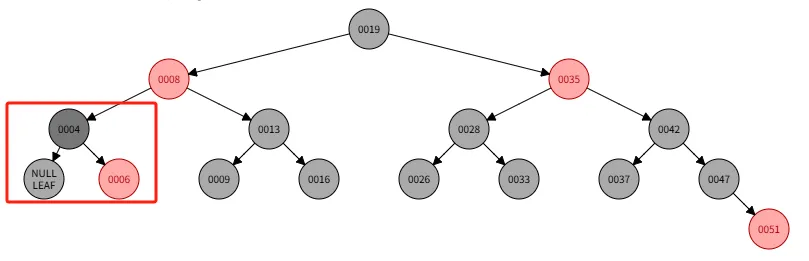
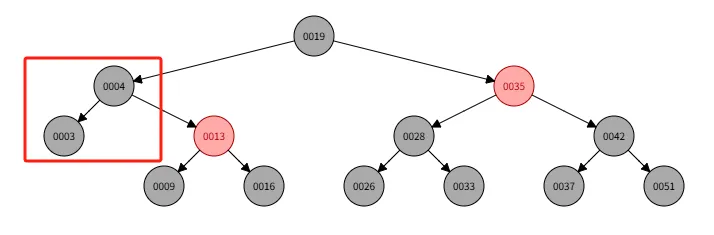
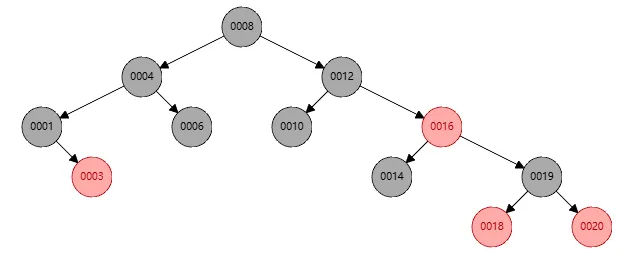
假设当前红黑树如下,我们准备删除节点1
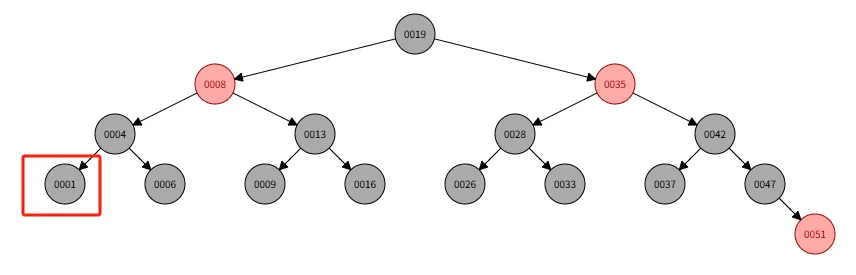
此时节点1有两个空黑节点,则直接进行第二阶段修复
在修复时,其情况为,兄弟节点6是黑色,且节点6包含两个空黑节点,如下图所示
于是步骤为如下:
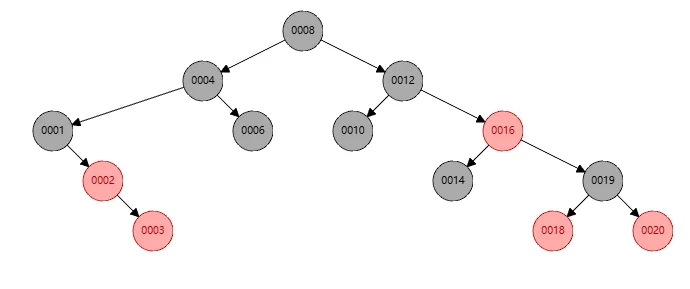
- 将兄弟节点6染红
- 将父节点4染黑
- 将关注节点设置为节点4
- 向上递归
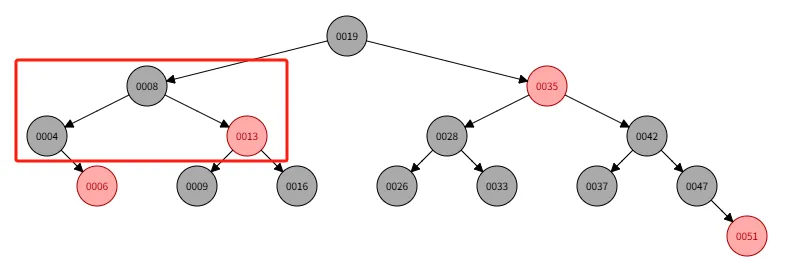
如下图示
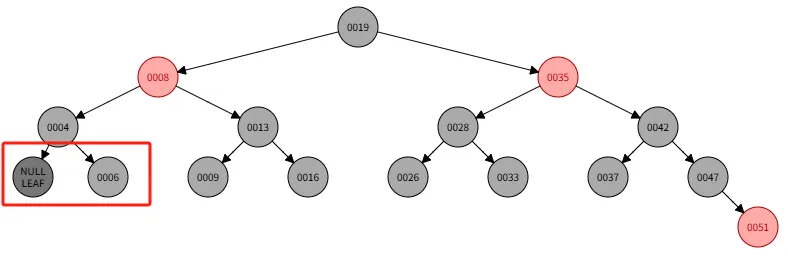
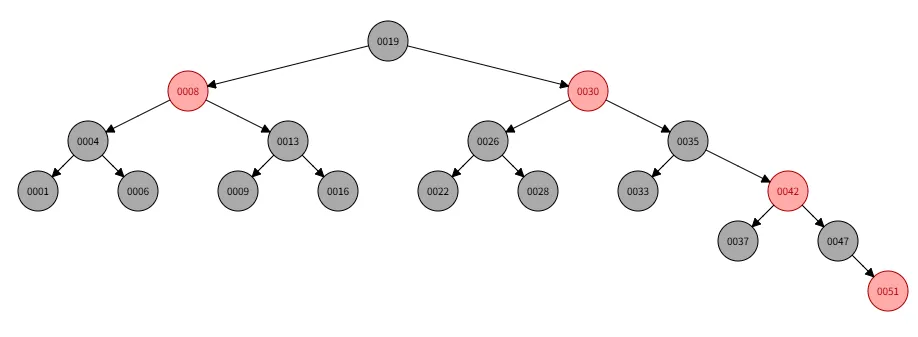
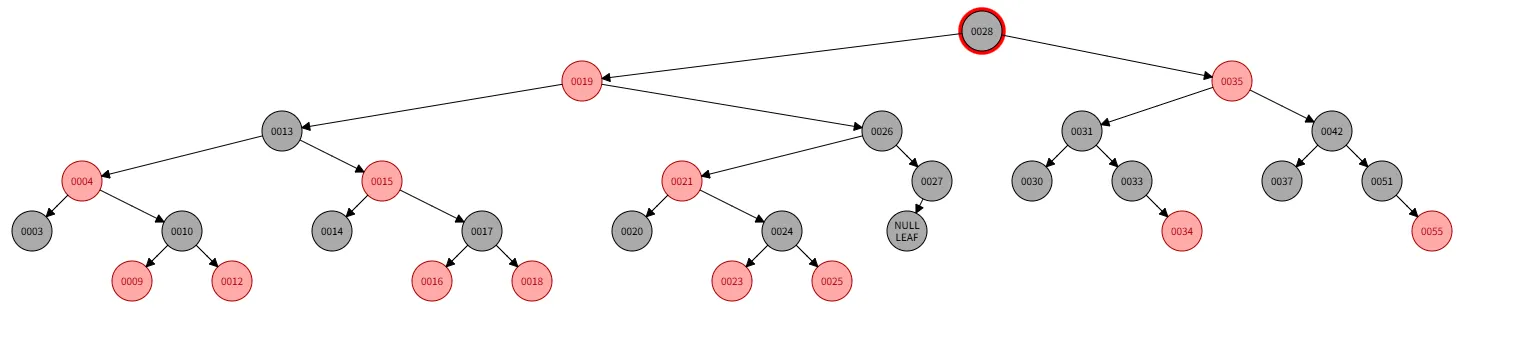
此时对于节点4,其兄弟节点13是黑色,兄弟节点包含两个黑节点9和16,则步骤如下:
- 将兄弟节点13染红
- 将父节点8染黑
- 将关注节点设置为节点8
- 由于节点8是根节点,则调整完成
如下图示
删除只有一个节点的节点
假设当前红黑树如下,我们准备删除节点4
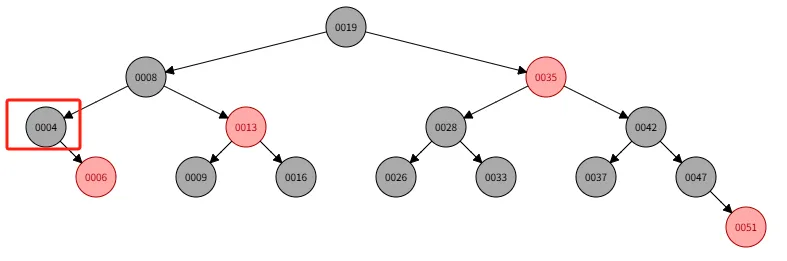
那么步骤如下
- 节点6替换节点4
- 将节点6染色为黑色
比较简单,就不截图了。
删除节点的前驱节点是删除节点的左孩子
要让删除节点的左孩子是删除节点的前驱节点,那么待删除节点的左孩子没有右孩子。 假设当前红黑树如下,我们准备删除节点8,因为节点8的左孩子节点4没有右孩子,所以节点4就是前驱节点
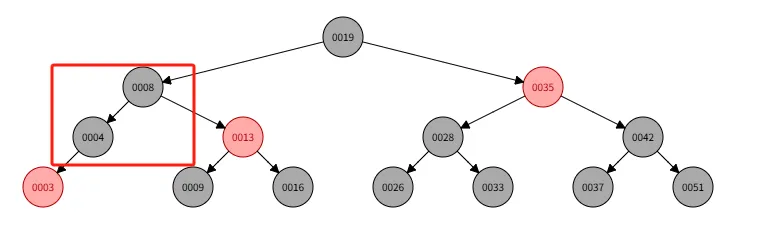
那么步骤如下:
- 将节点4替换到节点8上
- 将节点4的颜色设置为黑色
- 将节点4的左节点3设置为黑色
如下图
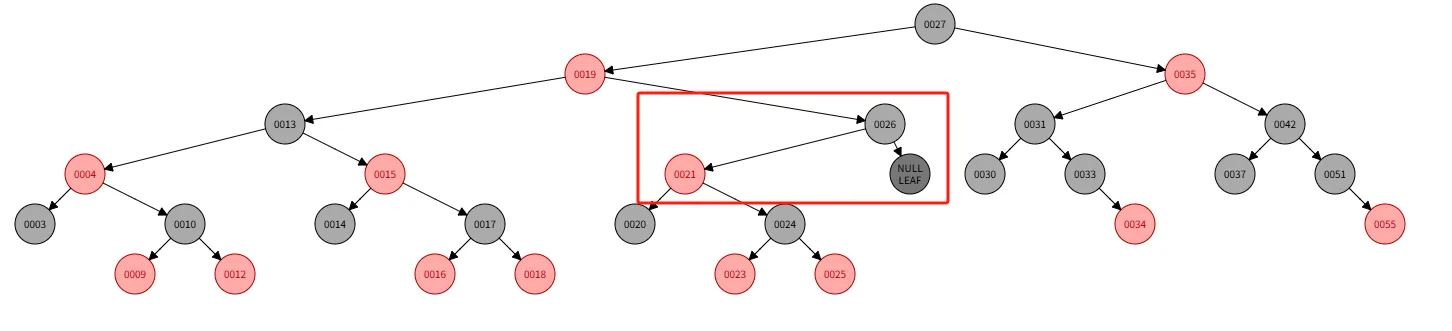
删除节点的前驱节点不是删除节点的左孩子
如果前驱节点不是删除节点的左孩子,那么前驱节点和被删除节点没有强相关性,我们在替换删除节点后,需要进行第二步根据实际情况修复步骤
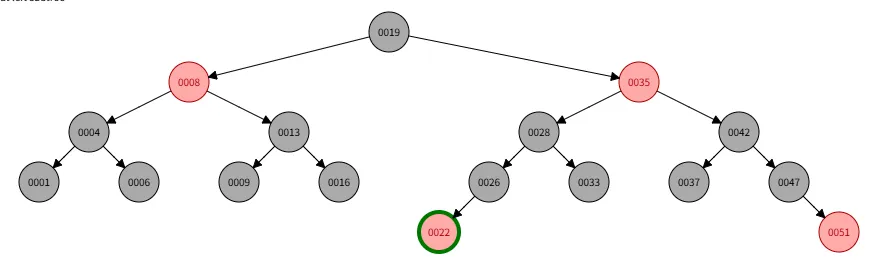
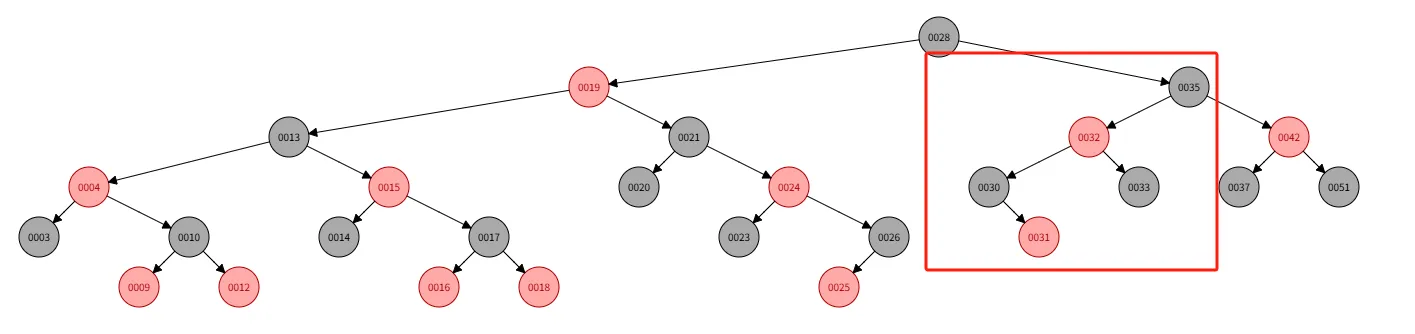
假设当前红黑树如下
此时我们删除节点30,按照前驱方式,默认节点28作为替代节点,如下
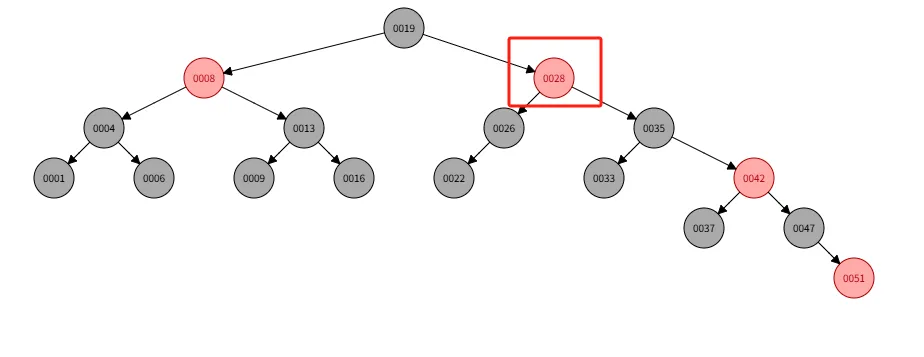
此时替代节点是节点26的右孩子,其兄弟节点22是黑色,且其兄弟节点22有两个黑色节点,我们需要:
- 节点22强制染红色
- 然后将关注节点调整为父节点,也就是节点26
如下图
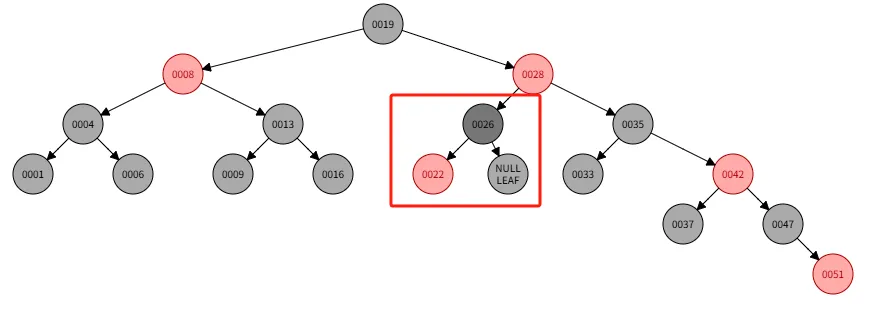
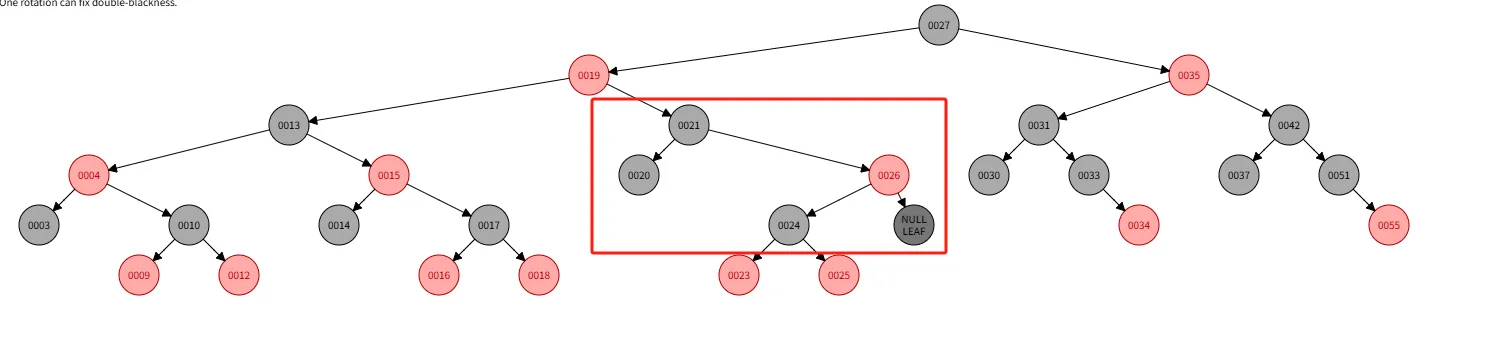
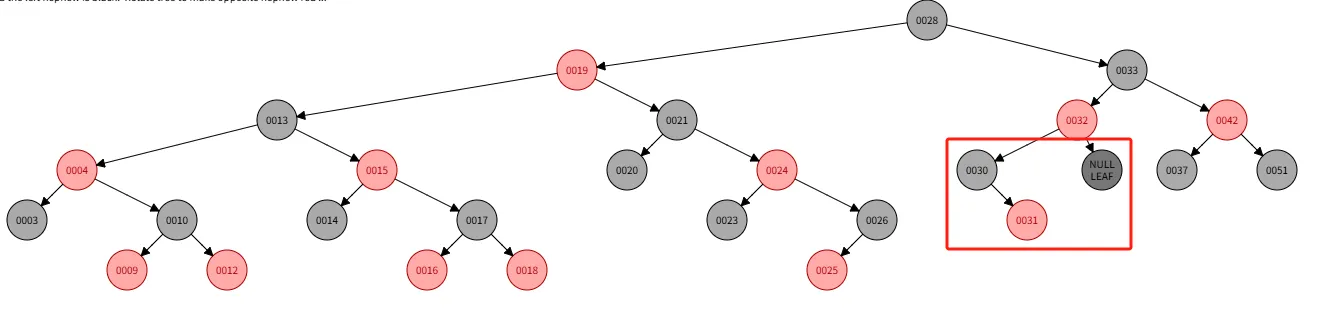
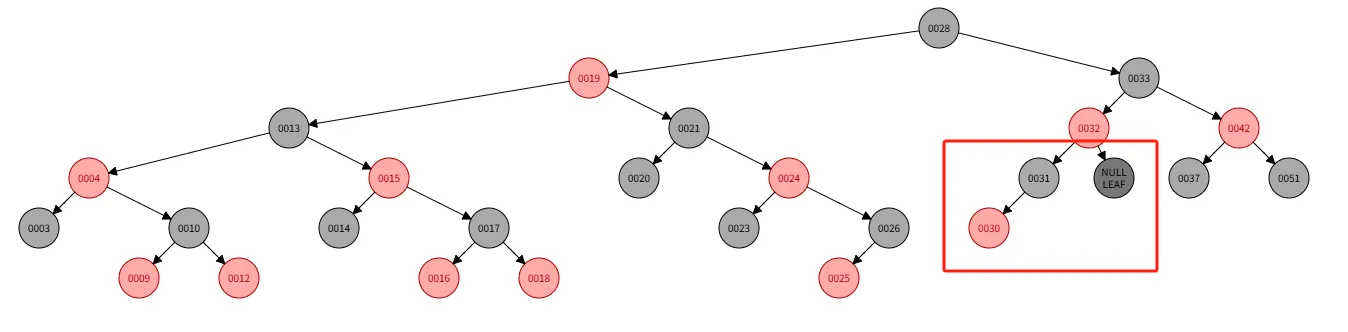
此时关注节点是26,其兄弟节点35是黑色,左侄子节点33是黑色,右侄子节点42是红色。我们需要:
- 左旋父节点,也就是节点28
- 左旋后,将祖父节点35设置为节点28的颜色,也就是红色
- 将父节点28设置为黑色
- 将叔叔节点42设置为黑色
- 调整完成
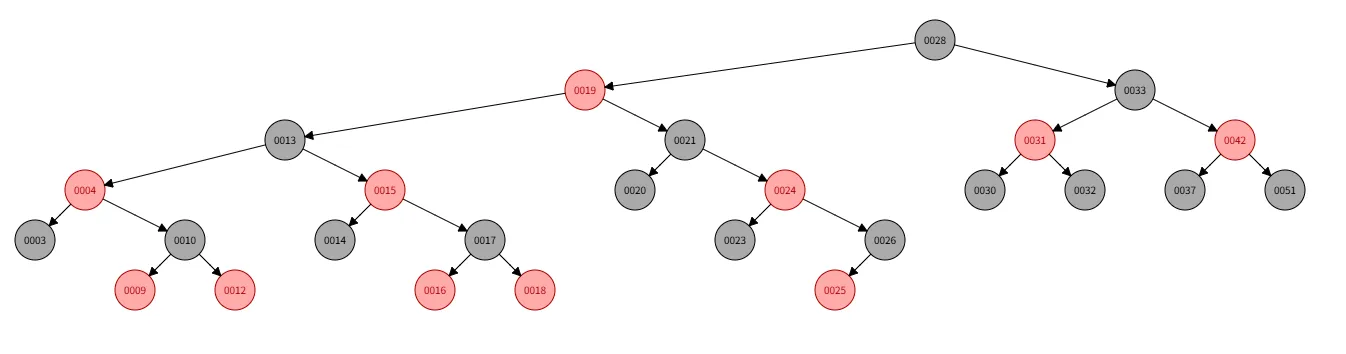
如下图
修复阶段:关注节点的兄弟节点是红色
为了复现此场景的例子,我们需要构造红黑树如下
此时我们删除节点28,此时节点27作为前驱节点替换到节点28位置上,而节点27作为关注节点,其兄弟节点21是红色。状态如下
此时步骤如下
- 将父节点26左旋
- 左旋完成后,将父节点26和祖父节点21颜色互换
- 继续检查关注节点
此时状态如下
此时关注节点的兄弟节点24是黑色,其左右孩子都是红色,符合场景:修复阶段:关注节点的兄弟节点是黑色,其左右侄子都是红色
此时关注节点作为节点26的右孩子,所以步骤如下
- 先右旋父节点26
- 将祖父节点24设置为父节点26的颜色(红色)
- 将父节点26设置为黑色
- 将叔叔节点23设置为黑色
- 调整结束
此时调整完成后的状态如下

修复阶段:关注节点作为右孩子时,其兄弟节点是黑色,右侄子是红色,左侄子是黑色
为了准备这种情况,我们需要构造红黑树情况如下,我们关注节点35,如下
此时我们删除节点35,那么节点33会替代节点35,然后关注节点在原节点33的位置,记住节点33是父节点32的右孩子,那么状态如下
此时关注节点的兄弟节点30是黑色,右侄子是红色,左侄子是黑色 我们需要目的将红色节点搬到左侄子节点上,那么步骤如下
- 兄弟节点30左旋
- 节点30和原右侄子节点颜色互换
那么此时状态如下
此时关注节点不变,其兄弟节点31是黑色,其左侄子节点是红色,右侄子节点是黑色,那么步骤如下
- 右旋父节点32
- 将祖父节点31的颜色设置为父节点32的颜色(红色)
- 将父节点32染黑
- 将叔叔节点30染黑
- 调整结束
上述步骤完成之后,状态如下
总结
至此,针对删除的所有场景演示完成了,本文没有按照关注节点的左右孩子都重复介绍,只是按照单边作为示例,演示了所有的场景。那么本文涉及到的场景如下:
可以对应文章<rb-tree实现-删除操作-原理>查看场景
删除阶段:
- 删除节点没有子节点
章节: <删除红色根节点> - 删除节点只有一个子节点
章节: <删除只有一个节点的节点> - 删除节点有两个子节点,前驱节点是其左孩子
章节: <删除节点的前驱节点是删除节点的左孩子> - 删除节点有两个子节点,前驱节点不是其左孩子
章节: <删除节点的前驱节点不是删除节点的左孩子>
修复阶段:
- 兄弟节点是红色
章节: <修复阶段:关注节点的兄弟节点是红色> - 兄弟节点是黑色,且侄子都是黑色
章节: <删除黑色根节点> - 兄弟节点是黑色,其左侄子是红色,右侄子是黑色
章节: <修复阶段:关注节点作为右孩子时,其兄弟节点是黑色,右侄子是红色,左侄子是黑色>(镜像) - 兄弟节点是黑色,其左侄子是黑色,右侄子是红色
章节: <删除节点的前驱节点不是删除节点的左孩子> - 兄弟节点是黑色,其左右侄子都是红色
章节: <修复阶段:关注节点的兄弟节点是红色>
至此,可以发现,全部演示完成。
之前介绍了插入操作,简单总结就是如果平衡出现问题,先向上递归染色成父红叔黑状态,然后根据LL/RR/LR/RL进行右旋(针对g节点)/左旋(针对g节点)/左旋(针对p节点)+右旋(针对g节点)/右旋(针对p节点)+左旋(针对g节点),最后互换颜色。
可以发现对于插入操作,我们可以一句话描述清楚所有场景,而对于删除操作,就比较复杂了。本文介绍删除操作的原理
删除操作
对于红黑树的删除操作,其全部操作分为两个阶段。
- 删除阶段:找到前驱/后继节点替换待删除节点
- 修复阶段:修复,平衡破坏,修复平衡
这两步操作宏观看还是非常好理解的,现在逐一介绍
删除阶段
对于删除阶段,主要有三种场景,我们先准备一下必要条件
- 如果被删除节点没有子节点,那么其就相当于有两个空黑节点 (一种情况)
- 如果被删除节点只有一个节点,那么被删除节点一定是黑色,被删除节点的子节点一定是红色 (两种情况)
因为被删除节点只有一个节点,而黑高必须平衡,所以子节点肯定得红色,又因为子节点必须是红色,所以被删除节点一定是黑色
- 如果被删除节点有两个节点,理论上按照有2的3次方共计8种组合方式,但是根据红黑树的规定,不能连续的红色,则只有按照前序遍历的 黑红红/红黑黑/黑红黑/黑黑红 (四种情况)
好了,根据上面的必要条件,一共七种情况,我们可以直接开始逐个根据所有场景分析了。
本文将相关节点如下称呼
- 待删除节点(s)
- 待替换节点(r)
- 父节点(p)
- 兄弟节点(b)
- 侄子节点(n):兄弟节点的左/右孩子
没有子节点
这种情况下,就相当于有两个空节点,没有人替换它,我们不需要进行第一阶段删除,直接跳转到第二阶段修复去调整平衡
只有一个子节点
这里两种情况,子节点无论是左边还是右边,处理方式都是
- 删除节点s,把其孩子节点作为节点r替换为节点s
- 将节点s从红色染色成黑色
因为只有一个子节点的时候,由红色节点替代了被删除的黑色节点,此时修复黑高的方法就是将替代节点r的红色染成黑色即可。
故仅需两步,调整结束
有两个子节点
这种情况对应了其他四种场景,此时我们需要找到前驱节点或后继节点。也就是找到小于此节点的值或者大于此节点的值。所以关键点在于如何找到前驱节点和后继节点作为替代节点r。
而找前驱节点和后继节点的情况分别又是两种。
所以在 黑红红/红黑黑/黑红黑/黑黑红 四种场景下,我们根据红黑树的找前驱还是后继的方式可以两种实现(前驱/后继)来找节点r,在不同的实现下如何找前驱和后继还有两种方式,下面逐一介绍。
前驱方式
先介绍前驱方式寻找小于节点s的节点r
节点s的左子树没有右孩子
如果节点s的左子树没有右孩子,那么节点s的左孩子就是替代节点r,因为此时的节点r就是节点s的前驱节点。那么步骤如下:
- 我们将节点r(前驱节点)替换到节点s上
- 将节点r的颜色设置为节点s的颜色
- 然后将节点r的左孩子强制设置为黑色
我们需要注意的是,节点r的左孩子只能是红色。原因如下:
如果节点r的左孩子是黑色,那么又因为节点r是单节点,黑高肯定不平衡,图示如下。
首先我们假设一个红黑树如下:

此时我们删除节点3,让其处于如下状态
此时节点2相当于节点r,节点1相当于节点r的左孩子
我们算上叶子节点来计算黑高,可以发现,4-2 这里黑高是3,而其他的黑高是4。所以黑高一定不平衡。
那么我们可以得出结论,此情况下,节点r的左孩子一定是红色
根据上面的结论而言,我们的步骤相当于删除前驱节点r的颜色,然后再将节点r的左孩子强制设置为黑色。因为节点r的左孩子一定是红色,我们将节点r的左孩子强制染黑,黑高自然就是平衡了。
再补充一点,我们知道节点r的左孩子一定是红色,根据红色不能连续的规则,那么节点r一定就是黑色,在这种情况下,删除节点r的颜色就是删除了一个黑色,而为了维持黑高,将节点r的孩子染色成黑色,自然就平衡了。
节点s的左子树有右孩子
因为节点s的左子树有右孩子,我们就需要遍历其所有的右孩子,找到节点s的前驱节点。
值得注意的是,此时节点s的前驱节点r和节点s就没有相关性了。如我们步骤如下
-
遍历其所有的右孩子,找到节点s的前驱节点
-
我们将节点r(前驱节点)替换到节点s上
-
将节点r的颜色设置为节点s的颜色
-
然后将节点r的左孩子强制设置为黑色
上面三个步骤和节点s的左子树无右孩子的场景一致,但是我们在第三步将节点r的左孩子强制染黑了,而此时节点r和节点s没有相关性。所以黑高平衡破坏了之后,没办法直接修复,需要进行修复第二步骤。也就是如下
补充一下为什么没办法直接修复,因为节点s和节点r相差距离可能很远,我们是删掉了节点r,将节点r的内容放在节点s,实际上是因为节点r的丢失,导致从节点s的左边全部失去平衡。所以才有了第二步骤:修复
- 将关注节点变成节点r的左孩子,进行第二步骤修复
后继方式
后继方式和前驱方式逻辑一致,操作方式是镜像的
节点s的右子树没有左孩子
步骤如下:
- 我们将节点r(后继节点)替换到节点s上
- 将节点r的颜色设置为节点s的颜色
- 然后将节点r的右孩子强制设置为黑色
节点s的右子树有左孩子
我们需要遍历其所有的左孩子,找到节点s的前驱节点。
指的注意的是,此时节点s的前驱节点r和节点s就没有相关性了。如我们步骤如下
-
遍历其所有的左孩子,找到节点s的后继节点
-
我们将节点r(后继节点)替换到节点s上
-
将节点r的颜色设置为节点s的颜色
-
然后将节点r的右孩子强制设置为黑色
-
将关注节点变成节点r的右孩子,进行第二步骤修复
总结
至此,我们针对最后四种场景下,根据找前驱和后继的方式,将原节点进行了删除操作,如果前驱/后继节点和节点s没有相关性,则我们需要开展第二阶段修复操作,否则我们强制染色就能维持平衡。接下来开始介绍红黑树删除的第二阶段:修复操作
修复阶段
在删除阶段,实际上我们目的是先将目标节点s删除,然后通过找前驱/后继的方式找到替代节点r,将其替换目标节点s。(其本质是删除了节点r)
而在修复阶段,实际上我们就需要将无法修复的黑高来进行进一步修复。
在这里,我们将兄弟节点称之为节点b,将侄子节点称之为节点n(ln/rn),将关注节点称之为节点s,记得关注节点注意和第一阶段区分。
在修复阶段,一共五种情况, 如下:
- 兄弟节点b是红色
- 兄弟节点b是黑色,且节点b的左右孩子(节点ln和rn)都是黑色(包含空节点)
- 兄弟节点b是黑色,且节点b的左孩子(节点ln)是红色,右孩子(节点rn)是黑色
- 兄弟节点b是黑色,且节点b的左孩子(节点ln)是黑色,右孩子(节点rn)是红色
这里还有一种情况:
- 兄弟节点b是黑色,且节点b的左右孩子(节点ln和rn)都是红色 这种情况和情况4合并
在上面五种情况下,我们还需要考虑关注节点s自身作为左孩子还是右孩子,这两种情况下,操作是镜像的。 为了方便介绍,我们先假设节点s自身作为父节点的左孩子。然后再介绍节点s自身作为父节点的右孩子的情况。
节点s是左孩子
假设节点s自身作为父节点的左孩子
兄弟节点b是红色
我们还是和插入的思想一致,如果兄弟节点b是红色的,我们要想办法让其变成黑色。
根据插入的时候的逻辑,假设是LL状态,那么我们对祖父节点右旋。这样自身插入节点向上一级。
同样的,如果是删除的时候,如果兄弟节点b是红色的,在L状态,为了让关注节点s向下降级,我们选择左旋。对谁左旋呢,当然是对父节点的左旋才能让关注节点s下降一级。
当左旋完成之后,节点s自降一级,我们知道节点b是红色的,那么节点b的任何子节点都一定是黑色的。那么左旋完成之后,兄弟节点肯定是黑色的。
这样我们就可以只讨论兄弟节点是黑色的情况了。
关于互换颜色,我们知道在插入操作后,会将兄弟节点b和父节点p颜色互换,同样删除也是。
对于左旋之后,我们需要的是将关注节点s的父节点p和祖父节点g的颜色互换
如果细心的可以了解到,对于颜色互换操作,其和插入操作是镜像的。 我列出如下
- 对于插入操作,LL状态下,右旋后将兄弟节点和父节点的颜色互换
- 对于删除操作,LL状态(左旋之后是LL状态),左旋后将父节点和祖父节点颜色互换
也就是说,如果兄弟节点b是红色,那么再左旋完成之后,需要做一下颜色互换即可。互换的角色是
旋转后的 父节点和祖父节点。
总结一下,那么其步骤如下:
- 将父节点p左旋
- 将父节点p和祖父节点g交换颜色
- 继续检查关注节点(因为左旋会让关注节点降级,所以可以继续关注节点)
至此,我们分析了情况1,它的目的是将兄弟节点染黑,染黑的操作是通过左旋完成(因为兄弟节点的子节点一定是黑色),自身下降一级。
兄弟节点b是黑色,节点b的子节点都是黑色(包含空节点)
我们知道进入修复阶段的时候,红黑树已经不平衡了,那么如果兄弟节点b是黑色,且其子节点都是黑色,那么我们计算其兄弟的黑高一定是2,而关注节点和子节点的黑高是1或2(自身是红则是1,自身是黑则是2)。所以
我们可以发现,在这个状态,就是黑高不平衡的状态。
我们找到了不平衡的关键点。我们的操作是强制让其染红,也就是
强制给兄弟节点染红
当兄弟节点染红之后,我们得到的结果是兄弟的黑高固定为1,往上递归,找到所有兄弟节点b是黑色且所有侄子节点(ln/rn)是黑色节点的情况,把兄弟节点染红,让其黑高固定为1.(兄弟节点红色,两个侄子节点都是黑色)
此时,我们将兄弟节点强制染红了,那么对父节点p,就需要强制染黑,否则出现了连续的红色节点
总结一下,那么本情况下,其步骤如下:
- 将兄弟节点b染色成红色
- 将父节点p染色成黑色
- 设置关注节点是父节点
- 向上递归
兄弟节点b是黑色,左侄子是红色,右侄子是黑色
我们现在剩下三种情况,如下
- 节点b是黑色,节点ln是红色,节点rn是黑色
- 节点b是黑色,节点ln是黑色,节点rn是红色
- 节点b是黑色,节点ln和rn都是红色
为了能够归一化这个问题,我们聚焦在一个点上:
- 右侄子节点(rn是红色)
为了让节点rn是红色,我们需要对 本情况1:节点b是黑色,节点ln是红色,节点rn是黑色 进行调整,调整步骤如下:
- 兄弟节点b右旋
- 交换兄弟节点b和节点ln的颜色
这样之后,我们发现,上述剩下的三种情况就变成两种情况了,我们继续情况4和5
兄弟节点b是黑色,左侄子是黑色,右侄子是红色
对于此情况,考虑到我们是删除操作,我们找到替代节点是前驱节点,前驱节点是找到左孩子的最右节点,实际上对于关注节点s,其黑高是少于右边的(因为删除过节点),为了修复黑高,此时应该做的是左旋
因为左旋会将左侄子节点rn给关注节点作为关注节点的右节点
故步骤如下
- 先左旋父节点p
- 将祖父节点g的颜色设置为父节点p的颜色
- 将父节点p的颜色设置为黑色
- 将叔叔节点u的颜色设置为黑色
此时调整结束
兄弟节点b是黑色,左右侄子都是红色
其实根据插入的定义,我们插入时必须要保证父红叔黑,所以插入节点后,不会出现非底层节点出现两个红色
那么出现左右侄子都是红色的情况是 左右侄子节点ln/rn都只含有空节点
此时,我们的行为可以和情况4合并,因为最后将 左侄子节点rn给关注节点作为关注节点的右节点 的时候,这个右节点是红色的,它本身就维持平衡了,调整结束。
节点s是右孩子
这种情况和节点s是左孩子的情况是镜像的,主要如下
兄弟节点b是红色
那么此时的步骤如下:
- 将父节点p右旋
- 将父节点p和祖父节点g交换颜色
- 继续检查关注节点(因为左旋会让关注节点降级,所以继续关注节点来修复)
兄弟节点b是黑色,节点b的子节点都是黑色(包含空节点)
那么此时的步骤如下
- 将兄弟节点b染色成红色
- 将父节点p染色成黑色
- 设置关注节点是父节点
- 向上递归
兄弟节点b是黑色,左侄子是黑色,右侄子是红色
那么此时的步骤如下
- 兄弟节点b左旋
- 交换兄弟节点b和节点ln的颜色
兄弟节点b是黑色,左侄子是红色,右侄子是黑色
那么此时的步骤如下
- 先右旋父节点p
- 将祖父节点g的颜色设置为父节点p的颜色
- 将父节点p的颜色设置为黑色
- 将叔叔节点u的颜色设置为黑色
兄弟节点b是黑色,左右侄子都是红色
此情况和 兄弟节点b是黑色,左侄子是红色,右侄子是黑色 情况一致,步骤也是一致
总结
红黑树的删除操作比较复杂,捋清楚需要认真思考很久,作为总结,删除操作简单来说如下,以节点s为左孩子为例:
- 先进行删除操作
- 删除操作中要找到替换节点,替换节点可能是左右子树,也可能是前驱节点,不同的红黑树实现,也可能使用后继节点实现
- 当平衡产生破坏的情况下,需要进行修复操作
- 修复操作的场景有五种,需要归一化处理
- 先让兄弟节点变黑,向下继续
- 如果兄弟节点和其子节点的黑高是2(都是黑的),强行染色兄弟节点,让其黑高暂时是1
- 根据5和6的操作,兄弟节点肯定是黑色,黑高不会一定是2
- 此时想办法固定右侄子节点为红色
- 如果右侄子为黑色,则对兄弟节点右旋,并交换颜色,此时右侄子一定为红色(因为原左侄子的红色给了右侄子)
- 此时所有情况都归一化到:兄弟节点是黑,右侄子是红的情况
- 将父节点左旋,完成后,强行将祖父节点设置为父节点颜色,并强行将父节点和叔叔节点染黑
- 调整结束
在节点为右孩子时,我们左旋右旋的操作镜像即可。
本文将删除的原理彻底弄清楚了,为了方便理解,下一篇文章将所有的场景示例出来,加深印象。
根据文章《rb-tree实现-插入操作-原理》中的内容,我们归类了红黑树的所有操作,光有理论不行,本文演示插入的所有场景
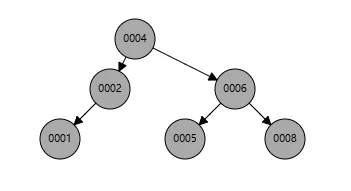
基础红黑树
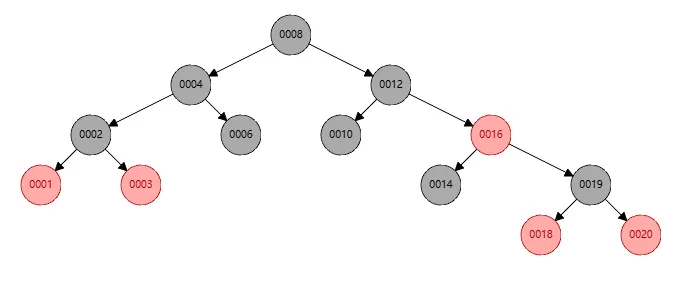
现在我们构建了一个10个元素的红黑树,其值从0-20,默认是偶数,其形状如下
父节点是黑色
我们测试插入节点1,则遍历到节点2上,往左边插入即可,如下
父节点和叔叔节点都是红色
为了让父节点和叔叔节点都是红色,需要先插入节点3,则情况如下
然后插入节点0,则此时会将叔叔和父亲染色为黑色,祖父设置为红色,然后向上递归,如下
父红叔黑LL状态
为了满足上述状态,需要先删掉节点0和3,其现状如下
此时我们添加节点0,它满足LL状态(祖父的左孩子是父,父的左孩子是节点0)
- 第一步:将节点2(祖父节点)进行右旋,右旋后如下
- 第二步:将节点0的兄弟节点2和父节点1的颜色互换,如下
父红叔黑RR状态
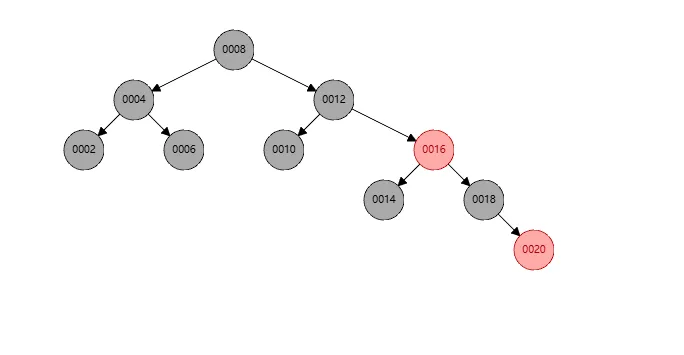
根据现在的情况,如果插入节点21,则满足父红叔黑RR状态(祖父的右孩子是父,父的右孩子是节点0)
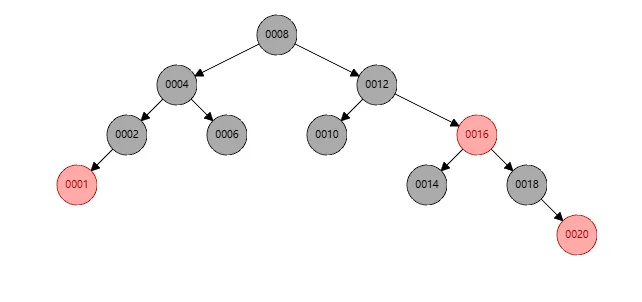
- 第一步:将节点18(祖父节点)进行左旋,左旋后如下
- 第二步:将节点21的兄弟节点18和父节点20的颜色互换,如下
父红叔黑LR状态
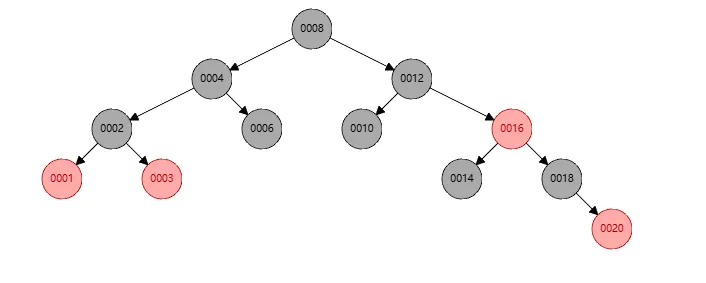
为了满足父红叔黑LR状态,需要先删除节点21,则初始情况如下
此时如果我们插入节点19,则满足父红叔黑LR状态
- 第一步:对节点18(父节点)进行左旋,关注节点变成节点18(父节点)。左旋后如下
- 第二步:对节点20(节点18(此时的关注节点)的祖父节点)右旋。右旋后如下
- 第三步:将节点18(此时的关注节点)的兄弟节点20和父节点19的颜色互换,如下
父红叔黑RL状态
为了满足父红叔黑RL状态,需要先删除节点0,2,再插入节点3,则初始情况如下
此时我们插入节点2,则满足父红叔黑RL状态
- 第一步:对节点3(父节点)进行右旋,关注节点变成节点3(父节点)。右旋后如下
- 第二步:对节点1(节点3(此时的关注节点)的祖父节点)左旋。左旋后如下

- 第三步:将节点3(此时的关注节点)的兄弟节点1和父节点2的颜色互换,如下
总结
至此,对于红黑树的插入操作的所有情况已经图示介绍了。
在了解了红黑树的基本概念之后,接下来我们详细了解一下红黑树的插入操作的几种场景
默认规定
对于红黑树而言,需要默认遵守如下两个规定
- 插入节点一定是红色(为了代码简化,默认黑色节点维持平衡)
- 插入操作都是在叶子节点执行
所有场景
根据前面的规定的插入操作,我们可以将全部的插入场景列举出来,将确定的场景在后面标号为(n)
- 将插入节点self称之为:
(s) - 将父亲节点parent称之为:
(p) - 将祖父节点grandfather称之为:
(g) - 将叔叔节点uncle称之为:
(u)
如下:
首先根据父节点颜色区分:
如果插入节点(s)的父节点(p)是黑色的 (1)
- 那么插入节点(s)什么都不做,维持平衡
如果插入节点(s)的父节点(p)是红色的
- 那么平衡破坏,需要进一步调整
然后根据叔叔节点的颜色区分
现在假设所有的插入操作,父节点(p)都是红色的,那么得出其祖父节点(g)一定是黑色的。 这时候叔叔节点(u)的颜色是红色或者黑色。 那么场景如下:
如果插入节点的叔叔节点(u)是红色的 (2)
- 那么将关注节点的父节点(p),叔叔节点(u)的颜色都设置为黑色
- 然后将关注节点的祖父节点(g)设置为红色.(维持红黑树的颜色)
- 将关注节点转换成祖父节点(g)
- 进一步调整(迭代)
这里进一步调整后,我们可以知道从自身修改为祖父节点(g)之后,情况肯定会发生改变,所以代码需要迭代来确定下一步动作
如果插入节点的叔叔节点(u)是黑色的
- 那么需要进一步调整
再根据插入节点相对于父节点(p)的位置区分
根据上面的统计,目前红黑树的已知现状为:
插入节点本身是红色的,插入节点的父节点(p)是红色的,插入节点的叔叔节点(u)是黑色的,插入节点的祖父节点(g)是黑色的,但是对于插入节点而言,不清楚其位于父节点(p)的左子树还是右子树
如果插入节点属于父节点(p)的右子树(3)
- 那么将关注节点设置为父节点(p)
- 然后将父节点(p)进行左旋。也就是让父节点(p)和父节点(p)的右节点断开,改变其父子关系
- 此时因为关注节点为父节点(p),经过左旋之后,它是原插入节点的左子树,所以进入情况
(4)
提前说明的是,这里假定父节点(p)是祖父节点(g)的左子树,所以在此情况下执行左旋
因为其父节点(p)左旋,则其右子树会变为原父节点(p)的父节点。
这里父节点(p)的右节点其实就是之前的关注节点,那么也就是将原关注节点作为原父节点(p)的父节点
因为此时我们的关注节点是父节点(p),父节点(p)经过左旋之后,自然成为插入节点的左子树。所以我们直接按照情况(4)进行调整,如下介绍情况(4)
如果插入节点属于父节点的左子树(4)
- 那么将关注节点的祖父节点(g)进行右旋
- 调整完成之后,关注节点的父节点(p)和兄弟节点(b)颜色互换
提前说明的是,这里假定父节点(p)是祖父节点(g)的左子树,所以在此情况下执行右旋
这里值得注意的是,将祖父节点(g)进行右旋之后,则祖父节点(g)和父节点(p)会断开,从而形成祖父节点(g)会成为父节点(p)的右子树。然后我们知道祖父节点(g)是黑色,父节点(p)是红色,那么右旋之后,形成的关系按照前序遍历是
父节点(p)--->关注节点(s)--->祖父节点(g)
其颜色状态如下
红(p)--->红(s)--->黑(g)
明显不满足红黑树的规则,所以就需要将父节点(p)的颜色红色和祖父节点(g)的黑色颜色互换,则颜色改变后如下:
黑(p)--->红(s)--->红(g)
最后根据叔叔节点相对于祖父节点的位置区分
根据之前的解析,我们确定的信息如下:
- 插入节点(s)是红色的
- 父节点(p)是红色的
- 叔叔节点(u)是黑色的
- 祖父节点(g)是黑色的
- 插入节点(s)位于父节点(p)的左子树情况已解析
- 插入节点(s)位于父节点(p)的右子树情况已解析
这个时候,我们发现,父节点(p)位于祖父节点(g)的左右情况并没有分析。而上面的情况(3)和(4)都假定了插入节点(s)的父节点(p)位于祖父节点(g)的左子树。而实际上父节点(p)相对于祖父节点(g)的关系既可能是左子树,也可能是右子树。所以出现如下情况:
如果父节点(p)位于祖父节点(g)的左子树
- 按照情况
(3)和(4)执行
如果父节点(p)位于祖父节点(g)的左子树
- 对于情况
(3),那么将关注节点设置为父节点(p)后,执行的是右旋 - 对于情况
(4),那么将关注节点设置为祖父节点(g)后,执行的是左旋,然后再染色
简化记忆
根据上面所有场景的介绍,为了方便记忆,本章以容易记忆的方式将场景简单列举出来,简化的场景如下
- 对黑色节点的插入无需操作
- 对红色节点的插入,如果叔叔节点(u)都是红色,想办法染色成黑色
具体染色操作是:将父节点(p)和叔叔节点(u)设置为黑色,并将祖父节点(g)设置为红色。然后将关注节点设置为祖父节点(g),向上递归,这样就把所有红黑树的叔叔节点(u)染色为黑色了 - 根据父节点(p)相对于祖父节点(g),插入节点(s)相对于父节点(p)的位置设置标号
具体标号操作是:从上往下的视角,如果父节点(p)在祖父节点(g)左边则记作L,右边记作R,插入节点(s)和父节点(p)的关系同理 - 如果是LL,则对祖父节点(g)右旋
- 如果是RR,则对祖父节点(g)左旋
- 如果是LR,则对父节点(p)左旋后,再按照LL操作给祖父节点(g)右旋
- 如果是RL,则对父节点(p)右旋后,再按照RR操作给祖父节点(g)左旋
进一步简化记忆,可以如下:
- 插入是红色才调整
- 如果叔叔是红色,则先染色
- 如果叔叔是黑色,根据LL/RR/LR/RL来执行操作
总结
至此,我们详细的了解了红黑树关于插入的操作步骤。并进一步的进行了简化记忆,接下来通过实验演示的方式验证所有的场景,下一个文章见
