rk3568的oh版本烧录镜像有多个image,本文解释这些img的作用
一、总览
包含镜像如下
MiniLoaderAll.bin	瑞芯微平台的芯片级的romcode
parameter.txt	瑞芯微平台分区表
resource.img	瑞芯微平台的资源文件,内部存放logo.bmp  logo_kernel.bmp  rk-kernel.dtb
boot_linux.img	ext2的boot分区,里面存放extlinux的image和dtb以及extlinux.conf,同时存放开机logo的bmp(logo.bmp  logo_kernel.bmp)
ramdisk.img	oh系统的ramdisk文件,做二级启动
system.img	oh系统的系统文件
vendor.img	oh系统芯片相关厂商目录,vendor/{产品解决方案厂商}/{产品名称}定义的文件按照规则放入vendor分区
sys_prod.img	oh系统定义的产品通用配置,对系统组件的能力扩展以及能力定制,承载产品级差异能力,存放产品相关的配置文件
chip_prod.img	oh系统产品硬件配置组件,单板外设特有硬件能力以及产品级硬件差异配置, 存放芯片相关的配置文件
updater.img	oh系统升级镜像,用于完成升级;正常启动时不加载次镜像,和ramdisk格式一致
eng_system.img	oh系统的eng模式,利用mount --bind属性overlay文件
chip_ckm.img	oh系统单独分区,用来支持内核树外独立构建ko模块能力
userdata.img	oh系统可写的用户数据镜像
二、MiniLoaderAll.bin
在/device/board/hihope/rk3568/loader目录中,通过/device/board/hihope/rk3568/kernel/build_kernel.sh拷贝到out/rk3568/packages/phone/images/
三、parameter.txt
同上也在/device/board/hihope/rk3568/loader中,通过/device/board/hihope/rk3568/kernel/build_kernel.sh拷贝到out/rk3568/packages/phone/images/
对于loader目录的文件,是通过/device/board/hihope/rk3568/BUILD.gn包含/device/board/hihope/rk3568/kernel/BUILD.gn中定义script = "build_kernel.sh"来运行build_kernel.sh的
对于parameter.txt内容,这里不详细解析,可以查看之前文章
四、resource.img
这个镜像内部包含文件logo.bmp logo_kernel.bmp rk-kernel.dtb
其中logo.bmp logo_kernel.bmp是开机uboot加载图片和内核加载图片,而rk-kernel.dtb是uboot阶段加载的默认dtb文件。瑞芯微平台可以将uboot加载的dtb和kernel加载的dtb放在同一个位置,但是oh下的rk3568没有这样做。所以需要resource.img放uboot加载的dtb,而boot_linux.img放内核通过extlinux加载的dtb
uboot加载dtb日志如下
dwmmc@fe2b0000: 1, dwmmc@fe2c0000: 2, sdhci@fe310000: 0
Bootdev(atags): mmc 0
MMC0: HS200, 200Mhz
PartType: EFI
DM: v1
boot mode: normal
FIT: No boot partition
A/B read part name is bootctrl
current_slot_addr value is 0x52544e45
current slot is 1381256773
Found DTB in resource part
DTB: rk-kernel.dtb
这里如果想解压resource.img,如下命令
../../OBJ/linux-5.10/scripts/resource_tool --verbose --unpack --image=../../OBJ/linux-5.10/resource.img
此时在当前目录的out下存在如下文件
logo.bmp logo_kernel.bmp rk-kernel.dtb
如果想自行打包resource.img,如下
../../OBJ/linux-5.10/scripts/resource_tool ../../OBJ/linux-5.10/arch/arm64/boot/dts/rockchip/rk3568-toybrick-x0-linux.dtb logo.bmp logo_kernel.bmp
此时当前目录下存在resource.img,直接烧录即可
注意:值得留意的是,resource_tool 打包时logo.bmp和logo_kernel.bmp不要带路径,否则启动时找不到
五、boot_linux.img
boot_linux.img是内核的镜像文件,这里是通过ext2打包,通过extlinux加载,uboot默认使能extlinux即可正常加载
boot_linux.img内文件如下
.
├── extlinux
│   ├── extlinux.conf
│   ├── Image
│   └── toybrick.dtb
├── logo.bmp
├── logo_kernel.bmp
这里注意的是,logo.bmp和logo_kernel.bmp目前uboot并没有使用,所以此文件可以删掉,后续如果动态开机日志修改时,需要修改uboot,读取此分区的bmp文件才行。
而toybrick.dtb是内核加载的设备树,Image是内核加载的二进制,uboot加载信息如下
Found /extlinux/extlinux.conf
Retrieving file: /extlinux/extlinux.conf
203 bytes read in 4 ms (48.8 KiB/s)
1: rockchip-kernel-5.10
A/B read part name is bootctrl
current_slot_addr value is 0x52544e45
current slot is 1381256773
Get a/b slot failed. assume device do not support A/B partition
find partition ' ramdisk '
Load from partition ' ramdisk ' to address 0xa200000, count: 8192 block(s)
Read from partition ' ramdisk ' done, total block(s) 8192
Openharmony ramdisk_addr_r = 0x0a200000:0x400000
find partition ' boot_linux '
Load from partition ' boot_linux ' to address 0x280000, count: 196608 block(s)
Read from partition ' boot_linux ' done, total block(s) 196608
Retrieving file: /extlinux/Image
47439880 bytes read in 266 ms (170.1 MiB/s)
append: earlycon=uart8250,mmio32,0xfe660000 root=PARTUUID=614e0000-0000-4b53-8000-1d28000054a9 rw rootwait rootfstype=ext4
Retrieving file: /extlinux/toybrick.dtb
openharmony的默认代码使用通过计算方式获取的vblank值,这个值是20ms,但是rk3588默认支持drmVBlank,所以可以直接使用libdrm的drmWaitVBlank接口等待每一个vblank的同步,从而提高ui的响应性能,如下是处理方式
一、vblank概念解释
通常的,我们知道一个显示屏有display timing参数,对于dsi屏幕,举例如下:
disp_timings0: display-timings {
 native-mode = <&dsi_timing0>;
 dsi_timing0: timing0 {
 clock-frequency = <72600000>;
 hactive = <800>;
 vactive = <1280>;
 hsync-len = <14>;
 hback-porch = <26>;
 hfront-porch = <32>;
 vsync-len = <8>;
 vback-porch = <20>;
 vfront-porch = <80>;
 hsync-active = <0>;
 vsync-active = <0>;
 de-active = <0>;
 pixelclk-active = <0>;
 };
 };
这里我们可以计算出来屏幕的刷新率,如下公式
刷新率 = 时钟/((有效宽度+HSYNC宽+HBP+HFP)(有效高度+VSYNC宽+VBP+VFP))
这里的刷新率,即屏幕的刷新率,通常是60hz。也就是系统每刷新一帧图像需要的实现的倒数,即vsync值。
而对于linux而言,drm框架抽象了vsync的概念,将其称之为vblank,也就意味着,在linux平台上,可以通过drm的接口获取到当前真实硬件的每帧刷新时间。从而可以帮助系统软件gpu渲染时更好的对接到硬件屏幕。
二、rk平台的vblank
在瑞芯微平台,我们知道瑞芯微存在一个vop驱动,路径为drivers/gpu/drm/rockchip/rockchip_drm_vop2.c,这个vop驱动将显示图像放在vp buffer内,从而直接送往硬件,vop存在于drm框架的底层实现上。
关于vop2的中断函数如下:
static irqreturn_t vop2_isr(int irq, void *data)
{
......
if (active_irqs & FS_FIELD_INTR) {
 rockchip_drm_dbg(vop2->dev, VOP_DEBUG_VSYNC, "vsync_vp%d\n", vp->id);
 vop2_wb_handler(vp);
 if (likely(!vp->skip_vsync) || (vp->layer_sel_update == false)) {
 drm_crtc_handle_vblank(crtc);
 vop2_handle_vblank(vop2, crtc);
 }
 active_irqs &= ~FS_FIELD_INTR;
 ret = IRQ_HANDLED;
 }
}
关于vop2触发vblank的函数如下:
static void vop2_handle_vblank(struct vop2 *vop2, struct drm_crtc *crtc)
{
 struct drm_device *drm = vop2->drm_dev;
 struct vop2_video_port *vp = to_vop2_video_port(crtc);
 unsigned long flags;
spin_lock_irqsave(&drm->event_lock, flags);
 if (vp->event) {
 drm_crtc_send_vblank_event(crtc, vp->event);
 drm_crtc_vblank_put(crtc);
 vp->event = NULL;
 }
 spin_unlock_irqrestore(&drm->event_lock, flags);
if (test_and_clear_bit(VOP_PENDING_FB_UNREF, &vp->pending))
 drm_flip_work_commit(&vp->fb_unref_work, system_unbound_wq);
}
根据drm_crtc_send_vblank_event drm_crtc_vblank_put 我们可以知道,他发送了vblank事件,这样如果上层应用程序调用到内核的drm_wait_vblank_ioctl就可以获取到每个vblank的时间。
所以,真实的vsync,应该是vop2驱动在发送vop2_isr的那一刻。
三、Openharmony当前策略
在代码device/soc/rockchip/rk3588/hardware/display/src/display_device/drm_display.cpp中,存在函数DrmDisplay::WaitForVBlank,此函数会被hdi层调用,其目前实现为
int32_t DrmDisplay::WaitForVBlank(uint64_t *ns)
{
 DISPLAY_CHK_RETURN((ns == nullptr), DISPLAY_NULL_PTR, DISPLAY_LOGE("in ns is nullptr"));
 usleep(1000*20);
 *ns = 1000*1000*20;
 return DISPLAY_SUCCESS;
}
在代码device/soc/rockchip/rk3588/hardware/display/src/display_device/drm_vsync_worker.cpp中,存在函数DrmVsyncWorker::WaitNextVBlank,如下
uint64_t DrmVsyncWorker::WaitNextVBlank(unsigned int &sq) { constexpr uint64_t SEC_TO_NSEC = 1000 * 1000 * 1000; struct timespec current; usleep(1000*20); sq = 1; clock_gettime(CLOCK_MONOTONIC, ¤t); return (uint64_t)(current.tv_sec * SEC_TO_NSEC + current.tv_nsec); }
WaitNextVBlank作为thread定期等待vsync信号来触发Vsync的callback,如下
void DrmVsyncWorker::WorkThread()
{
 DISPLAY_LOGD();
 unsigned int seq = 0;
 while (WaitSignalAndCheckRuning()) {
 // wait the vblank
 uint64_t time = WaitNextVBlank(seq);
 if (mCallBack != nullptr) {
 mCallBack->Vsync(seq, time);
 } else {
 DISPLAY_LOGE("the callbac is nullptr");
 }
 }
}
故可以发现,Openharmony默认使用计时等待的方式来等待vsync,而rk3588默认实际上可以支持vblank,则可以修改vblank,调用drm接口,使得显示支持vblank。
四、代码修改
根据上述代码分析,我们可以将openharmony默认的vblank修改为硬件等待的方式,从而使得系统更加流畅。主要修改代码如下
关于drm_display.cpp,如下
int32_t DrmDisplay::WaitForVBlank(uint64_t *ns)
{
int ret;
constexpr uint64_t nPerS = 1000000000;
constexpr uint64_t nPerUS = 1000;
drmVBlank vbl = {
.request.type = DRM_VBLANK_RELATIVE,
.request.sequence = 0,
.request.signal = 0,
};
DISPLAY_CHK_RETURN((ns == nullptr), DISPLAY_NULL_PTR, DISPLAY_LOGE("in ns is nullptr"));
ret = drmWaitVBlank(mDrmDevice->GetDrmFd(), &vbl);
DISPLAY_CHK_RETURN((ret != 0), DISPLAY_FAILURE, DISPLAY_LOGE("wait vblank failed errno %{public}d", errno));
*ns = static_cast<uint64_t>(vbl.reply.tval_sec * nPerS + vbl.reply.tval_usec * nPerUS);


return DISPLAY_SUCCESS;
}
关于drm_vsync_worker.cpp,如下
uint64_t DrmVsyncWorker::WaitNextVBlank(unsigned int &sq)
{
 constexpr uint64_t SEC_TO_NSEC = 1000 * 1000 * 1000;
 constexpr uint64_t USEC_TO_NSEC = 1000;

 drmVBlank vblank = {
 .request =
 drmVBlankReq {
 .type = DRM_VBLANK_RELATIVE,
 .sequence = 1,
 .signal = 0,
 }
 };
 /* The drmWaitVBlank need set the crtc pipe when there are multi crtcs in the system. */
 if (mCallBack->GetPipe() == 1)
 vblank.request.type = drmVBlankSeqType((int)(vblank.request.type) | (int)DRM_VBLANK_SECONDARY);
 int ret = drmWaitVBlank(mDrmFd, &vblank);
 DISPLAY_CHK_RETURN((ret < 0), 0,
 DISPLAY_LOGE("wait vblank failed ret : %{public}d errno %{public}d", ret, errno));
 sq = vblank.reply.sequence;
 return (uint64_t)(vblank.reply.tval_sec * SEC_TO_NSEC + vblank.reply.tval_usec * USEC_TO_NSEC);
}
完整补丁如 0001-rk3588-drm-vblank-wait.patch
五、编译验证
完成代码修改后,需要编译验证,如下是编译脚本
prebuilts/build-tools/linux-x86/bin/ninja -w dupbuild=warn -C out/rk3588/ display_composer_vendor
mount /root/tf/rk3588/out/rk3588/packages/phone/images/vendor.img /tmp/temp/
md5sum /tmp/temp/lib64/libdisplay_composer_vendor.z.so
cp /root/tf/rk3588/out/rk3588/hdf/rockchip_products/libdisplay_composer_vendor.z.so /tmp/temp/lib64/libdisplay_composer_vendor.z.so
md5sum /tmp/temp/lib64/libdisplay_composer_vendor.z.so
umount /tmp/temp/
编译后,更新烧录vendor.img即可
开发Openharmony的时候,经常需要调试Openharmony的hdi层,这层对上是对接UI,对下对接内核hdf,所以经常需要通过hilog命令来进行开发调试,本文根据display框架来讲解hilog的使用技巧
一、hilog概述
hilog是openharmony的日志系统,我们可以等价的理解为android的logcat,对于hilog而言,只要系统启动了hilogd,则hilog可以正常工作,如下
# ps -A | grep hilogd
 281 ? 00:01:03 hilogd
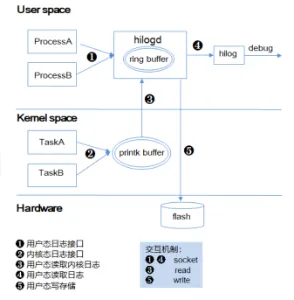
hilog的架构图如下
二、hilog使用说明
对于hilog使用,这里总结有两种方式
- hilog实时抓取日志
- hilog记录和保存日志
2.1、 hilog实时抓取日志
直接运行hilog即可抓取当前系统的hilog日志,如下
# hilog
04-18 08:52:57.711 0 0 I I00000/HiLog: ========Zeroth log of type: init
可以留意的是,hilog是将缓存的日志打印出来并阻塞等待新的日志信息
如果相对hilog日志做区分,可以将hilog日志分为init,app,core。分别对应启动日志,应用日志,核心(HDI)日志,如下:
# hilog -t init
04-18 08:52:57.711 0 0 I I00000/HiLog: ========Zeroth log of type: init
hilog日志存在日志等级,info,debug,error, fault。如果我们需要查看指定等级的日志可以如下:
hilog -L E
04-18 10:57:23.289 776 776 E C02f01/AccessTokenInfoManager: [GetNativeTokenInfo]:token 537715846 is invalid.
hilog默认关闭了debug等级的日志, 所以如果需要打开debug级别的日志,则需要单独设置hilog的输出日志等级,如下
# hilog -b D
Set global log level to D successfully
# hilog -L D
04-18 10:59:00.008 1285 1285 D A0001a/SystemUI_Default: CommonEvent_TimeManager --> handle common event: usual.event.TIME_TICK
hilog可以指定模块tag的日志进行显示,从而达到过滤的作用,可以通过如下指定只查看DISP显示模块的日志
# hilog -T DISP
04-18 11:00:00.063 746 752 D C02500/DISP: [CallLayerFunction:51] device Id : 1
hilog可以给日志带上颜色,这样我们可以很方便的通过颜色来判断什么日志是我们需要关心的,如下
hilog -T DISP -v color
04-18 11:02:00.051 746 752 D C02500/DISP: [CallLayerFunction:51] device Id : 1
04-18 11:02:00.051 746 752 D C02500/DISP: [GetHdiLayer:214] id : 78
hilog可以指定pid来查看日志,如果我们知道服务是哪个进程启动的,则可以如下
# hilog -P `pidof composer_host`
04-18 11:04:08.816 746 752 D C02500/DISP: [CallDisplayFunction:39] device Id : 1
hilog可以过来日志信息中的关键字,如果我们对日志内部有关键字标识,可以如下
hilog -e failed
04-18 11:07:30.432 1328 1343 E C03900/Ace: [<private>(<private>)] connect failed errno:111
2.2、hilog记录和保存日志
通常情况下,hilog可以抓取大部分的日志,但是对于开机日志,我们只能通过hilog日志保存到文件上,重新开机来抓取这次开机的错误日志信息来判断问题,所以需要如下设置
hilog -w stop
hilog -w start -m none -f display -l 20M
hilog -b D
rm /data/log/hilog/*
reboot
此时hilog打开了日志保存文件的功能,文件默认保存在/data/log/hilog/display.*下,此时我们重启,则可以将重启的hilog日志进行导出,此时导出日志需要利用hdc命令,hdc命令是类似于android的adb命令。故如下
hdc file recv /data/log/hilog/ .
这样我们可以将机器的hilog日志正常导出出来
三、hilog的代码填写示例
对于hilog日志,不同的模块通过不同的封装来实现,我以display模块为例。对于打印display模块的hilog日志,可以如下
DISPLAY_LOGD("kylin: set crtc to active");
可以发现DISPLAY_LOGD是一个宏定义,如下
#ifndef DISPLAY_LOGI
#define DISPLAY_LOGI(format, ...) \
 do { \
 HILOG_INFO(LOG_CORE, "[%{public}s@%{public}s:%{public}d] " format "\n", __FUNCTION__, FILENAME, __LINE__, \
 ##__VA_ARGS__); \
 } while (0)
#endif
可以知道其定义是HILOG_INFO,在base/hiviewdfx/hilog/interfaces/native/innerkits/include/hilog/log_c.h定义如下
#define HILOG_INFO(type, ...) ((void)HILOG_IMPL((type), LOG_INFO, LOG_DOMAIN, LOG_TAG, __VA_ARGS__))
对于HILOG_IMPL定义如下

#define HILOG_IMPL(type, level, domain, tag, ...) HiLogPrint(type, level, domain, tag, ##__VA_ARGS__)
对于HiLogPrint定义如下
int HiLogPrint(LogType type, LogLevel level, unsigned int domain, const char *tag, const char *fmt, ...)
{
 int ret;
 va_list ap;
 va_start(ap, fmt);
 ret = HiLogPrintArgs(type, level, domain, tag, fmt, ap);
 va_end(ap);
 return ret;
}
故,大家在开发openharmony时,注意好日志的宏设计即可
我们在适配众达的硬件的时候,发现Openharmony系统开机无法显示logo,遂排查,这里提供解决过程
一、logo核心代码
logo无法显示的问题,是内核开机logo驱动可能出错,我们需要找出核心的代码,如下
drivers/gpu/drm/rockchip/rockchip_drm_logo.c
根据我们之前梳理的众达显示的文章《Openharmony之众达rk3568内核显示panel代码梳理》,我们梳理代码逻辑如下:
rockchip_drm_bind--->rockchip_drm_show_logo---->of_parse_display_resource--→find_sub_dev_by_bridge
二、定位问题
根据上面代码的梳理,我们可以知道find_sub_dev_by_bridge是可能出现错误的地方,根据原始代码逻辑如下:
static struct rockchip_drm_sub_dev *
find_sub_dev_by_bridge(struct drm_device *drm_dev, struct device_node *node)
{
        struct device_node *np_encoder, *np_connector = NULL;
        struct rockchip_drm_sub_dev *sub_dev = NULL;
        struct device_node *port, *endpoint;

        np_encoder = of_graph_get_remote_port_parent(node);
        if (!np_encoder || !of_device_is_available(np_encoder))
                goto err_put_encoder;

        port = of_graph_get_port_by_id(np_encoder, 1);
        if (!port) {
                dev_err(drm_dev->dev, "can't found port point!\n");
                goto err_put_encoder;
        }

        for_each_child_of_node(port, endpoint) {
                np_connector = of_graph_get_remote_port_parent(endpoint);
                if (!np_connector) {
                        dev_err(drm_dev->dev,
                                "can't found connector node, please init!\n");
                        goto err_put_port;
                }
                if (!of_device_is_available(np_connector)) {
                        of_node_put(np_connector);
                        np_connector = NULL;
                        continue;
                } else {
                        break;
                }
        }
        if (!np_connector) {
                dev_err(drm_dev->dev, "can't found available connector node!\n");
                goto err_put_port;
        }

        sub_dev = rockchip_drm_get_sub_dev(np_connector);
        if (!sub_dev)
                goto err_put_port;

        of_node_put(np_connector);
err_put_port:
        of_node_put(port);
err_put_encoder:
        of_node_put(np_encoder);

        return sub_dev;
}
根据分析上面代码的关键,我们可以知道,默认情况下,作为hdmi设备,我们将其作为bridge时,我们只寻找他的下一个remote port,然后再通过rockchip_drm_get_sub_dev拿到sub_dev
而现有的代码两点不满足
2.1 找不到正确的connector
根据《Openharmony之众达rk3568内核显示panel代码梳理》第一章的概念中解释的,现在众达的显示架构下,我们是hdmi--->rk628-→panel。所以单独一个for_each_child_of_node是找不到最终的设备,代码如下
for_each_child_of_node(port, endpoint) {
        np_connector = of_graph_get_remote_port_parent(endpoint);
        if (!np_connector) {
                dev_err(drm_dev->dev,
                        "can't found connector node, please init!\n");
                goto err_put_port;
        }
        if (!of_device_is_available(np_connector)) {
                of_node_put(np_connector);
                np_connector = NULL;
                continue;
        } else {
                break;
        }
}
根据上述的代码,我们可以知道,它可以从port中编译endpoint,然后根据endpoint找到对应的节点np。在实际情况中,它找到的是rk628_hdmirx,这不符合我们的期望。
2.2 bridge下并不是subdev
从rockchip_drm_get_sub_dev的分析我们知道, 我们需要在最后一个bridge的时候,register一个drm sub dev设备,这样才能通过rockchip_drm_get_sub_dev拿到这个设备。代码如下
sub_dev = rockchip_drm_get_sub_dev(np_connector);
根据2.1的分析,我们拿到的np_connector是rk628_hdmirx,但是很明显,他并不是连接panel的哪个connector,真实的应该是rk628_lvds,所以我们应该分析rk628_lvds.c驱动,代码如下
static int rk628_lvds_bridge_attach(struct drm_bridge *bridge,
                                    enum drm_bridge_attach_flags flags)
{
        struct rk628_lvds *lvds = bridge_to_lvds(bridge);
        struct drm_connector *connector = &lvds->connector;
        struct drm_device *drm = bridge->dev;
        int ret;

        if (flags & DRM_BRIDGE_ATTACH_NO_CONNECTOR)
                return 0;

        ret = drm_connector_init(drm, connector, &rk628_lvds_connector_funcs,
                                 DRM_MODE_CONNECTOR_LVDS);
        if (ret) {
                dev_err(lvds->dev, "Failed to initialize connector with drm\n");
                return ret;
        }

        drm_connector_helper_add(connector, &rk628_lvds_connector_helper_funcs);
        drm_connector_attach_encoder(connector, bridge->encoder);

        return 0;
}
可以发现,这里没有注册sub dev,所以需要修改
三、修改代码
关于上面的解析,我们需要修改两处代码
3.1 寻找正确的bridge
对于2.1的问题,我们需要借用递归的思路寻找下一个bridge,所以修改代码如下
again:
        for_each_child_of_node(port, endpoint) {
                np_connector = of_graph_get_remote_port_parent(endpoint);
                if (!np_connector) {
                        dev_err(drm_dev->dev,
                                "can't found connector node, please init!\n");
                        goto err_put_port;
                }

                if(of_device_is_available(np_connector)){
                        if (strcmp(np_connector->name, "panel") != 0) {
                                port = of_graph_get_port_by_id(np_connector, 1);
                                if(port == NULL){
                                        break;
                                } else {
                                        np_encoder = np_connector;
                                        goto again;
                                }
                        } else {
                                np_connector = np_encoder;
                                break;
                        }
                }else{
                        of_node_put(np_connector);
                        np_connector = NULL;
                        continue;
                }
        }
此时我们找到的下一个bridge为rk628_hdmirx的时候,还是会继续往下寻找,知道找到最后一个名为panel的节点
3.2 在bridge上注册sub dev
根据3.1的递归,我们可以正确的找到rk628_lvds,所以需要在驱动中添加注册drm sub dev,如下
static int rk628_lvds_bridge_attach(struct drm_bridge *bridge,
                                    enum drm_bridge_attach_flags flags)
{
        struct rk628_lvds *lvds = bridge_to_lvds(bridge);
        struct drm_connector *connector = &lvds->connector;
        struct drm_device *drm = bridge->dev;
        int ret;

        if (flags & DRM_BRIDGE_ATTACH_NO_CONNECTOR)
                return 0;

        ret = drm_connector_init(drm, connector, &rk628_lvds_connector_funcs,
                                 DRM_MODE_CONNECTOR_LVDS);
        if (ret) {
                dev_err(lvds->dev, "Failed to initialize connector with drm\n");
                return ret;
        }

        drm_connector_helper_add(connector, &rk628_lvds_connector_helper_funcs);
        drm_connector_attach_encoder(connector, bridge->encoder);

        lvds->sub_dev.connector = &lvds->connector;
        lvds->sub_dev.of_node = lvds->dev->of_node;
        rockchip_drm_register_sub_dev(&lvds->sub_dev);

        return 0;
}
四、日志确认
根据分析代码,我们需要添加日志从而确定问题情况,如下是调试日志
printk("kylin: %s %d port=%pOF\n", __func__, __LINE__, port);
根据此,我们可以从启动日志找到如下信息
[ 4.490238] kylin: find_sub_dev_by_bridge 93 np_connector=/i2c@fe5d0000/rk628@50/hdmirx
[ 4.490288] kylin: find_sub_dev_by_bridge 106 port=/i2c@fe5d0000/rk628@50/hdmirx/ports/port@1
[ 4.490325] kylin: find_sub_dev_by_bridge 93 np_connector=/i2c@fe5d0000/rk628@50/post-process
[ 4.490367] kylin: find_sub_dev_by_bridge 106 port=/i2c@fe5d0000/rk628@50/post-process/ports/port@1
[ 4.490403] kylin: find_sub_dev_by_bridge 93 np_connector=/i2c@fe5d0000/rk628@50/lvds
[ 4.490443] kylin: find_sub_dev_by_bridge 106 port=/i2c@fe5d0000/rk628@50/lvds/ports/port@1
[ 4.490474] kylin: find_sub_dev_by_bridge 93 np_connector=/panel
此时我们正确的找到了panel节点,
五、关于特殊屏幕的DRM_MODE_TYPE_PREFERRED属性
我们知道我们的屏幕是panel-simple驱动的,所以我们需要留意get_timings回调如下
static const struct drm_panel_funcs panel_simple_funcs = {
        .disable = panel_simple_disable,
        .unprepare = panel_simple_unprepare,
        .prepare = panel_simple_prepare,
        .enable = panel_simple_enable,
        .get_modes = panel_simple_get_modes,
        .get_timings = panel_simple_get_timings,
};
这里面当timing的数量为1的时候,默认设置了perfered,如下
static unsigned int panel_simple_get_timings_modes(struct panel_simple *panel,
                                                   struct drm_connector *connector)
{
        struct drm_display_mode *mode;
        unsigned int i, num = 0;

        for (i = 0; i < panel->desc->num_timings; i++) {
                const struct display_timing *dt = &panel->desc->timings[i];
                struct videomode vm;

                videomode_from_timing(dt, &vm);
                mode = drm_mode_create(connector->dev);
                if (!mode) {
                        dev_err(panel->base.dev, "failed to add mode %ux%u\n",
                                dt->hactive.typ, dt->vactive.typ);
                        continue;
                }

                drm_display_mode_from_videomode(&vm, mode);

                mode->type |= DRM_MODE_TYPE_DRIVER;

                if (panel->desc->num_timings == 1)
                        mode->type |= DRM_MODE_TYPE_PREFERRED;

                drm_mode_probed_add(connector, mode);
                num++;
        }

        return num;
}
此时我们需要在fill bmp数据之前找到我们正确的mode,需要添加如下:
if (!found) {
        list_for_each_entry(mode, &connector->modes, head) {
                if (mode->type & DRM_MODE_TYPE_PREFERRED) {
                        found = 1;
                        break;
                }
        }
}
其关键代码如下:
if (setup_initial_state(drm_dev, state, set)) {
        drm_framebuffer_put(set->fb);
        INIT_LIST_HEAD(&set->head);
        list_add_tail(&set->head, &mode_unset_list);
        continue;
}
至此,开机logo即正常显示。
最近在开发Openharmony系统,因为Openharmony涉及的目录特别多,而且需要来回的切换,常用的cd和cd -已经不满足基本的开发环境要求了,于是借鉴了栈的思想,写了一个脚本,能够提高大家的开发效率
一、基于栈
我们知道栈的结构是先进后出,也就意味着越新的元素我们就越经常使用。这个概念恰好契合了我们在cd目录的场景上。所以我们切换目录如果是栈的形式保存了目录结构,这样就非常方便我们开发了。基于此思想,我开始了此工具的开发
二、pushd/popd
我们知道,linux有几个基本的命令叫做pushd和popd,这是以栈的思想打开文件目录。但是pushd和popd要经常配合dirs来运行,所以不是很方便,原因如下:
- 切换目录要敲很多字,
- 没有很好的提示告诉我们应该按照需要几来取出目录
- 取出元素需要+符号,打字不方便
pushd和popd以及dir的常用命令如下
pushd /tmp
popd
dirs
pushd +1
三、自定义脚本使用指南
基于上述现状上,我没办法直接使用popd和pushd命令,所以我自己编写了一个较为易用的脚本,使用方法如下:
将脚本命名为p,放入/usr/local/bin/下,赋予执行权限,并在环境中设置如下:
alias p='source p'
3.1 将文件夹压入栈
p dir
例如:
# p /root/
[0]:~ [1]:~/tf/repo/rk3568/vendor/hihope/rk3568/hdf_config/khdf/hdf_test [2]:
3.2 将文件夹推出栈
p
例如:
root@chroot:~# p
root@chroot:~/tf/repo/rk3568/vendor/hihope/rk3568/hdf_config/khdf/hdf_test#
3.3 查看目录栈的内容
p -h
例如
root@chroot:/sys# p -h
[0]:/sys
[1]:/tmp
[2]:/root
[3]:/root/tf/repo/rk3568/vendor/hihope/rk3568/hdf_config/khdf/hdf_test
3.3 在栈中选择某个目录
p 3
这里选择序号为3的目录栈进行推出
p 3
[0]:~/tf/repo/rk3568/vendor/hihope/rk3568/hdf_config/khdf/hdf_test [1]:/sys [2]:/tmp
3.4 清空栈目录
p -c
这样目录栈就没有其他文件夹了
四、脚本源码
#!/bin/bash

dir=$1

BLK='\033[0;30m' # Black
RED='\033[0;31m' # Red
GRN='\033[0;32m' # Green
BLU='\033[0;34m' # Blue
CYA='\033[0;36m' # Cyan
WHI='\033[0;37m' # White
YEL='\033[0;33m' # Yellow
PUR='\033[0;35m' # Purple
NC='\033[0m' # No Color


function fault_log()
{
        echo -e "${RED}$1${NC}"
}

function info_log()
{
        echo -e "${GRN}$1${NC}"
}

function dir_list()
{
        array=()
        dir_name=$(dirs -l)
        dir_num=$(echo ${dir_name}| awk '{print NF}')
        i=0
        for name in ${dir_name}
        do
                array[i]=$name
                let i=i+1
        done

        output_message=""
        for i in ${!array[@]}
        do
                info_log "${RED}[${i}]${GRN}:${array[i]}"
        done
}
function help()
{
        array=()
        dir_name=$(dirs)
        dir_num=$(echo ${dir_name}| awk '{print NF}')
        i=0
        for name in ${dir_name}
        do
                array[i]=$name
                let i=i+1
        done

        output_message=""
        #for i in ${!array[@]}
        for((i=0;i<3;i++))
        do
                output_message="${output_message}${RED}[${i}]${GRN}:${array[i]} "
        done
        info_log "${output_message}"
}

function push_dir()
{
        if [[ "$1" =~ "+" ]]
        then
                num=$(dirs -l | xargs | tr ' ' '\n' | wc -l)
                if [ ${num} == 1 ]
                then
                        fault_log "pushd: 目录栈为空"
                        return
                fi
        fi
        pushd $1 > /dev/null
        if [ $? -ne 0 ]
        then
                fault_log "pushd error"
        fi
        help
}

function pop_dir()
{
        popd > /dev/null 2>&1
        if [ $? == 1 ]
        then
                fault_log "popd: 目录栈为空"
        fi
}


case "${dir}" in
        "")
                pop_dir
                ;;
        "-h")
                dir_list
                ;;
        "-c")
                dirs -c
                ;;
        [0-9])
                [ -d ${dir} ] && info_log "存在数字命名的文件夹"
                [ -d ${dir} ] && push_dir ${dir}
                [ ! -d ${dir} ] && push_dir "+${dir}"
                ;;
        *)
                [ ! -d ${dir} ] && info_log "没有这样的目录"
                [ -d ${dir} ] && push_dir ${dir}
                ;;
esac
