目录
刚装好的jetson nano,需要简单的验证一下cuda nn,本文基于刚刷好的机器,进行cudann的简单测试
确定支持范围
nvidia jetpack 默认情况下cuda有一定的支持范围,我们需要先针对机器安装情况和官网的范围进行核对,如果不是在范围之内,则需要升级一下软件。否则出现如下错误。
 CUDA Device Query (Runtime API) version (CUDART static linking)

cudaGetDeviceCount returned 35
-> CUDA driver version is insufficient for CUDA runtime version
Result = FAIL
这类问题,首先需要查看nvidia-smi的输出,获取cuda版本和driver版本,如下
# nvidia-smi
Sun Jul 27 14:54:34 2025
+---------------------------------------------------------------------------------------+
| NVIDIA-SMI 540.4.0                Driver Version: 540.4.0      CUDA Version: 12.6     |
|-----------------------------------------+----------------------+----------------------+
| GPU  Name                 Persistence-M | Bus-Id        Disp.A | Volatile Uncorr. ECC |
| Fan  Temp   Perf          Pwr:Usage/Cap |         Memory-Usage | GPU-Util  Compute M. |
|                                         |                      |               MIG M. |
|=========================================+======================+======================|
|   0  Orin (nvgpu)                  N/A  | N/A              N/A |                  N/A |
| N/A   N/A  N/A               N/A /  N/A | Not Supported        |     N/A          N/A |
|                                         |                      |                  N/A |
+-----------------------------------------+----------------------+----------------------+

+---------------------------------------------------------------------------------------+
| Processes:                                                                            |
|  GPU   GI   CI        PID   Type   Process name                            GPU Memory |
|        ID   ID                                                             Usage      |
|=======================================================================================|
|  No running processes found                                                           |
+---------------------------------------------------------------------------------------+
我们关注机器的driver版本和cuda的版本如下
- driver version: 540.4.0
- cuda version: 12.6
此时我们进入cuda的release-notes中查看匹配范围
https://docs.nvidia.com/cuda/cuda-toolkit-release-notes/index.html
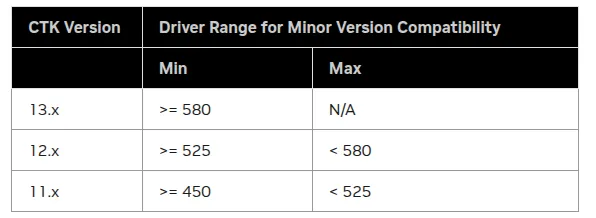
可以看到,我的内核在540版本,它不适合安装cuda 13.x, 而我自己版本安装的是12.6,符合cuda的要求
本地测试
默认情况下,12.6版本的cuda的sample程序没有预置,需要自己从github上安装,如下
默认通过sdkmanager安装的版本,nvjpeg没有替我们安装,这里手动安装一下,方便后续直接编译
apt install libnvjpeg-dev-12-6
apt install g++ freeglut3-dev build-essential libx11-dev libxmu-dev libxi-dev libglu1-mesa-dev libfreeimage-dev libglfw3-dev
编译cuda的测试用例,需要为其指明cuda的安装位置,否则出现如下错误
CMake Error at CMakeLists.txt:5 (project):
  No CMAKE_CUDA_COMPILER could be found.

  Tell CMake where to find the compiler by setting either the environment
  variable "CUDACXX" or the CMake cache entry CMAKE_CUDA_COMPILER to the full
  path to the compiler, or to the compiler name if it is in the PATH.
由如下宏定义实现
CMAKE_CUDA_COMPILER=/usr/local/cuda-12.6/bin/nvcc
所以构建命令如下
cmake -DCMAKE_CUDA_COMPILER=/usr/local/cuda-12.6/bin/nvcc ..
最后,因为cuda-sample是针对所有的nvidia显卡的测试用例,为了能够在我们orin nano 上正常使用,我们需要先查询一下其代号,如下

可以看到,我这里使用的jetson orin nano 属于8.7的Compute Capability
所以在代码里面,我们应该指定为87,如下
set(CMAKE_CUDA_ARCHITECTURES 50 52 60 61 70 72 75 80 86 87 89 90 100 101 120)
如果是其他不支持的平台,例如compute_100,我们可以删除之。
测试deviceQuery
deviceQuery的代码在Samples/1_Utilities/deviceQuery,完成上述的预备操作之后,进入代码,直接编译即可。
mkdir build && cmake ..
make
Consolidate compiler generated dependencies of target deviceQuery
[100%] Built target deviceQuery
此时测试程序编译出来了,我们运行即可
# ./deviceQuery
./deviceQuery Starting...

 CUDA Device Query (Runtime API) version (CUDART static linking)

Detected 1 CUDA Capable device(s)

Device 0: "Orin"
  CUDA Driver Version / Runtime Version          12.6 / 12.6
  CUDA Capability Major/Minor version number:    8.7
  Total amount of global memory:                 7620 MBytes (7990489088 bytes)
  (008) Multiprocessors, (128) CUDA Cores/MP:    1024 CUDA Cores
  GPU Max Clock rate:                            1020 MHz (1.02 GHz)
  Memory Clock rate:                             1020 Mhz
  Memory Bus Width:                              128-bit
  L2 Cache Size:                                 2097152 bytes
  Maximum Texture Dimension Size (x,y,z)         1D=(131072), 2D=(131072, 65536), 3D=(16384, 16384, 16384)
  Maximum Layered 1D Texture Size, (num) layers  1D=(32768), 2048 layers
  Maximum Layered 2D Texture Size, (num) layers  2D=(32768, 32768), 2048 layers
  Total amount of constant memory:               65536 bytes
  Total amount of shared memory per block:       49152 bytes
  Total shared memory per multiprocessor:        167936 bytes
  Total number of registers available per block: 65536
  Warp size:                                     32
  Maximum number of threads per multiprocessor:  1536
  Maximum number of threads per block:           1024
  Max dimension size of a thread block (x,y,z): (1024, 1024, 64)
  Max dimension size of a grid size    (x,y,z): (2147483647, 65535, 65535)
  Maximum memory pitch:                          2147483647 bytes
  Texture alignment:                             512 bytes
  Concurrent copy and kernel execution:          Yes with 2 copy engine(s)
  Run time limit on kernels:                     No
  Integrated GPU sharing Host Memory:            Yes
  Support host page-locked memory mapping:       Yes
  Alignment requirement for Surfaces:            Yes
  Device has ECC support:                        Disabled
  Device supports Unified Addressing (UVA):      Yes
  Device supports Managed Memory:                Yes
  Device supports Compute Preemption:            Yes
  Supports Cooperative Kernel Launch:            Yes
  Supports MultiDevice Co-op Kernel Launch:      Yes
  Device PCI Domain ID / Bus ID / location ID:   0 / 0 / 0
  Compute Mode:
     < Default (multiple host threads can use ::cudaSetDevice() with device simultaneously) >

deviceQuery, CUDA Driver = CUDART, CUDA Driver Version = 12.6, CUDA Runtime Version = 12.6, NumDevs = 1
Result = PASS
可以看到这里直接查询到板卡的所有基本信息。
测试conv_sample
conv_sample 是 jetpack 预装的示例包libcudnn9-samples,我们构建此用来来测试cuda,如下
cp -r /usr/src/cudnn_samples_v9/conv_sample/ /tmp/
cd /tmp/conv_sample && make
编译完成之后,直接运行测试,测试结果如下
# ./conv_sample
Executing: conv_sample
Using format CUDNN_TENSOR_NCHW (for INT8x4 and INT8x32 tests use CUDNN_TENSOR_NCHW_VECT_C)
Testing single precision
====USER DIMENSIONS====
input dims are 1, 32, 4, 4
filter dims are 32, 32, 1, 1
output dims are 1, 32, 4, 4
====PADDING DIMENSIONS====
padded input dims are 1, 32, 4, 4
padded filter dims are 32, 32, 1, 1
padded output dims are 1, 32, 4, 4
Testing conv
^^^^ CUDA : elapsed = 0.00111403 sec,
Test PASSED
Testing half precision (math in single precision)
====USER DIMENSIONS====
input dims are 1, 32, 4, 4
filter dims are 32, 32, 1, 1
output dims are 1, 32, 4, 4
====PADDING DIMENSIONS====
padded input dims are 1, 32, 4, 4
padded filter dims are 32, 32, 1, 1
padded output dims are 1, 32, 4, 4
Testing conv
^^^^ CUDA : elapsed = 0.0234335 sec,
Test PASSED
可以看到测试cudann的转换成功。
测试tensorrt
jetpack默认预装了libnvinfer-samples,这是tensorrt的测试程序。下面基于此进行测试验证 关于tensorrt的测试说明,可以参考如下链接
https://docs.nvidia.com/deeplearning/tensorrt/latest/getting-started/quick-start-guide.html
这里以mnist的测试模型为例,展示通过onnx转换成trt的engine。借助libnvinfer-samples默认的测试程序,路径如下
/usr/src/tensorrt/samples/sampleOnnxMNIST
进入上述目录之后,直接make即可 编译完成之后,/usr/src/tensorrt/bin下会存在程序sample_onnx_mnist,直接运行即可验证
# ./sample_onnx_mnist
&&&& RUNNING TensorRT.sample_onnx_mnist [TensorRT v100300] # ./sample_onnx_mnist
[08/09/2025-18:53:25] [I] Building and running a GPU inference engine for Onnx MNIST
[08/09/2025-18:53:25] [I] [TRT] [MemUsageChange] Init CUDA: CPU +13, GPU +0, now: CPU 31, GPU 2505 (MiB)
[08/09/2025-18:53:28] [I] [TRT] [MemUsageChange] Init builder kernel library: CPU +927, GPU +583, now: CPU 1001, GPU 3133 (MiB)
[08/09/2025-18:53:28] [I] [TRT] ----------------------------------------------------------------
[08/09/2025-18:53:28] [I] [TRT] Input filename:   ../data/mnist/mnist.onnx
[08/09/2025-18:53:28] [I] [TRT] ONNX IR version:  0.0.3
[08/09/2025-18:53:28] [I] [TRT] Opset version:    8
[08/09/2025-18:53:28] [I] [TRT] Producer name:    CNTK
[08/09/2025-18:53:28] [I] [TRT] Producer version: 2.5.1
[08/09/2025-18:53:28] [I] [TRT] Domain:           ai.cntk
[08/09/2025-18:53:28] [I] [TRT] Model version:    1
[08/09/2025-18:53:28] [I] [TRT] Doc string:
[08/09/2025-18:53:28] [I] [TRT] ----------------------------------------------------------------
[08/09/2025-18:53:28] [I] [TRT] Local timing cache in use. Profiling results in this builder pass will not be stored.
[08/09/2025-18:53:30] [I] [TRT] Detected 1 inputs and 1 output network tensors.
[08/09/2025-18:53:30] [I] [TRT] Total Host Persistent Memory: 18976
[08/09/2025-18:53:30] [I] [TRT] Total Device Persistent Memory: 0
[08/09/2025-18:53:30] [I] [TRT] Total Scratch Memory: 0
[08/09/2025-18:53:30] [I] [TRT] [BlockAssignment] Started assigning block shifts. This will take 4 steps to complete.
[08/09/2025-18:53:30] [I] [TRT] [BlockAssignment] Algorithm ShiftNTopDown took 0.031107ms to assign 2 blocks to 4 nodes requiring 31744 bytes.
[08/09/2025-18:53:30] [I] [TRT] Total Activation Memory: 31744
[08/09/2025-18:53:30] [I] [TRT] Total Weights Memory: 25704
[08/09/2025-18:53:30] [I] [TRT] Engine generation completed in 1.73945 seconds.
[08/09/2025-18:53:30] [I] [TRT] [MemUsageStats] Peak memory usage of TRT CPU/GPU memory allocators: CPU 0 MiB, GPU 8 MiB
[08/09/2025-18:53:30] [I] [TRT] [MemUsageStats] Peak memory usage during Engine building and serialization: CPU: 1437 MiB
[08/09/2025-18:53:30] [I] [TRT] Loaded engine size: 0 MiB
[08/09/2025-18:53:30] [I] [TRT] [MemUsageChange] TensorRT-managed allocation in IExecutionContext creation: CPU +0, GPU +0, now: CPU 0, GPU 0 (MiB)
[08/09/2025-18:53:30] [I] Input:
[08/09/2025-18:53:30] [I] @@@@@@@@@@@@@@@@@@@@@@@@@@@@
@@@@@@@@@@@@@@@@@@@@@@@@@@@@
@@@@@@@@@@@@@@@@@@@@@@@@@@@@
@@@@@@@@@@@@@@@@@@@@@@@@@@@@
@@@@@@@@#-:.-=@@@@@@@@@@@@@@
@@@@@%=     . *@@@@@@@@@@@@@
@@@@%  .:+%%% *@@@@@@@@@@@@@
@@@@+=#@@@@@# @@@@@@@@@@@@@@
@@@@@@@@@@@%  @@@@@@@@@@@@@@
@@@@@@@@@@@: *@@@@@@@@@@@@@@
@@@@@@@@@@- .@@@@@@@@@@@@@@@
@@@@@@@@@:  #@@@@@@@@@@@@@@@
@@@@@@@@:   +*%#@@@@@@@@@@@@
@@@@@@@%         :+*@@@@@@@@
@@@@@@@@#*+--.::     +@@@@@@
@@@@@@@@@@@@@@@@#=:.  +@@@@@
@@@@@@@@@@@@@@@@@@@@  .@@@@@
@@@@@@@@@@@@@@@@@@@@#. #@@@@
@@@@@@@@@@@@@@@@@@@@#  @@@@@
@@@@@@@@@%@@@@@@@@@@- +@@@@@
@@@@@@@@#-@@@@@@@@*. =@@@@@@
@@@@@@@@ .+%%%%+=.  =@@@@@@@
@@@@@@@@           =@@@@@@@@
@@@@@@@@*=:   :--*@@@@@@@@@@
@@@@@@@@@@@@@@@@@@@@@@@@@@@@
@@@@@@@@@@@@@@@@@@@@@@@@@@@@
@@@@@@@@@@@@@@@@@@@@@@@@@@@@
@@@@@@@@@@@@@@@@@@@@@@@@@@@@

[08/09/2025-18:53:30] [I] Output:
[08/09/2025-18:53:30] [I]  Prob 0  0.0000 Class 0:
[08/09/2025-18:53:30] [I]  Prob 1  0.0000 Class 1:
[08/09/2025-18:53:30] [I]  Prob 2  0.0000 Class 2:
[08/09/2025-18:53:30] [I]  Prob 3  1.0000 Class 3: **********
[08/09/2025-18:53:30] [I]  Prob 4  0.0000 Class 4:
[08/09/2025-18:53:30] [I]  Prob 5  0.0000 Class 5:
[08/09/2025-18:53:30] [I]  Prob 6  0.0000 Class 6:
[08/09/2025-18:53:30] [I]  Prob 7  0.0000 Class 7:
[08/09/2025-18:53:30] [I]  Prob 8  0.0000 Class 8:
[08/09/2025-18:53:30] [I]  Prob 9  0.0000 Class 9:
[08/09/2025-18:53:30] [I]
&&&& PASSED TensorRT.sample_onnx_mnist [TensorRT v100300] # ./sample_onnx_mnist
可以看到tensorrt的转换测试也是没有问题的
测试vpi
nvidia提供了vpi接口,默认也是通过jetpack的vpi3-samples提供测试示例,同样的也进行一下测试验证
cp -r /opt/nvidia/vpi3/samples/01-convolve_2d /tmp
cd /tmp/samples/01-convolve_2d && mkdir build && cmake .. && make
此时我们运行测试程序即可
./vpi_sample_01_convolve_2d cuda /opt/nvidia/vpi3/samples/assets/kodim08.png
./vpi_sample_01_convolve_2d cpu /opt/nvidia/vpi3/samples/assets/kodim08.png
运行之后,本地存在两张图片,如下
edges_cpu.png edges_cuda.png
两个图片一致即可。
使用容器
jetson orin 支持容器镜像运行,下面通过容器验证。
在使用之前,需要手动安装容器镜像,如下确定
apt install nvidia-container nvidia-container-runtime nvidia-container-toolkit nvidia-container-toolkit-base libnvidia-container1 nvidia-docker2
上面安装完成之后,需要确定docker的配置,如下
# cat /etc/docker/daemon.json
{
    "default-runtime": "nvidia",
    "runtimes": {
        "nvidia": {
            "args": [],
            "path": "nvidia-container-runtime"
        }
    }
}
如果设置不对,则需要手动写进去。
安装镜像
在安装容器镜像之前,需要先确定容器的版本和机器的版本尽可能一致
先查看机器的安装版本,通过jtop如下

可以看到我的板卡L4T的版本是36.4.4。所以我们找最新的容器版本,如下
https://catalog.ngc.nvidia.com/orgs/nvidia/containers/l4t-jetpack/tags

这里最新的是r36.4.0,点击右侧的复制,可以获取容器的镜像位置,然后如下进行运行容器
docker run -it --rm --net=host --runtime nvidia -e DISPLAY=$DISPLAY -v /tmp/.X11-unix/:/tmp/.X11-unix -v /root/github:/root/github -v /tmp/samples/01-convolve_2d/:/root/01-convolve_2d -v /usr/src/cudnn_samples_v9/conv_sample:/root/conv_sample nvcr.io/nvidia/l4t-jetpack:r36.4.0
这里值得注意的是,需要将主机运行的测试程序,通过-v选项,挂载到docker内运行。
测试deviceQuery
直接容器里面运行即可
/root/github/cuda-samples/build/Samples/1_Utilities/deviceQuery/deviceQuery
测试conv_sample
直接容器里面运行即可
/root/conv_sample/conv_sample
测试tensorrt
这个默认在jetpack中,直接编译运行
cd /usr/src/tensorrt/samples/sampleOnnxMNIST && make -j8
/usr/src/tensorrt/bin/sample_onnx_mnist
测试vpi
为了避免编译,直接运行如下
/root/01-convolve_2d/build/vpi_sample_01_convolve_2d cuda /opt/nvidia/vpi3/samples/assets/kodim08.png
/root/01-convolve_2d/build/vpi_sample_01_convolve_2d cpu /opt/nvidia/vpi3/samples/assets/kodim08.png
参考文献
https://catalog.ngc.nvidia.com/orgs/nvidia/containers/l4t-jetpack
http://forecr.io/blogs/programming/nvidia-container-runtime-1-installation
https://docs.nvidia.com/cuda/cuda-toolkit-release-notes/index.html
https://docs.nvidia.com/cuda/cuda-installation-guide-linux/index.html
总结
至此,完成了一些基本的cuda的验证。