我们知道linux都是基于dbus来进行通信的,dbus分为server和client,也就是说,如果应用程序作为client发送消息,我们只需要劫持这条dbus即可将错误的dbus信息返回给client,这样就能修改核心信息,
一、找出dbus的调用
对于我们感兴趣的调用,我们可以通过监听的方式找到调用,如下:
dbus-monitor --system "destination=org.freedesktop.activation"
此时我们可以抓到某个method call如下:
method call time=1723771942.107726 sender=:1.4302 -> destination=org.freedesktop.activation serial=26 path=/org/freedesktop/activation; interface=org.freedesktop.activation.interface; member=date
二、复刻method
我们编写pro如activation-daemon.pro文件如下:
QT += dbus

TARGET = activation-daemon

SOURCES += activation-daemon.cpp
HEADERS += activation-daemon.h
然后编写dbus interface class为activation-daemon.h如下:

#include <QCoreApplication>
#include <QtDBus>

// https://doc.qt.io/qt-5/qdbusabstractadaptor.html
class ActivationDaemon : public QDBusAbstractAdaptor {
    Q_OBJECT
    Q_CLASSINFO("D-Bus Interface", "org.freedesktop.activation.interface")

public:
    ActivationDaemon(QObject *parent = nullptr) : QDBusAbstractAdaptor(parent) {}

public slots:
    QString date() {
        return "kylin hack";
    }
};
最后实施这个类activation-daemon.cpp 如下:
#include "activation-daemon.h"

int main(int argc, char *argv[]) {
    QObject object;
    QCoreApplication app(argc, argv);
    QDBusConnection connection = QDBusConnection::systemBus();

    ActivationDaemon ac(&object);
    connection.registerObject("/org/freedesktop/activation", &object);
    connection.registerService("org.freedesktop.activation");

    qDebug() << "Kylin Hacking...";
    return app.exec();
}
编译后生成如下:
qmake && make
此时我们生成二进制为activation-daemon,将其替换到系统如下:
mv activation-daemon /usr/sbin/activation-daemon
三、验证
此时我们通过dbus-send验证这条dbus即可,如下
root@kylin:~# dbus-send --system --print-reply --dest=org.freedesktop.activation /org/freedesktop/activation org.freedesktop.activation.interface.date
method return time=1723772343.990579 sender=:1.4205 -> destination=:1.4309 serial=115 reply_serial=2
 string "kylin hack"
可以看到这条dbus的响应已经变成我们自己写的dbus服务了。大功告成
四、如何防止
针对上述这种手段,我们可以知道,基于篡改二进制导致的劫持可以导致dbus的响应被篡改,为了保障核心相关二进制不被篡改,我们可以通过加密解密的方式完成,详情请查看如下:
激活防破解方案-使用非对称加密和数字签名
根据之前的讨论,我们CD盘的短期目标是基于overlayfs来实现系统数据和应用数据的隔离(形式上)。长期目标是将应用数据和系统数据完全隔离开来。本文主要讨论peony上显示应用盘的基本改造流程
一、简述overlayfs
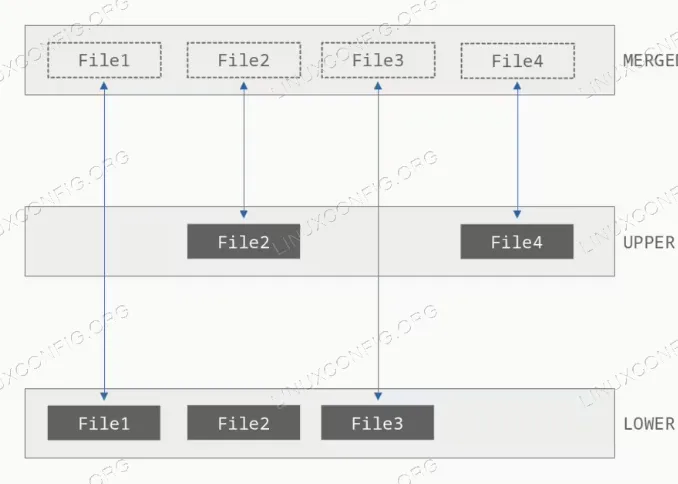
根据上图我们可以知道,对于overlayfs,区分lower和upper两层。我们可以将lower设置为sysroot,将upper设置为appfs。这样,我们发行操作系统的时候,默认情况下lower是发行的原始操作系统,而upper是除了原始发行的操作系统之外的所有改动。
我们将发行操作系统之外的所有改动都认为是应用的改动,所以直接认为upper就是应用盘。
二、peony的改造
对于peony,我们需要修改sidebar上的显示,显示系统盘和应用盘。效果如下:

这里我们文件系统盘是默认的overlay,如下:
kylinoverlay 19G 8.3G 9.5G 47% /
这里应用盘是appfs目录,如下:
/dev/mmcblk0p5 19G 8.3G 9.5G 47% /appfs
这里系统盘是sysroot目录,如下:
root@kylin:~# ls /sysroot/
bin boot data dev etc home lib media mnt opt proc root run sbin srv sys tmp usr var work
对于代码,主要如下:
2.1 应用盘新增
From 79f4bfabfde8d8d2deaaf2908933c1be36a1d198 Mon Sep 17 00:00:00 2001
From: =?UTF-8?q?=E5=94=90=E5=B3=B0?= <tangfeng@kylinos.cn>
Date: Wed, 15 Jan 2025 17:36:13 +0800
Subject: [PATCH] changelog: 3.14.4.5-0k3.0tablet18rk3.egf1.3

---
 .../model/side-bar-file-system-item.cpp       | 22 ++++++++++++++-----
 translations/libpeony-qt/libpeony-qt_zh_CN.ts |  4 ++++
 3 files changed, 31 insertions(+), 5 deletions(-)

diff --git a/libpeony-qt/model/side-bar-file-system-item.cpp b/libpeony-qt/model/side-bar-file-system-item.cpp
index 6268ddfb6..0b6664966 100644
--- a/libpeony-qt/model/side-bar-file-system-item.cpp
+++ b/libpeony-qt/model/side-bar-file-system-item.cpp
@@ -169,6 +169,11 @@ void SideBarFileSystemItem::initDirInfo(const QString &uri)
        m_displayName = tr("Data");
        m_iconName = "drive-harddisk";
    }
+
+   if (uri == "file:///appfs") {
+       m_displayName = tr("Appfs");
+       m_iconName = "drive-harddisk";
+   }
 }

 void SideBarFileSystemItem::initComputerInfo()
@@ -259,6 +264,7 @@ void SideBarFileSystemItem::initVolumeInfo(const Experimental_Peony::Volume &vol
     }else{
         m_uri = "file://" + m_uri;
     }
+
     /* 文件系统项特殊处理 */
     if("file:///" == m_uri){
         m_unmountable = m_mountable = m_ejectable = m_stopable = false;
@@ -270,11 +276,11 @@ void SideBarFileSystemItem::initVolumeInfo(const Experimental_Peony::Volume &vol
         m_mounted = true;
         m_displayName = QObject::tr("Data");
         m_iconName = "drive-harddisk";
-    }
-
-    /* 隐藏指定的挂载点 */
-    if(m_device == getDeviceMount("/media/root-rw") || m_device == getDeviceMount("/media/root-ro")){
-   m_hidden = true;
+    }else if("file:///appfs" == m_uri){
+        m_unmountable = m_mountable = m_ejectable = m_stopable = false;
+        m_mounted = true;
+        m_displayName = QObject::tr("Appfs");
+        m_iconName = "drive-harddisk";
     }

     // kydrive特殊处理
@@ -612,6 +618,12 @@ void SideBarFileSystemItem::findChildren()
             m_model->endInsertRows();
         }

+        if (FileUtils::isFileDirectory("file:///appfs")) {
+            m_model->beginInsertRows(this->firstColumnIndex(), m_children->count(), m_children->count());
+            SideBarFileSystemItem* item = new SideBarFileSystemItem("file:///appfs", nullptr, this, m_model);
+            m_children->append(item);
+            m_model->endInsertRows();
+        }
     }else{
         //对挂载点进行已存在文件的枚举操作
         QString enumdir = m_uri;
diff --git a/translations/libpeony-qt/libpeony-qt_zh_CN.ts b/translations/libpeony-qt/libpeony-qt_zh_CN.ts
index d8de5ad92..68bdf8f4b 100644
--- a/translations/libpeony-qt/libpeony-qt_zh_CN.ts
+++ b/translations/libpeony-qt/libpeony-qt_zh_CN.ts
@@ -3792,6 +3792,10 @@ Do you want to delete the link file?</source>
         <source>Data</source>
         <translation>数据盘</translation>
     </message>
+    <message>
+        <source>Appfs</source>
+        <translation>应用盘</translation>
+    </message>
 </context>
 <context>
     <name>Peony::SideBarMenu</name>
--
2.25.1
这里完成了应用盘的新增工作,识别/appfs的目录,将其作为单独的硬盘显示在peony的侧边栏
2.2 系统盘新增
diff --git a/libpeony-qt/model/side-bar-file-system-item.cpp b/libpeony-qt/model/side-bar-file-system-item.cpp
index 0b6664966..f38d678e7 100644
--- a/libpeony-qt/model/side-bar-file-system-item.cpp
+++ b/libpeony-qt/model/side-bar-file-system-item.cpp
@@ -174,6 +174,11 @@ void SideBarFileSystemItem::initDirInfo(const QString &uri)
        m_displayName = tr("Appfs");
        m_iconName = "drive-harddisk";
    }
+
+   if (uri == "file:///sysroot") {
+       m_displayName = tr("Sysroot");
+       m_iconName = "drive-harddisk";
+   }
 }

 void SideBarFileSystemItem::initComputerInfo()
@@ -281,6 +286,11 @@ void SideBarFileSystemItem::initVolumeInfo(const Experimental_Peony::Volume &vol
         m_mounted = true;
         m_displayName = QObject::tr("Appfs");
         m_iconName = "drive-harddisk";
+    }else if("file:///sysroot" == m_uri){
+        m_unmountable = m_mountable = m_ejectable = m_stopable = false;
+        m_mounted = true;
+        m_displayName = QObject::tr("Sysroot");
+        m_iconName = "drive-harddisk";
     }

     // kydrive特殊处理
@@ -618,6 +628,13 @@ void SideBarFileSystemItem::findChildren()
             m_model->endInsertRows();
         }

+        if (FileUtils::isFileDirectory("file:///sysroot")) {
+            m_model->beginInsertRows(this->firstColumnIndex(), m_children->count(), m_children->count());
+            SideBarFileSystemItem* item = new SideBarFileSystemItem("file:///sysroot", nullptr, this, m_model);
+            m_children->append(item);
+            m_model->endInsertRows();
+        }
+
         if (FileUtils::isFileDirectory("file:///appfs")) {
             m_model->beginInsertRows(this->firstColumnIndex(), m_children->count(), m_children->count());
             SideBarFileSystemItem* item = new SideBarFileSystemItem("file:///appfs", nullptr, this, m_model);
diff --git a/translations/libpeony-qt/libpeony-qt_zh_CN.ts b/translations/libpeony-qt/libpeony-qt_zh_CN.ts
index 68bdf8f4b..3c0814fc8 100644
--- a/translations/libpeony-qt/libpeony-qt_zh_CN.ts
+++ b/translations/libpeony-qt/libpeony-qt_zh_CN.ts
@@ -3792,6 +3792,10 @@ Do you want to delete the link file?</source>
         <source>Data</source>
         <translation>数据盘</translation>
     </message>
+    <message>
+        <source>Sysroot</source>
+        <translation>系统盘</translation>
+    </message>
     <message>
         <source>Appfs</source>
         <translation>应用盘</translation>
这里新增了系统盘的显示,指向了sysroot目录。
三、总结
通过上述操作,我们可以在文件管理器中正常的导航到/appfs和/sysroot两个目录。这两个目录实际上就是overlay的lower和upper。至此,在当前阶段,系统的文件存放在sysroot,而应用的文件存放在appfs。我们完成了应用程序和操作系统的分离。
我们在看内核代码的时候,有一个关于C语言的一个小技巧,个人觉得可以介绍分享一下,做个记录。从而方便大家看代码的时候心里直接有个答案,无需脑子里面再转个弯。
一、直接找到结构体父指针
我们知道内核头文件会定义结构体,在定义结构体的时候,默认会把重要的结构体的第一项作为子结构体。如下示例:
struct __drm_planes_state {
        struct drm_plane *ptr;
        struct drm_plane_state *state, *old_state, *new_state;
};
这里我们有个C语言的知识点如下:
struct drm_plane *ptr 的地址是struct __drm_planes_state的地址
也就是说,如果我们一直在操作ptr指针,其实我可以随时和任意的操作struct __drm_planes_state指针,伪代码如下:
struct __drm_planes_state* stat = (struct __drm_planes_state*) &ptr;
if(stat->state){
        ......
}
这里必须要清楚的是,ptr指针一定要是__drm_planes_state的成员,不能是从其他地方构造和赋值的指针值地址,错误的例子如下:
struct drm_plane *p1 = ptr;
stat = (struct __drm_planes_state*) &p1;
这里p1我们不能直接去做取&运算,因为它本身不是__drm_planes_state的成员, 它只是普普通通的一个栈区地址。
1.1 测试程序
#include <stdio.h>
#include <stdlib.h>

struct lower {
        int a;
};

struct upper  {
        struct lower *k;
        int b;
};

int main()
{
        struct upper *u = malloc(sizeof(struct upper));
        struct lower *l = u->k;
        u->b = 2;

        struct upper* t1 = (struct upper*)&(u->k);
        struct upper* t2 = (struct upper*)&l;
        printf("t1=%p t2=%p t1->b=%d \n", t1, t2, t1->b);
}
这里我们构造了一个upper的结构体,设置成员b的值为2,然后我们提取了t1和t2,并打印了地址,得到输出如下:
# gcc test.c -o test && ./test
t1=0x558beacb70 t2=0x7ffd087628 t1->b=2
发现没,t1大概在堆区地址范围上,t2在栈区范围上,我们通过t1能够直接找到b,其值为2。
1.2 小结
这里我们知道了一个内核通用技巧,我们可以在内核代码中经常看到直接强制类型转换就拿到了父的结构体的指针,然后直接操作代码。非常方便大家理解内核的逻辑。
以后大家看内核代码的时候,这类操作就不需要停顿下来脑子去转弯了。
二、通过container_of找到结构体父指针
如果经常看代码,我们可以发现内核充斥着大量的container_of函数,这个函数的意思是:
输入一个成员变量实体,一个父结构体类型,一个结构体成员变量声明,输出结构体父指针
为什么会有这样的函数呢,我们可以根据上文我们可以很容易提出疑问
如果我想找到父结构体指针,那么我的成员必定是第一个成员,那多不方便啊。如果这个成员不是第一个,那有啥好办法能够找到父结构体指针呢? 关于此,我们有两个知识点需要准备:
- 结构体成员在内存中是顺序存放的
- 父结构体指针可以通过→定位到结构体成员
那基于此,很容易得出这么一个想法
我知道结构体的成员地址,然后推算我之前有多少的偏移,直接拿自己的指针减去这个偏移不就是父指针的地址了么 所以,我们开始解析container_of的宏定义,如下:
#define container_of(ptr, type, member) ({                              \
        void *__mptr = (void *)(ptr);                                   \
        ((type *)(__mptr - offsetof(type, member))); })
我们还需要看offsetof的定义,根据内核头文件,我们可以查到:
#define offsetof(TYPE, MEMBER) ((size_t)&((TYPE *)0)->MEMBER)
这里有一个技巧,那就是
运用0地址做强制类型转换,然后去取类型的成员,这样就能拿到成员在结构体的偏移量,然后将其强制类型转换成size_t类型用作指针的减法运算
2.1 测试程序
#include <stdio.h>
#include <stdlib.h>
#include <stddef.h>

#ifndef offsetof
#define offsetof(TYPE, MEMBER)  ((size_t)&((TYPE *)0)->MEMBER)
#endif

#define container_of(ptr, type, member) ({                              \
        void *__mptr = (void *)(ptr);                                   \
        ((type *)(__mptr - offsetof(type, member))); })


struct lower {
        int a;
};

struct upper  {
        int c,d,e,f;
        struct lower *k;
        int b;
};

int main()
{
        struct upper *u = malloc(sizeof(struct upper));

        // struct upper* t = ({ void *__mptr = (void *)(&u->k); ((struct upper *)(__mptr - ((size_t)&((struct upper *)0)->k))); });
        struct upper* t = container_of(&u->k, struct upper, k);

        printf("t=%p up=%p k=%p\n", t, u, &u->k);
}
这里我们传入u->k的地址,upper的结构体定义,k成员,我们就能拿到upper的指针t
此时我们运行如下:
# gcc test.c -o test && ./test
t=0x559829eb70 up=0x559829eb70 k=0x559829eb80
可以发现t,up的地址完全相等,k刚刚差一个offset地址偏移,也就是4*4=16,就是int c,d,e,f;的占用空间

2.2 小结
这里我们知道了内核非常普遍的container_of的实现,它能够直接获取成员的父结构体指针
三、总结
至此,我们知道了内核操作结构体的小技巧,通过这个技巧,我们可以轻松的找到结构体指针以及成员。这里作为内核的入门知识,对了解内核的人而言至关重要。
对于安卓系统,开机起来之后会全局发送一个BOOT_COMPLETED广播。应用程序通过这个广播就知道系统正常启动完成了。通常情况下,是安卓启动完全完成之后,ams会发送一个FINISH_BOOTING_MSG消息后,开启了30s的timeout检查是否为boot-completed。这里30s是开机动画,如果开机动画正常退出或者超过30s退出,则认为boot-completed。但是,在linux中,我们的系统好像没有利用起来这个机制。
本文基于systemd的默认机制,说明一下linux如何实现boot-completed信号。
一、为什么要boot-completed信号
对于系统而言,应该主动发送boot-completed信号,让其他程序能够获取当前系统的启动状态,如何此信号接收到,则代表系统已经准备完成,ui类型的应用可以运行,可以检测系统是否破损,可以判断系统是否异常等等。
对于安卓,我们可以通过如下获取信号
getprop sys.boot_completed
二、systemd的boot_completed信号
对于systemd,默认提供了类似此机制的信号,如下:
systemctl is-system-running --wait
此方法会一直阻塞,知道systemd认为系统启动完成。引入此功能的patch如下:
https://github.com/systemd/systemd/pull/9796/commits/02d9350cda6b330669607ae88c74ac7256212741
我们可以知道,此命令一直等待的是StartupFinished的dbus信号。
当systemd的一系列jobs都正常处理完成,则发送此信号,我们可以通过list-jobs来查看jobs运行状态,如下:
systemctl list-jobs
三、应用程序如何集成
针对上面提到的,我们可以知道,我们直接监听dbus的StartupFinished信号,那么应用程序就能接收到systemd发送的boot_completed,所以我们借助yocto的工具源码dbus-wait如下:
/*
 * Copyright (C) 2008 Intel Corporation.
 *
 * Author: Ross Burton <ross@linux.intel.com>
 *
 * This program is free software; you can redistribute it and/or modify it under
 * the terms of the GNU General Public License as published by the Free Software
 * Foundation; either version 2 of the License, or (at your option) any later
 * version.
 *
 * This program is distributed in the hope that it will be useful, but WITHOUT
 * ANY WARRANTY; without even the implied warranty of MERCHANTABILITY or FITNESS
 * FOR A PARTICULAR PURPOSE.  See the GNU General Public License for more
 * details.
 *
 * You should have received a copy of the GNU General Public License along with
 * this program. If not, see <http://www.gnu.org/licenses/>.
 */

#include <string.h>
#include <stdlib.h>
#include <stdio.h>
#include <signal.h>
#include <unistd.h>
#include <dbus/dbus.h>

static char *interface, *member, *path;

static void
alarm_handler (int signum)
{
  fprintf(stderr, "Timeout waiting for %s.%s\n", interface, member);
  exit (EXIT_SUCCESS);
}

static DBusHandlerResult
filter (DBusConnection *conn, DBusMessage *message, void *user_data)
{
  /* If the interface matches */
  if (strcmp (interface, dbus_message_get_interface (message)) == 0)
    /* And the member matches */
    if (strcmp (member, dbus_message_get_member (message)) == 0)
      /* And the path is NULL or matches */
      if (path == NULL || strcmp (path, dbus_message_get_path (message)) == 0)
        /* Then exit */
        exit (EXIT_SUCCESS);

  return DBUS_HANDLER_RESULT_HANDLED;
}

int
main (int argc, char **argv)
{
  DBusError error = DBUS_ERROR_INIT;
  DBusConnection *conn;
  char *match = NULL;

  if (argc < 3 || argc > 4) {
    fprintf (stderr, "$ dbus-wait <INTERFACE> <MEMBER> [PATH]\n");
    return EXIT_FAILURE;
  }

  signal (SIGALRM, alarm_handler);
  alarm (60);

  /* TODO: allow system or session */

  conn = dbus_bus_get (DBUS_BUS_SYSTEM, &error);
  if (!conn) {
    fprintf (stderr, "Cannot get system bus: %s\n", error.message);
    dbus_error_free (&error);
    return EXIT_FAILURE;
  }

  switch (argc) {
  case 3:
    interface = argv[1];
    member = argv[2];
    path = NULL;
    asprintf (&match, "type='signal',interface='%s',member='%s'", interface, member);
    break;
  case 4:
    interface = argv[1];
    member = argv[2];
    path = argv[3];
    asprintf (&match, "type='signal',interface='%s',member='%s',path='%s'", interface, member, path);
    break;
  }

  dbus_bus_add_match (conn, match, &error);
  free (match);
  if (dbus_error_is_set (&error)) {
    fprintf (stderr, "Cannot add match: %s\n", error.message);
    dbus_error_free (&error);
    return EXIT_FAILURE;
  }

  dbus_connection_add_filter (conn, filter, NULL, NULL);

   while (dbus_connection_read_write_dispatch (conn, -1))
     ;

   dbus_connection_unref (conn);

   return EXIT_SUCCESS;
}
编译如下:
gcc dbus-wait.c $(pkg-config --libs --cflags dbus-1)-o dbus-wait
至此,我们可以直接监听此dbus信号如下:
dbus-wait org.freedesktop.systemd1.Manager StartupFinished
四、linux的缺陷
对于通常的boot_completed信号,它只能判断systemd的service是否启动完成。我们知道,对于一个桌面系统而言,systemd服务并不代表系统真实的启动完成,例如ukui-session带起来的一系列应用程序,如果peony未启动,systemd并不能察觉,StartupFinished信号的发送和peony等应用程序的是否正常运行没有产生关联。所以我们需要产生关联。
至此,我们需要在ukui-session中,一边接受此信号,一边等待系统核心应用完成。然后,构造一个完整的boot_completed信号,提供给用户,至此我们在linux中,也具备了boot_completed信号。
我们开发工作中,如果是面向嵌入式的场景,很多客户其实倾向于使用交叉编译工具链,我们作为操作系统可以提供与系统本身gcc版本一致的交叉编译工具,这样构建的时候就不用担心libc/binutils等版本不匹配导致的符号问题从而构建的二进制无法运行的问题,关于交叉编译工具链的文章和工具获取,可以参考交叉编译环境搭建,本文主要谈一谈关于qt工程中,如果直接使用qmake来进行交叉编译过程中,我们需要修改qt.conf和qmake.conf的一些细节性问题
一、关于qt的交叉编译
我们可以通过qt官方的wiki找到支持qt的交叉编译的办法,根据此办法,我相信大家能够很轻易的支持到qt环境的交叉编译,关于qt环境的交叉编译的细节就不再赘述,有兴趣可以仔细看看文档,文章链接如下:
https://wiki.qt.io/Cross-Compile_Qt_6_for_Raspberry_Pi
如果wiki.qt.io无法正常访问,那么github上关于qt的cross compiling的文章也是一样的意思,如下
https://github.com/UvinduW/Cross-Compiling-Qt-for-Raspberry-Pi-4
还有一篇文章可以辅助了解
https://www.stefanocottafavi.com/crosscompile-qt-for-rpi/
根据上面的信息,我简单描述如下:
- 获取sysroot,sysroot就是我们的系统环境
- 获取交叉编译工具链
- 下载qt的源码
- 在构建源码时指定CROSS_COMPILE和–sysroot
- 构建完成之后,此时我们的qt工程可以通过qt源码的qmake直接生成Makefile完成构建
根据上面的简述,可以知道,我们在讨论qt的交叉编译的时候,往往是通过构建了qt的源码库。从而生成了对应的qmake和相关配置,我们直接使用qmake和相关配置即可完成交叉构建。这也是qt官方推荐的做法。
但是,本文需要的是直接基于sysroot中已安装的qt版本,来手动配置qmake和qtconf来实现交叉编译,那么这可以省略编译qt源码安插–sysroot这一个步骤。与上面官方的方法不同的点我列表如下:
qt官方:需要构建qt源码工程
本文讨论的:无需构建qt源码工程,程序链接sysroot下的qt库文件
二、实现思路
我们知道如果不想通过重新构建qt源码来实现交叉编译的话,我们就需要在host上强行指定好sysroot,头文件位置,库文件位置,数据文件位置等。这需要对qmake和qt.conf有详细的了解。这也是本文讨论的重点。主要步骤如下:
2.1 下载交叉编译工具链
我们可以通过linaro官网上下载工具链,也可以使用我们提供的工具链,交叉编译环境搭建有提到工具链地址是
gcc-kylin-9.3.0-2024.10-x86_64_aarch64-linux-gnu.tar.gz
文件获取位置(110服务器):/home/yangquan/develop/嵌入式相关/01_嵌入式定制部门/嵌入式版本项目&产品版本问题解决集/KylinSdk
2.2 下载sysroot环境
我们需要一个编译的sysroot环境,这个环境可以在已有的机器环境上打包其rootfs,也可以在麒麟平台上根据系统iso的filesystem.squashfs来进行解压获取,里面是一个标准的操作系统环境,我们还需要在这个环境中根据deb包来下载安装必要的头文件和动态库
2.3 配置qmake
qt默认提供了基于aarch64的交叉编译配置,地址如下:
/usr/lib/x86_64-linux-gnu/qt5/mkspecs/linux-aarch64-gnu-g++/qmake.conf
我们可以发现其会设置相应的环境变量,例如
QMAKE_CC                = aarch64-linux-gnu-gcc
QMAKE_CXX               = aarch64-linux-gnu-g++
QMAKE_LINK              = aarch64-linux-gnu-g++
QMAKE_LINK_SHLIB        = aarch64-linux-gnu-g++

# modifications to linux.conf
QMAKE_AR                = aarch64-linux-gnu-ar cqs
QMAKE_OBJCOPY           = aarch64-linux-gnu-objcopy
QMAKE_NM                = aarch64-linux-gnu-nm -P
QMAKE_STRIP             = aarch64-linux-gnu-strip
可以发现,这里指向的是交叉编译工具链中的编译工具
2.4 配置qt.conf
我们配置了qmake默认使用交叉编译工具之后,还需要配置qt.conf,如下:
[Paths]
Prefix=/usr
ArchData=lib/aarch64-linux-gnu/qt5
Binaries=lib/qt5/bin
Data=share/qt5
TargetSpec=linux-aarch64-gnu-g++
HostSpec=linux-aarch64-gnu-g++
Documentation=share/qt5/doc
Examples=lib/aarch64-linux-gnu/qt5/examples
Headers=include/aarch64-linux-gnu/qt5
HostBinaries=lib/qt5/bin
HostData=lib/x86_64-linux-gnu/qt5
HostLibraries=lib/x86_64-linux-gnu
Imports=lib/aarch64-linux-gnu/qt5/imports
Libraries=lib/aarch64-linux-gnu
LibraryExecutables=lib/aarch64-linux-gnu/qt5/libexec
Plugins=lib/aarch64-linux-gnu/qt5/plugins
Qml2Imports=lib/aarch64-linux-gnu/qt5/qml
Settings=/etc/xdg
Translations=share/qt5/translations
Sysroot=/root/tf/kylin_test_cross/sysroot
SysrootifyPrefix=true
例如sysroot位置,header文件查找位置,libraries库查找位置。
有了这个qt.conf,我们的一些环境变量会发生改变,例如,如果没有qt.conf,我们query的信息如下:
# qmake -query
QT_SYSROOT:
QT_INSTALL_PREFIX:/usr
QT_INSTALL_ARCHDATA:/usr/lib/x86_64-linux-gnu/qt5
QT_INSTALL_DATA:/usr/share/qt5
QT_INSTALL_DOCS:/usr/share/qt5/doc
QT_INSTALL_HEADERS:/usr/include/x86_64-linux-gnu/qt5
QT_INSTALL_LIBS:/usr/lib/x86_64-linux-gnu
QT_INSTALL_LIBEXECS:/usr/lib/x86_64-linux-gnu/qt5/libexec
QT_INSTALL_BINS:/usr/lib/qt5/bin
QT_INSTALL_TESTS:/usr/tests
QT_INSTALL_PLUGINS:/usr/lib/x86_64-linux-gnu/qt5/plugins
QT_INSTALL_IMPORTS:/usr/lib/x86_64-linux-gnu/qt5/imports
QT_INSTALL_QML:/usr/lib/x86_64-linux-gnu/qt5/qml
QT_INSTALL_TRANSLATIONS:/usr/share/qt5/translations
QT_INSTALL_CONFIGURATION:/etc/xdg
QT_INSTALL_EXAMPLES:/usr/lib/x86_64-linux-gnu/qt5/examples
QT_INSTALL_DEMOS:/usr/lib/x86_64-linux-gnu/qt5/examples
QT_HOST_PREFIX:/usr
QT_HOST_DATA:/usr/lib/x86_64-linux-gnu/qt5
QT_HOST_BINS:/usr/lib/qt5/bin
QT_HOST_LIBS:/usr/lib/x86_64-linux-gnu
QMAKE_SPEC:linux-g++
QMAKE_XSPEC:linux-g++
QMAKE_VERSION:3.1
QT_VERSION:5.12.8
可以发现其默认指向了本地的库和头文件,并未设置sysroot地址,如果我们指定qt.conf,则如下
# qmake -query -qtconf ./qt.conf
QT_SYSROOT:/root/tf/kylin_test_cross/sysroot/
QT_SYSROOT:/root/tf/kylin_test_cross/sysroot
QT_INSTALL_PREFIX:/root/tf/kylin_test_cross/sysroot/usr
QT_INSTALL_PREFIX/raw:/usr
QT_INSTALL_ARCHDATA:/root/tf/kylin_test_cross/sysroot/usr/lib/aarch64-linux-gnu/qt5
QT_INSTALL_ARCHDATA/raw:/usr/lib/aarch64-linux-gnu/qt5
QT_INSTALL_DATA:/root/tf/kylin_test_cross/sysroot/usr/share/qt5
QT_INSTALL_DATA/raw:/usr/share/qt5
QT_INSTALL_DOCS:/root/tf/kylin_test_cross/sysroot/usr/share/qt5/doc
QT_INSTALL_DOCS/raw:/usr/share/qt5/doc
QT_INSTALL_HEADERS:/root/tf/kylin_test_cross/sysroot/usr/include/aarch64-linux-gnu/qt5
QT_INSTALL_HEADERS/raw:/usr/include/aarch64-linux-gnu/qt5
QT_INSTALL_LIBS:/root/tf/kylin_test_cross/sysroot/usr/lib/aarch64-linux-gnu
QT_INSTALL_LIBS/raw:/usr/lib/aarch64-linux-gnu
QT_INSTALL_LIBEXECS:/root/tf/kylin_test_cross/sysroot/usr/lib/aarch64-linux-gnu/qt5/libexec
QT_INSTALL_LIBEXECS/raw:/usr/lib/aarch64-linux-gnu/qt5/libexec
QT_INSTALL_BINS:/root/tf/kylin_test_cross/sysroot/usr/lib/qt5/bin
QT_INSTALL_BINS/raw:/usr/lib/qt5/bin
QT_INSTALL_TESTS:/root/tf/kylin_test_cross/sysroot/usr/tests
QT_INSTALL_TESTS/raw:/usr/tests
QT_INSTALL_PLUGINS:/root/tf/kylin_test_cross/sysroot/usr/lib/aarch64-linux-gnu/qt5/plugins
QT_INSTALL_PLUGINS/raw:/usr/lib/aarch64-linux-gnu/qt5/plugins
QT_INSTALL_IMPORTS:/root/tf/kylin_test_cross/sysroot/usr/lib/aarch64-linux-gnu/qt5/imports
QT_INSTALL_IMPORTS/raw:/usr/lib/aarch64-linux-gnu/qt5/imports
QT_INSTALL_QML:/root/tf/kylin_test_cross/sysroot/usr/lib/aarch64-linux-gnu/qt5/qml
QT_INSTALL_QML/raw:/usr/lib/aarch64-linux-gnu/qt5/qml
QT_INSTALL_TRANSLATIONS:/root/tf/kylin_test_cross/sysroot/usr/share/qt5/translations
QT_INSTALL_TRANSLATIONS/raw:/usr/share/qt5/translations
QT_INSTALL_CONFIGURATION:/root/tf/kylin_test_cross/sysroot/etc/xdg
QT_INSTALL_CONFIGURATION/raw:/etc/xdg
QT_INSTALL_EXAMPLES:/root/tf/kylin_test_cross/sysroot/usr/lib/aarch64-linux-gnu/qt5/examples
QT_INSTALL_EXAMPLES/raw:/usr/lib/aarch64-linux-gnu/qt5/examples
QT_INSTALL_DEMOS:/root/tf/kylin_test_cross/sysroot/usr/lib/aarch64-linux-gnu/qt5/examples
QT_INSTALL_DEMOS/raw:/usr/lib/aarch64-linux-gnu/qt5/examples
QT_HOST_PREFIX:/usr
QT_HOST_DATA:/usr/lib/x86_64-linux-gnu/qt5
QT_HOST_BINS:/usr/lib/qt5/bin
QT_HOST_LIBS:/usr/lib/x86_64-linux-gnu
QMAKE_SPEC:linux-aarch64-gnu-g++
QMAKE_XSPEC:linux-aarch64-gnu-g++
QMAKE_VERSION:3.1
QT_VERSION:5.12.8
可以发现,我们headers和libs等等都从正确的路径寻找。
至此,我们发现,整个qt.conf和qmake.conf已经正确配置,我们可以良好的进行编译构建。
三、演示
如果对于一个qt仓库,我们以qt的example为例,/usr/lib/x86_64-linux-gnu/qt5/examples/gui/analogclock。我们可以如下:
cd /usr/lib/x86_64-linux-gnu/qt5/examples/gui/analogclock
我们需要根据qmake生成Makefile,如下
/usr/lib/qt5/bin/qmake -qtconf ./qt.conf
然后直接make,如下:
make
此时,我们会生成如下文件
# file analogclock
analogclock: ELF 64-bit LSB shared object, ARM aarch64, version 1 (SYSV), dynamically linked, interpreter /lib/ld-linux-aarch64.so.1, BuildID[sha1]=5f848734c8f59a6958bf829be3a72dd4d6b0a124, for GNU/Linux 3.7.0, not stripped
此时,文件生成完成,可以发现是aarch64的qt程序,我们将其发送到实际机器上即可正常运行。
